- Logging In
- Dashboard
- User Navigation
- Using ExACT
- Creating and Editing Content Sets
- Aligning Content
- Content Editing
- Approve Alignments
- Upload Content
- Batch Upload Content
- Exporting Standards
- Reporting
- Direct Alignment
- Direct Align to Related Standards
- Import Alignments
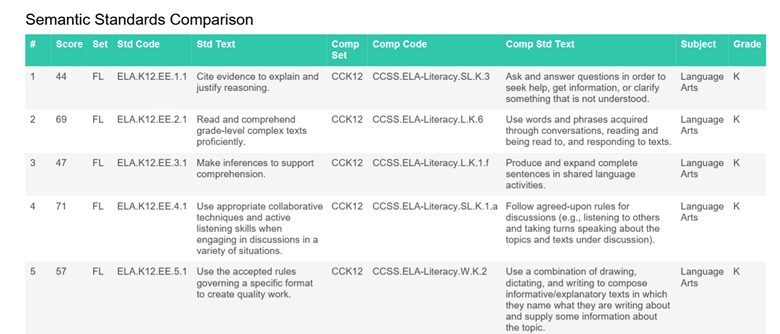
- Semantic Standards Comparisons
Logging in to the ExACT Standards Platform
Bookmark the URL
The ExACT Standards Tool is located at: https://correlation.edgate.com/exact
The ExACT Standards Platform requires a username and password every time you enter. Your EdGate Project Manager will provide you with this information. Click in the first text box and type your Username and then tab or click in the password box and type it. Click Login.
ExACT Standards Platform Dashboard
Once you successfully sign in, the ExACT Standards Platform Dashboard will display. Your username will appear in the upper right hand corner of the navigation bar.
You are now ready to begin aligning your resources.
The dashboard comes preloaded with six widgets, My Content, My Standards, Correlation Coverage, Semantic Standards Comparison, Latest Standards Updates and Favorite Reports.

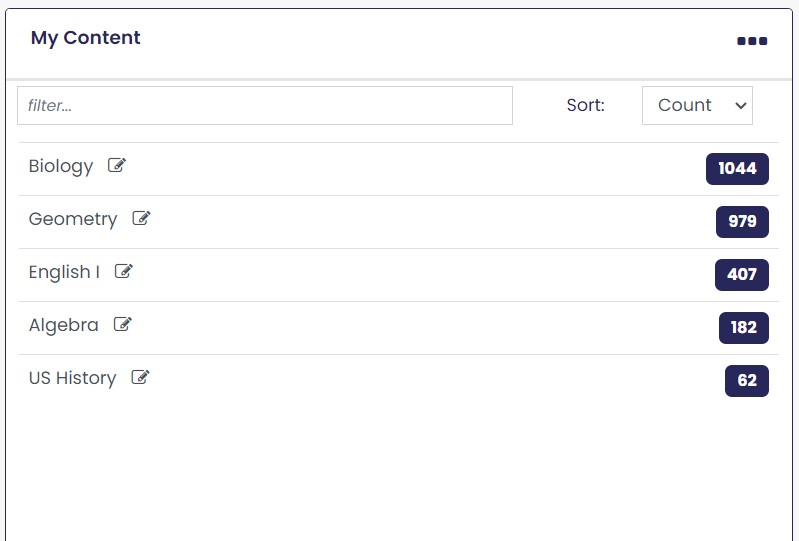
My Content
A list of your company’s resources with a total item count, and with a count by Content Set. Each Content Set title is a link which when clicked will display the list of resources within the selected Content Set. Content Sets can be sorted by count (number of resources contained within each Content Set) or by name (alphabetical by title of Content Set) by using the Sort dropdown in the top right of the widget. Content can also be filtered by typing a search term in the Filter box at the top of the widget.
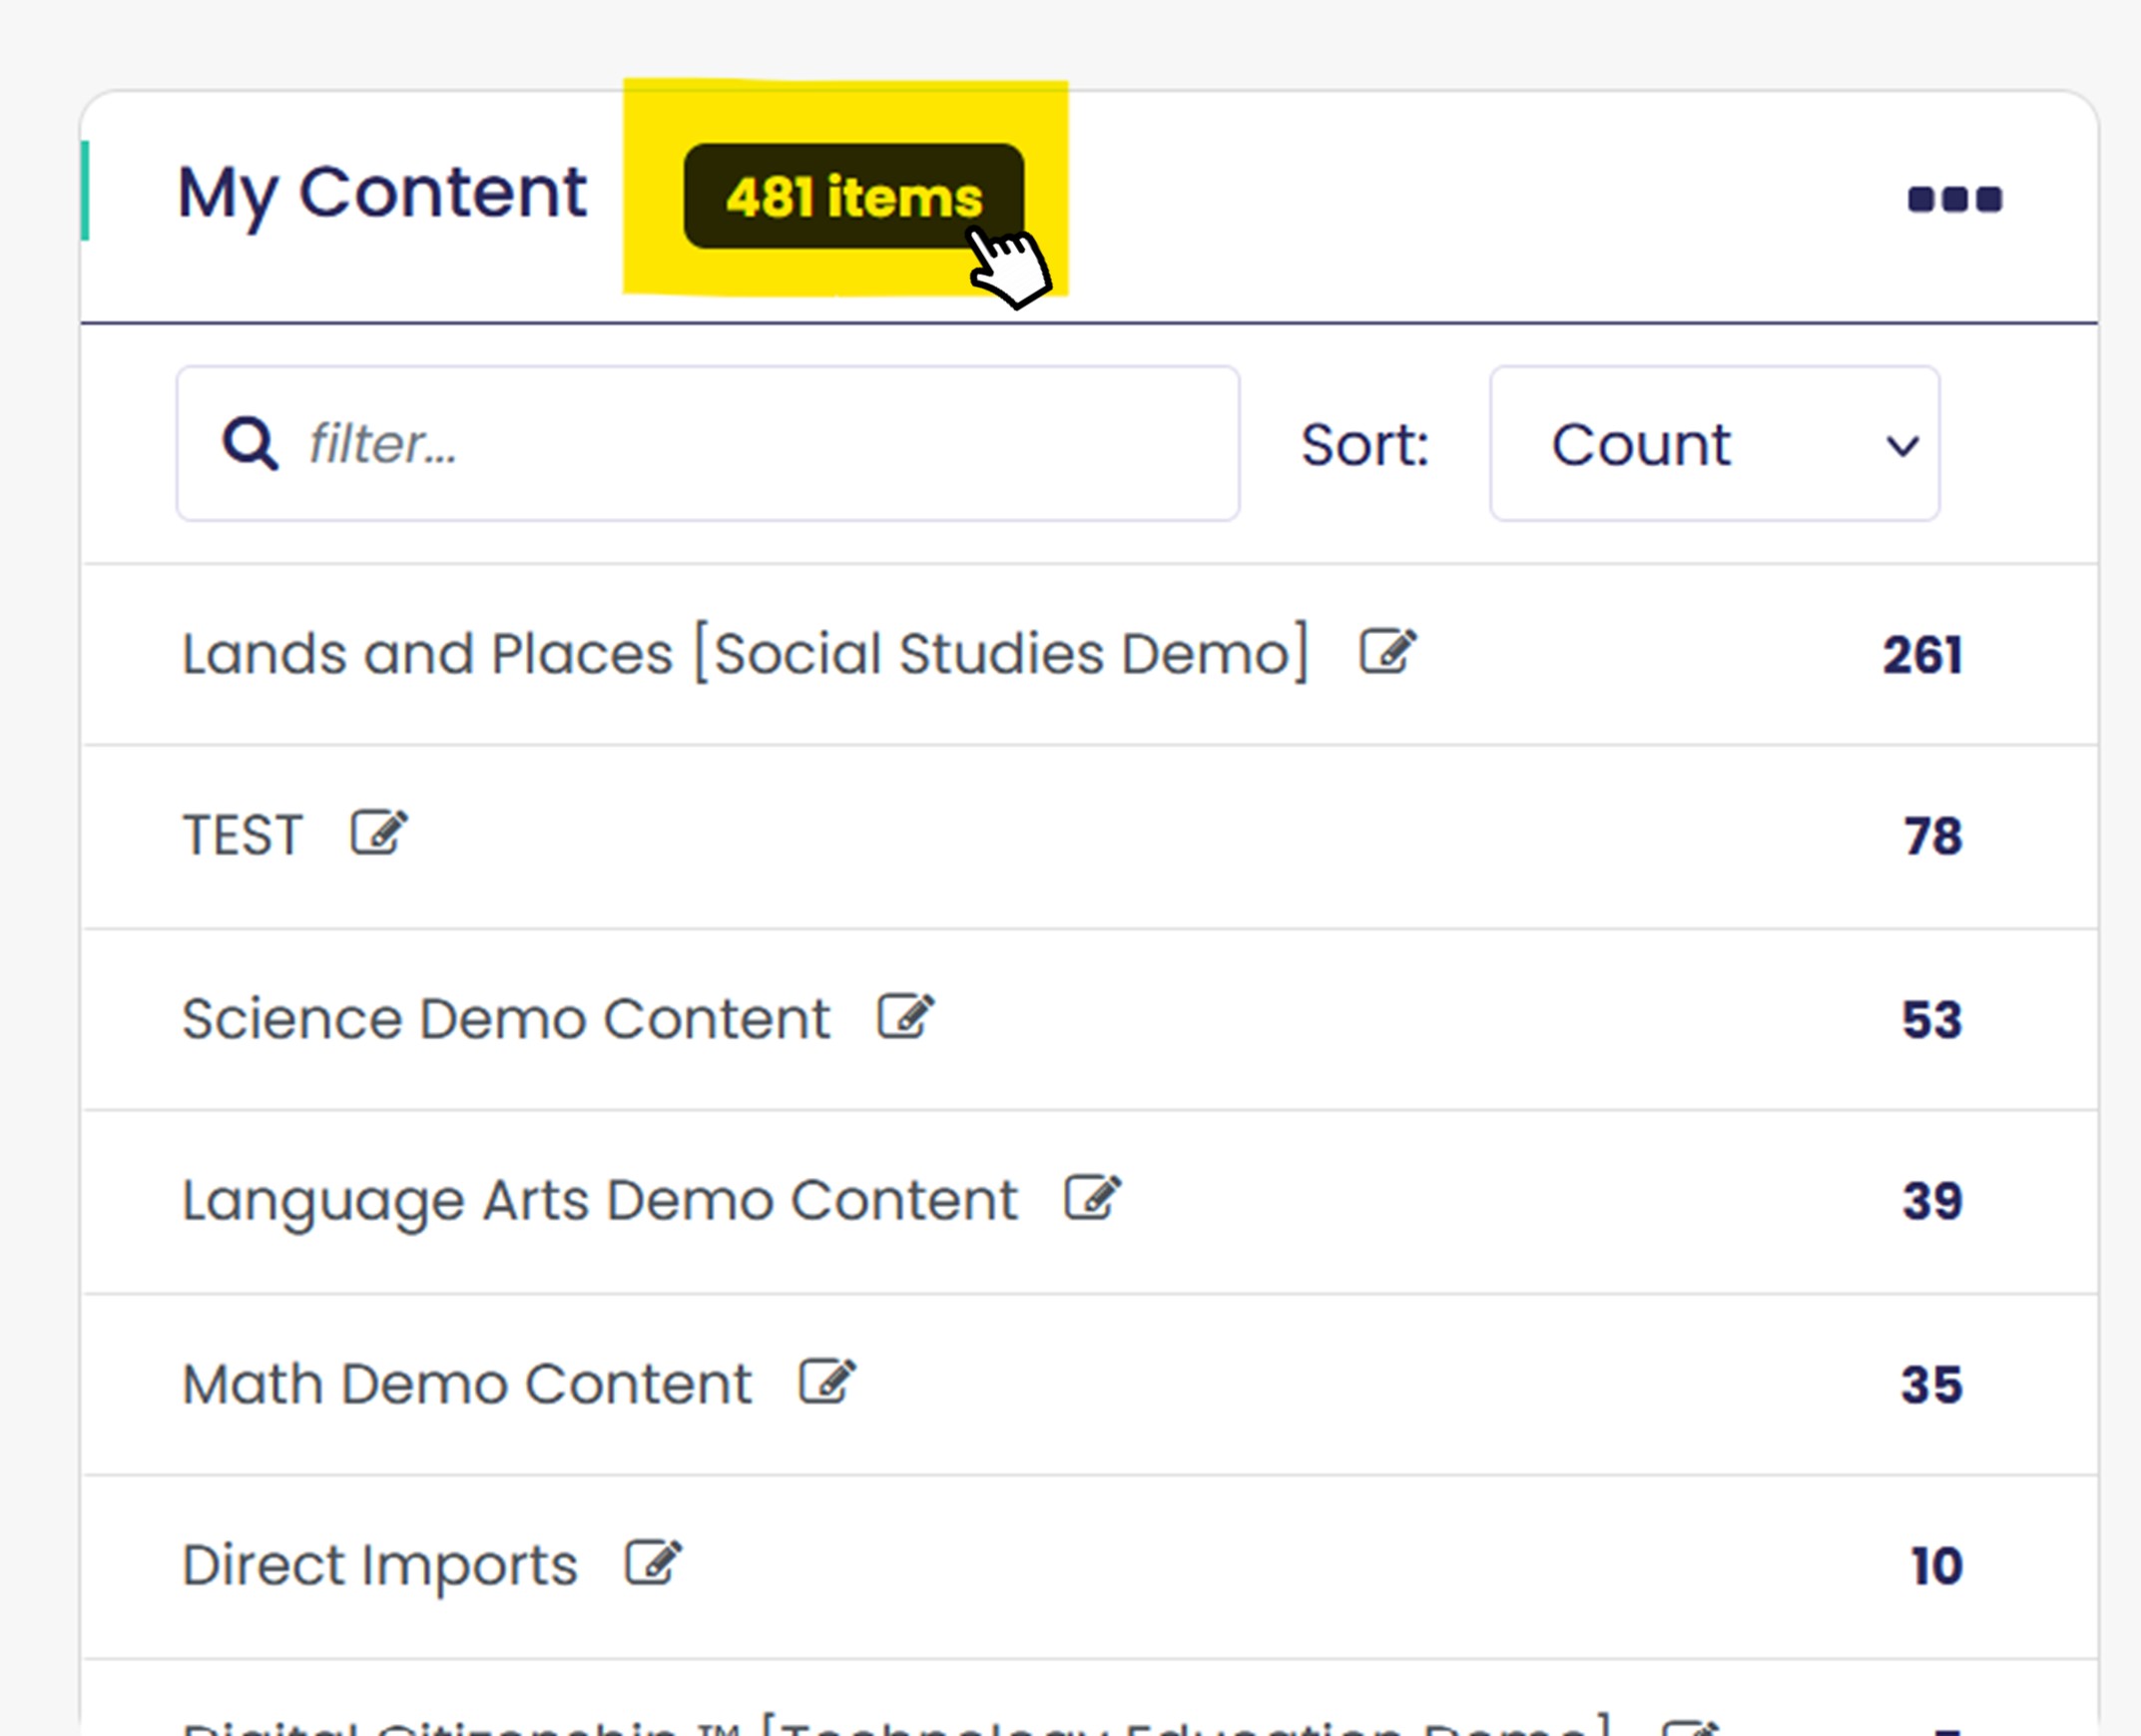
Total Item Count
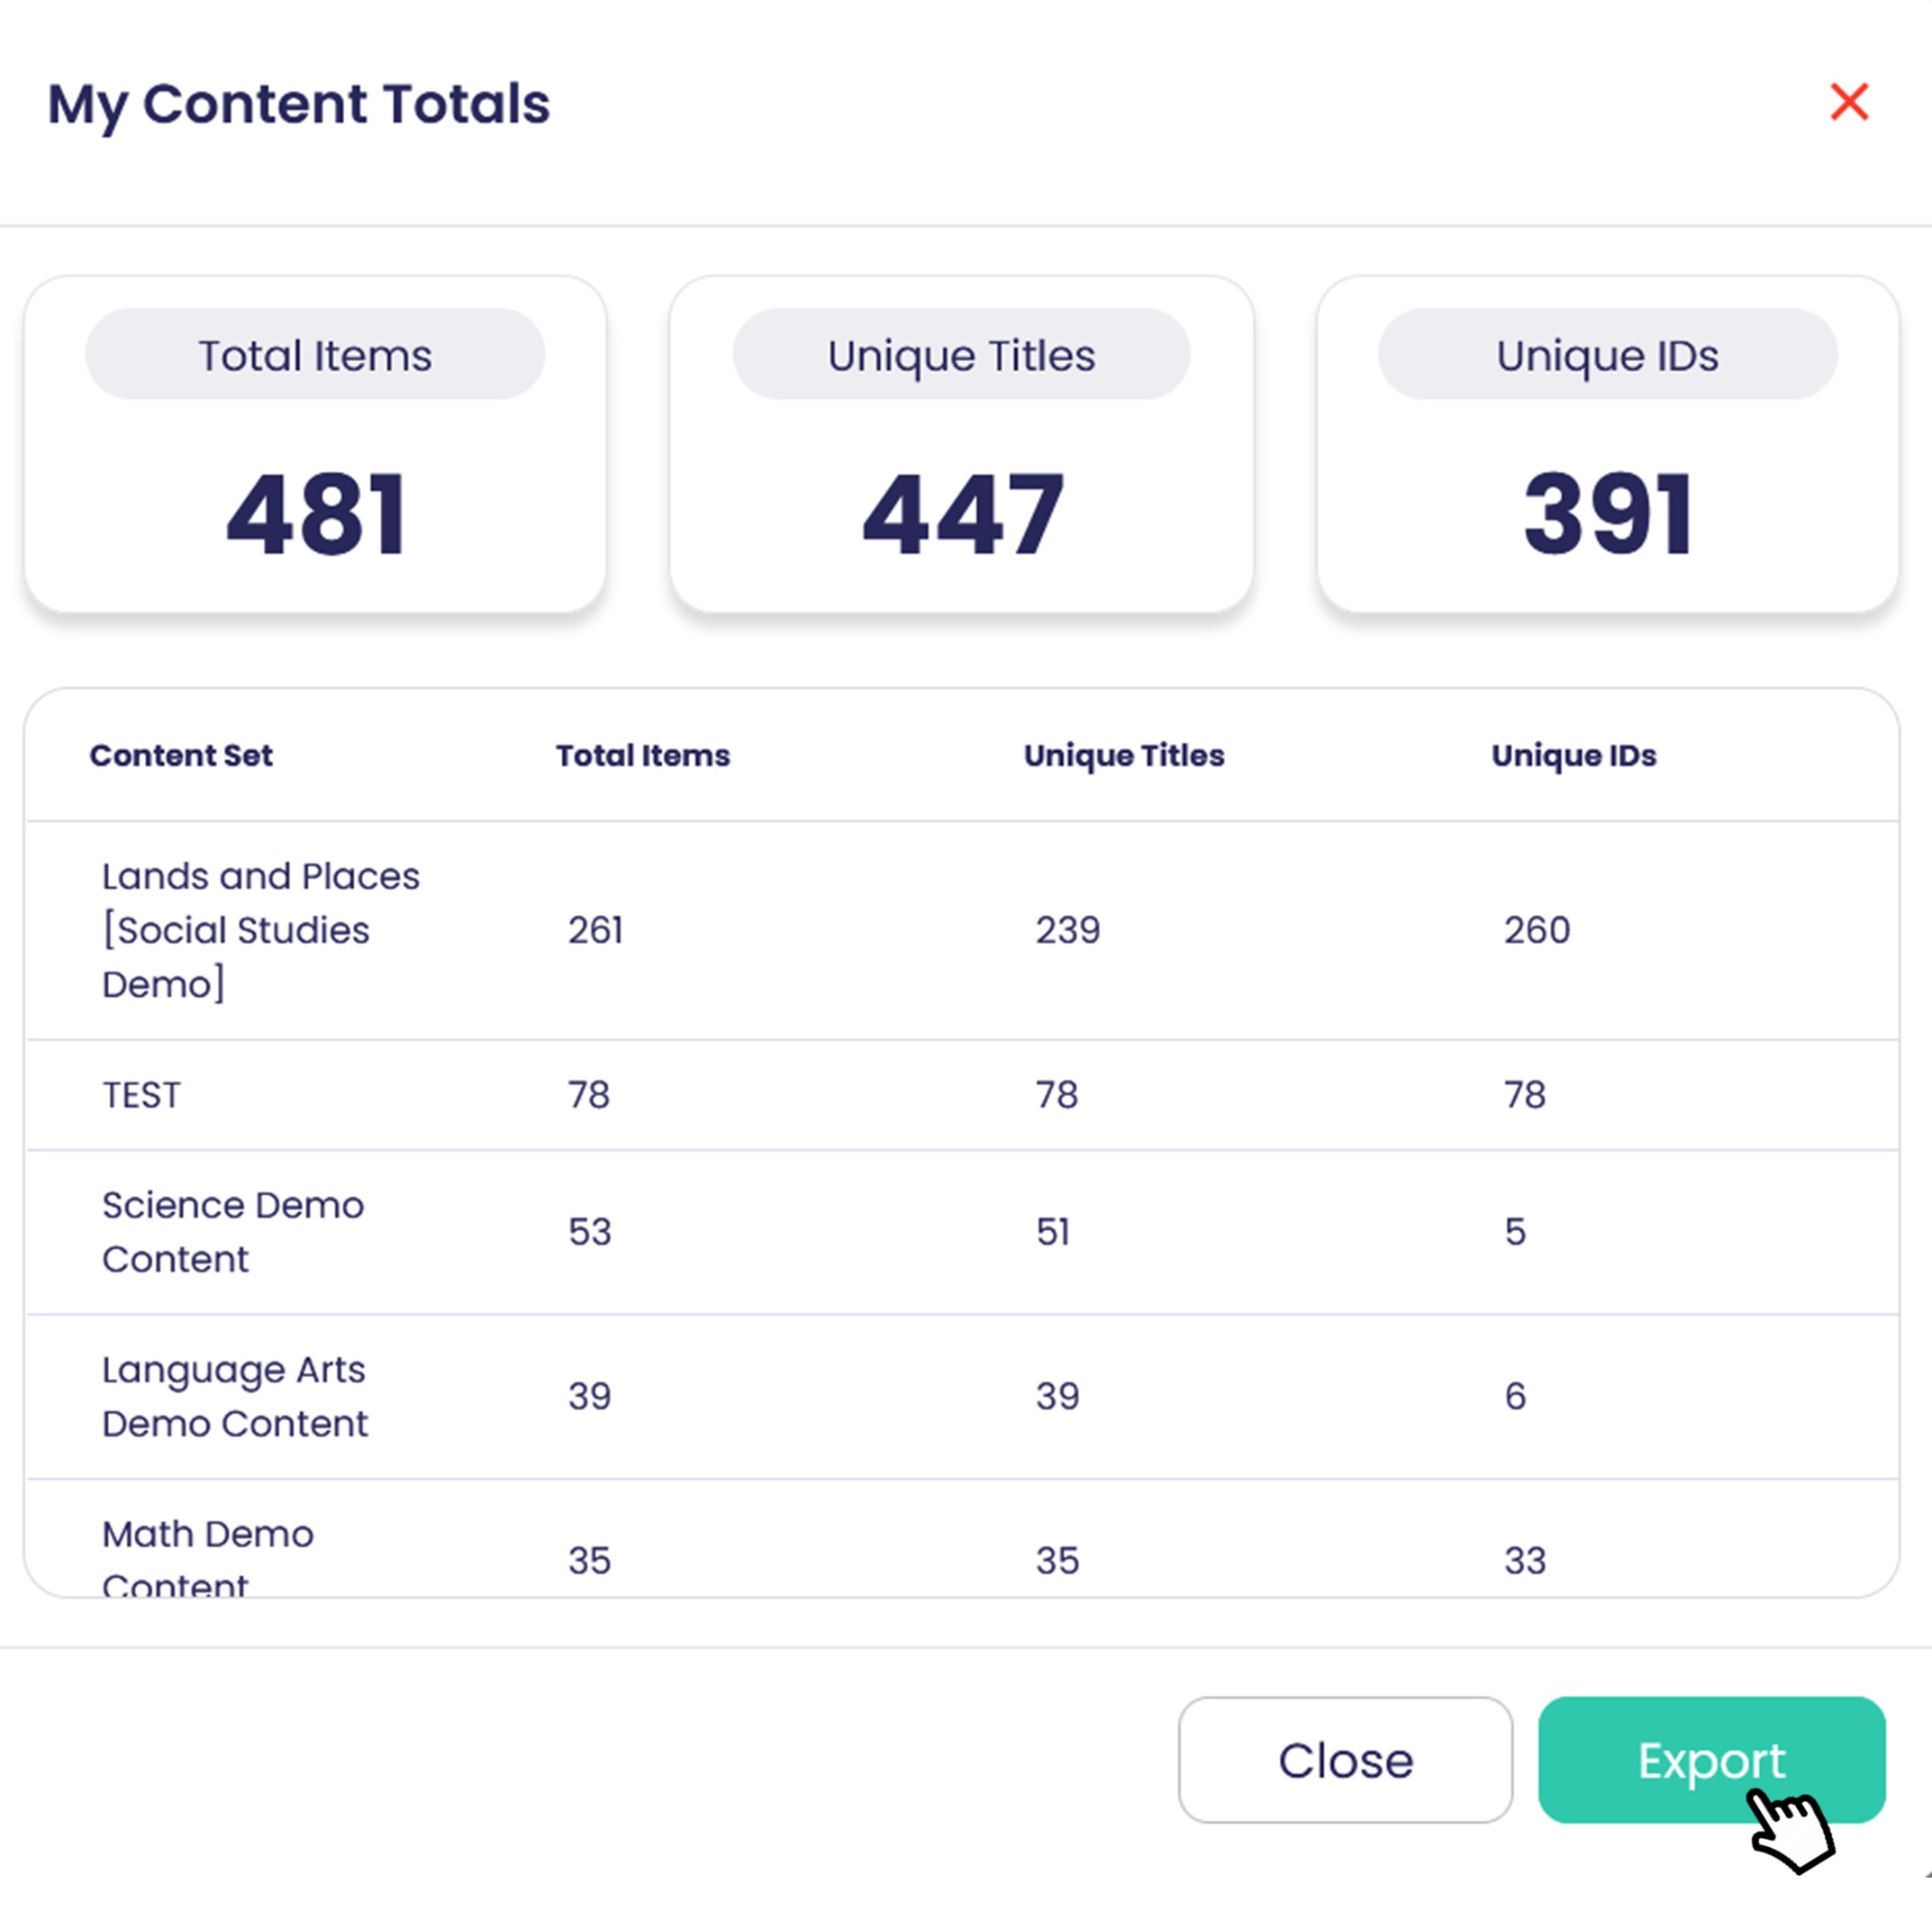
A total count of Content Units, including by unique titles or unique item numbers, can be displayed by clicking on the Item Count located at the top of the My Content widget.
A modal window will open and total counts all content items, as well as for each Content Set, will display by total items, unique titles, and unique IDs. This data can be exported by clicking on the Export button at the bottom of the window.
Exporting Content
All the titles from a Content Set can be exported by ExACT users.
ExACT Reporting users can export the titles from a content set by selecting Export in the My Content section of the Dashboard.

ExACT Standards Tool users can export the titles from a content set by clicking on the overflow menu button in the upper right-hand side of the My Content section, then selecting Export Content Set.

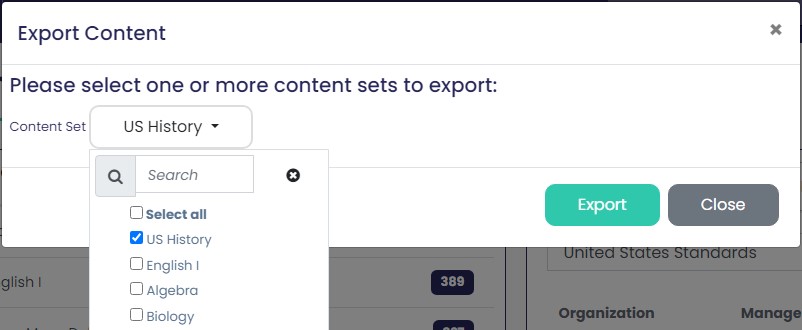
After selecting Export a modal window will display.

Use the dropdown box to select the Content Set(s) you would like to export. Check the box next to the Content Set for those you would like to export and click Export.
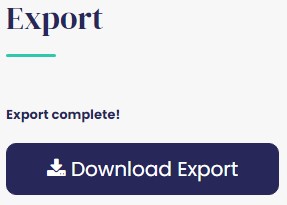
When the export is complete, a message will display with a Download Export button. Click the button to download the file.
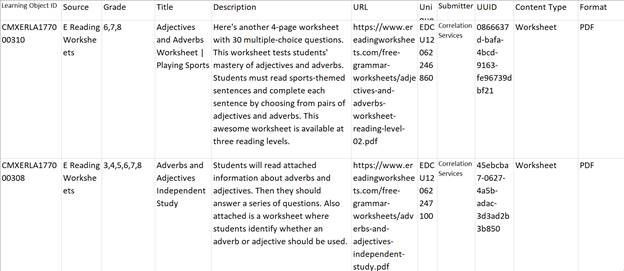
When opening the file, it will open as a Comma Separate Values file that you can save as Excel. Choose file Save As and change the file type to Excel Workbook.
The file will have multiple fields with metadata for all the resources. You can make edits to the information in this file. You will want to leave all the columns in the order exported. Needed edits should be made to the individual resources. If deleting a resource, delete the entire row.
Contact your Project Manager for assistance for loading the edited content.
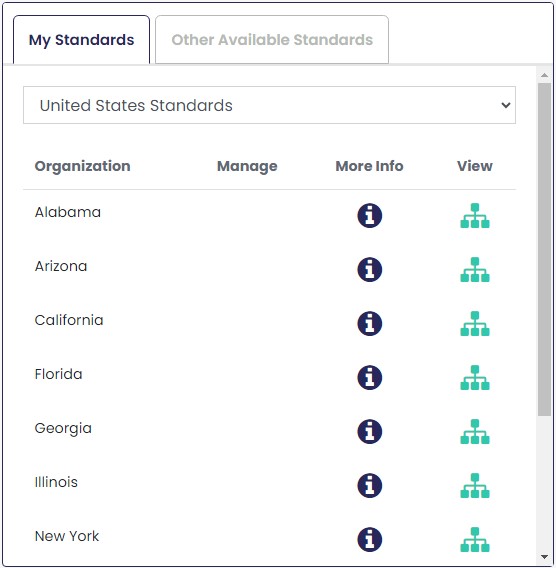
My Standards
On the My Standards tab is a list of the standards included in your profile. This list will be the list as agreed upon in the contract.
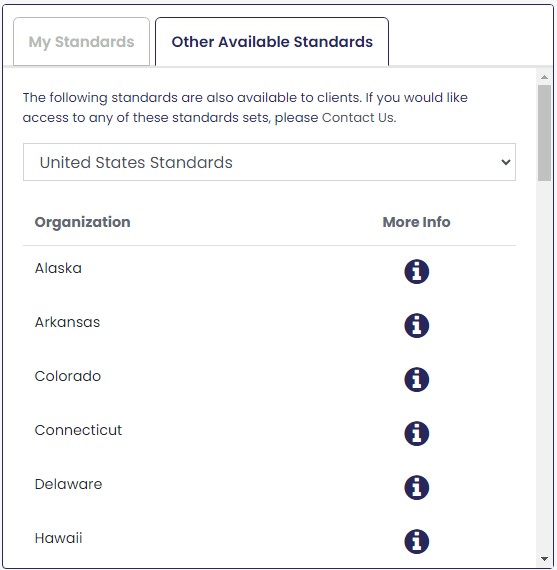
Other Available Standards
This list contains standards that are included in the EdGate repository which are available for purchase.
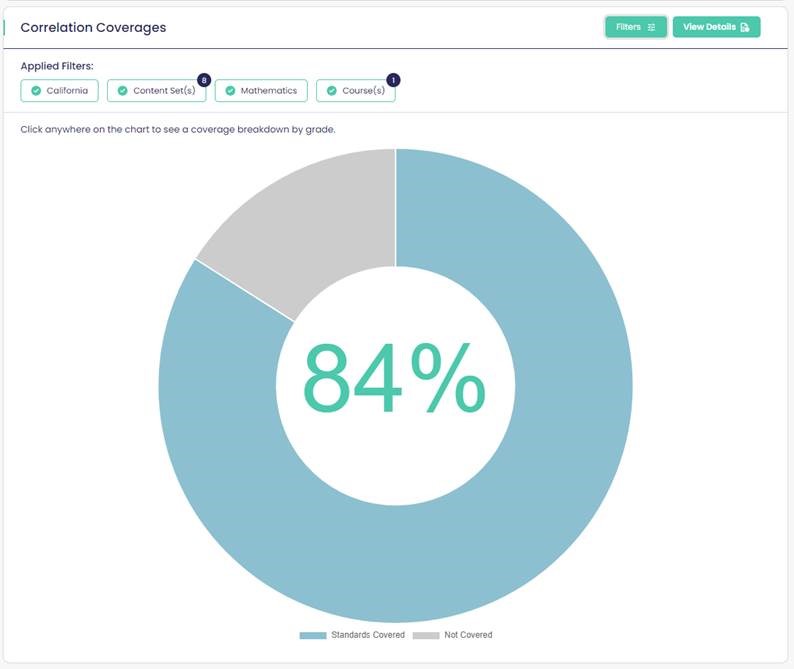
Correlation Coverage
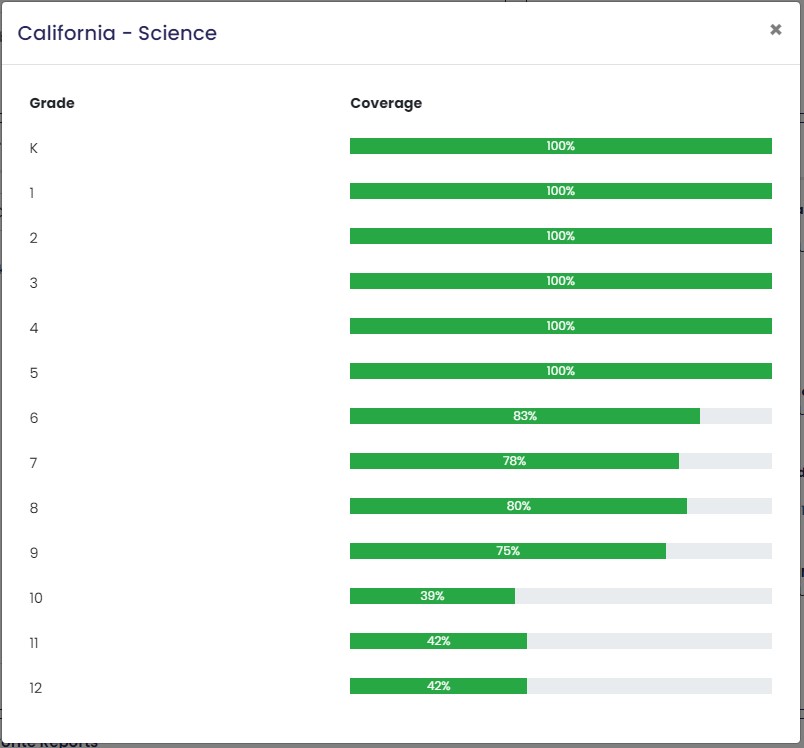
The Correlation Coverage widget will give you an overview of your company’s content coverage to a state, subject, and course. After selecting a state and subject the percent coverage graph will refresh to update the coverage criteria for the selected options. Clicking anywhere in this widget will display coverage by grade. Results can be filtered by content set, and course/ strand within standards. This allows for quick access to meaningful correlation coverage for specific content sets or courses within a subject. If your company purchased Gap Services, when clicking the View Details, this will launch the Reporting widget with the Gap selections and Correlation Statistics options.
Coverage by Grade
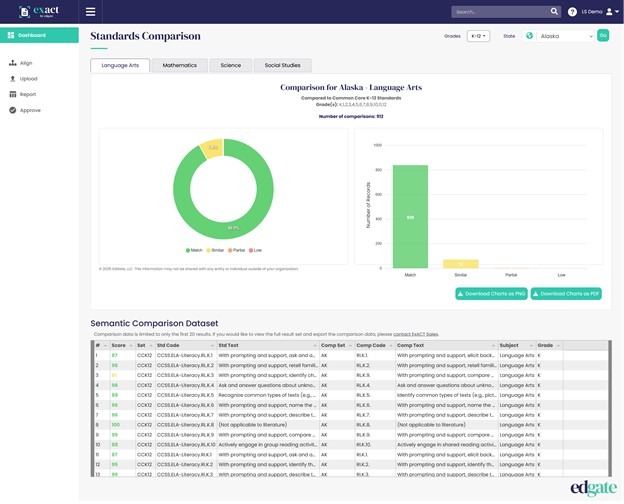
Semantic Standards Comparison
The Semantic Standards Comparison widget allows users to use an interactive map to compare the precise differences between state and national standards for the subjects of Language Arts (Common Core), Math (Common Core), Science (NGSS), and Social Studies (College, Career, and Civic Life (C3)).
Learn more here.
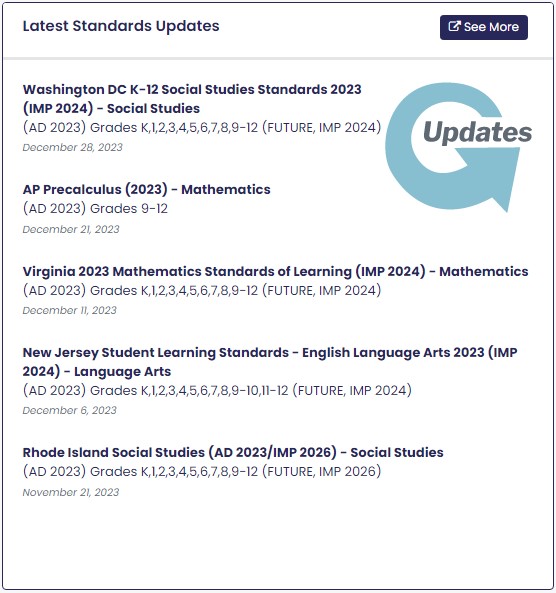
Latest Standards Updates
A list of the most recently loaded standards in to the EdGate repository. This list is a feed of the loads to the repository of new and updated standards, some of which may/may not be applicable to your company’s contract.
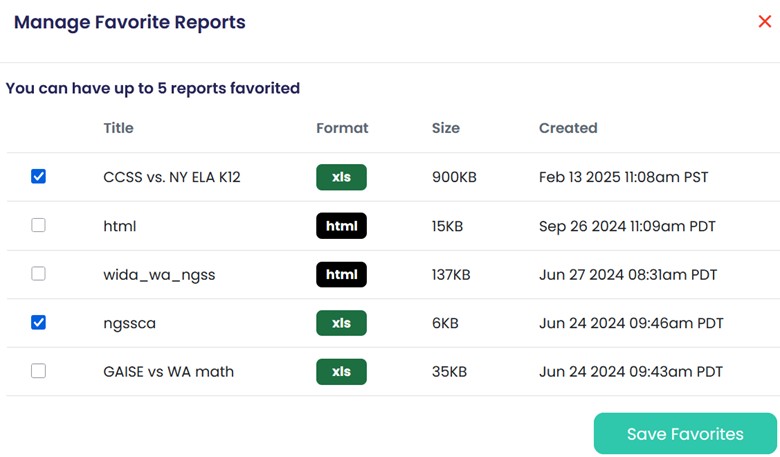
Favorite Reports
The Favorite Reports widget allows you to save up to five reports on the dashboard for easy access. To save a report to Favorite Reports, click on Manage Favorites.
Note: In order to save reports to your favorite list, you must first run the report in the background via the Reporting feature. This will save the report to your Queued reports. See the Reporting section of this manual for instructions on running reports.

A modal window will open and allow you to choose up to five of your queued reports to your favorite list.
Select the reports you wish to save to favorites, and click Save Favorites.
Navigation Bar (Header)

The ExACT Standards Tool interface is designed to give you fast access to all the functions that you need to search for and create alignments of your resources. On each page, you have access to your user account and also to several functions that you will use on a regular basis.
Search
A general search for the ExACT Alignment Tool
Online Help
Quick links to help you navigate the ExACT platform, or to contact our representatives.
User Navigation
The user navigation on the top right provides many different options for personalization for the specific user. View more information in the User Navigation section.
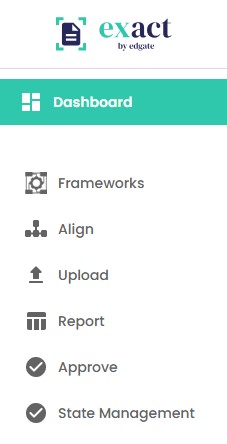
Left Navigation
The Navigation Bar (Left Hand Side) menu is always available. It provides you with easy access to the major actions and functions that you will perform on the ExACT Alignment Tool. Each of these functions is described in the additional tabs.
Search
Clicking on the magnifying glass will expand the search bar.

After inputting a search term (i.e. fraction), click the magnifying glass to start the search. This will bring back results in Standards, Concepts, and Content for that term.

Online Help
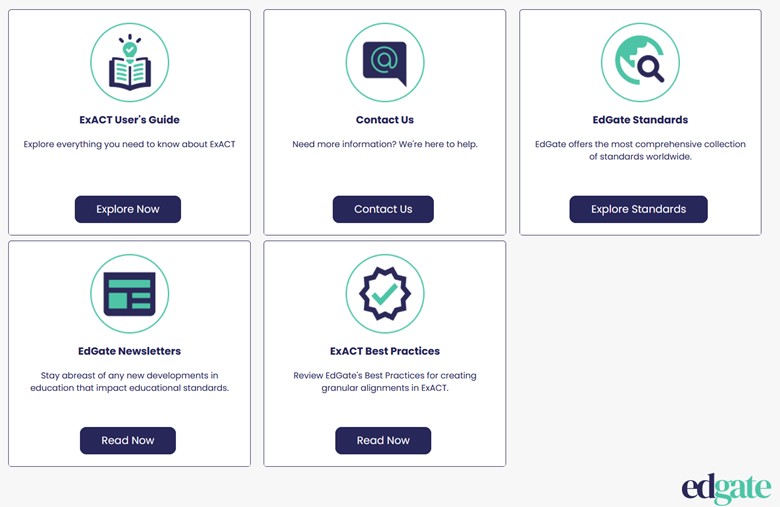
Clicking on the question mark will display quick links to help you navigate the ExACT platform. Here you have access to the ExACT User’s Guide (this document), a Contact Us form for submitting questions, a link to the EdGate Standards page, a link to the EdGate Newsletters, and a link to ExACT Best Practices, a support document for Alignment Tool clients.
User Navigation
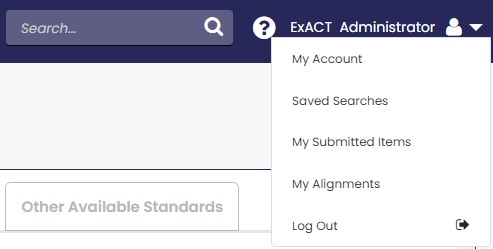
In the top navigation if you click on you User Name, a drop down menu will appear. In this menu you have choices between My Account, Saved Searches, My Submitted Items, My Alignments, or Log Out.
Saved Searches
Links to any searches that you have saved from the ExACT Alignment Tool and allows you to review or delete searches.
My Submitted Items
Using this link, you can view, edit or delete items that you have uploaded and aligned using the Submit a Resource link.
My Alignments
This feature lists the items and the alignment status of the items that you have aligned.
Log Out
Logs your session out of the ExACT application.
User Name Dropdown
Using the dropdown next to your name provides a list of account options.
My Account
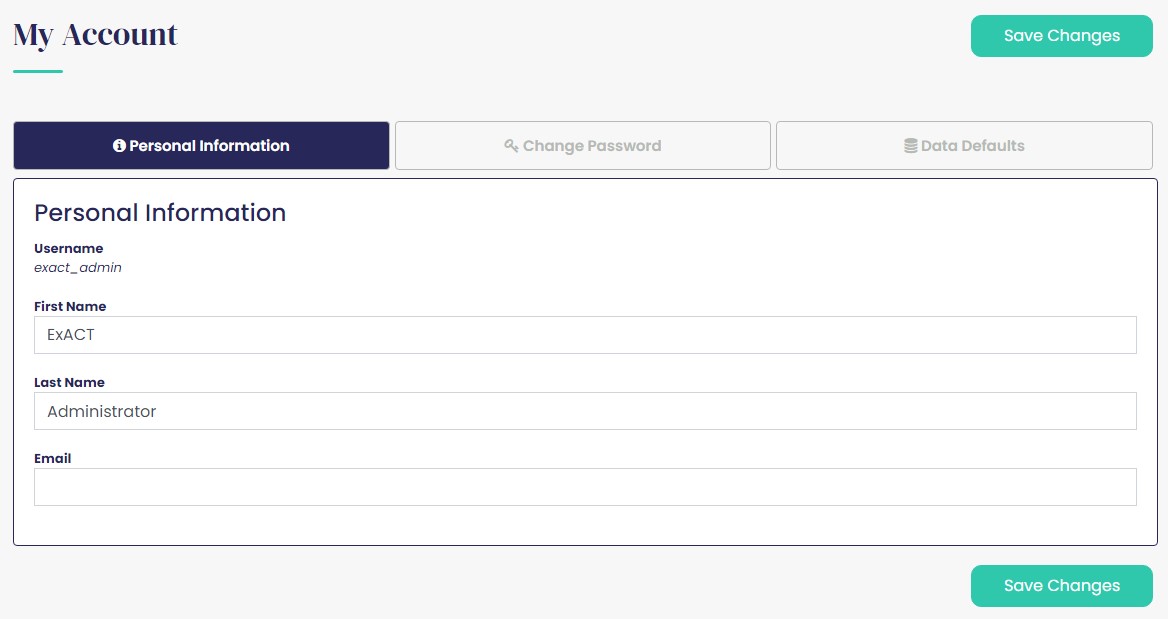
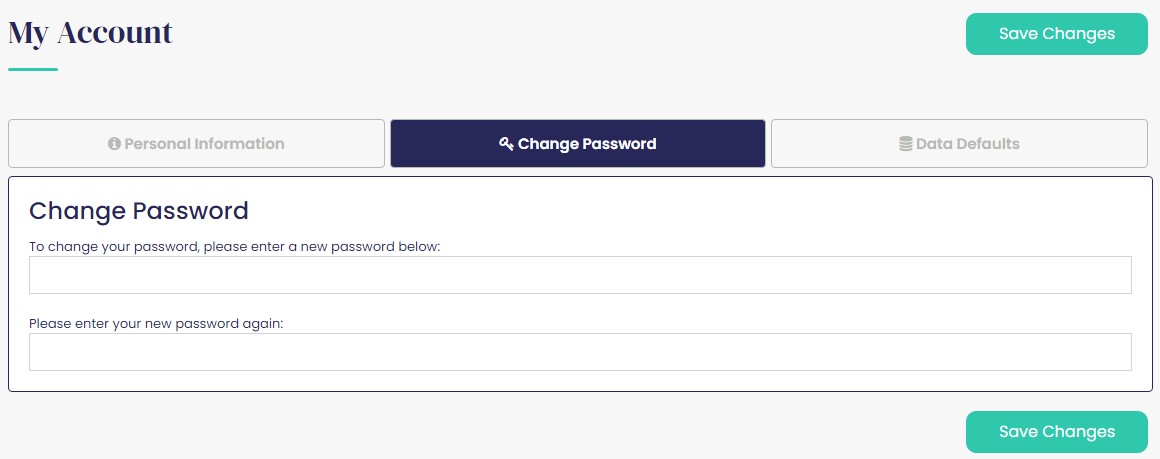
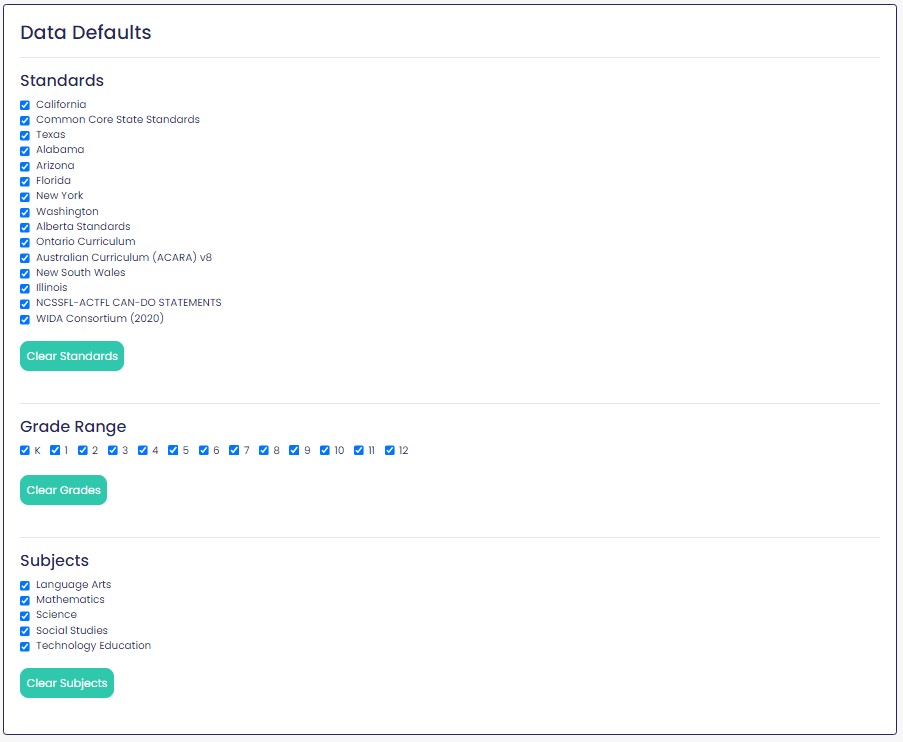
Here you can make changes to your account, password, and set data defaults.
Data Defaults
Filter out standards, subjects, or grades in your own profile
Saved Searches
Links to any searches that you have saved from the ExACT Alignment Tool and allows you to review or delete searches.

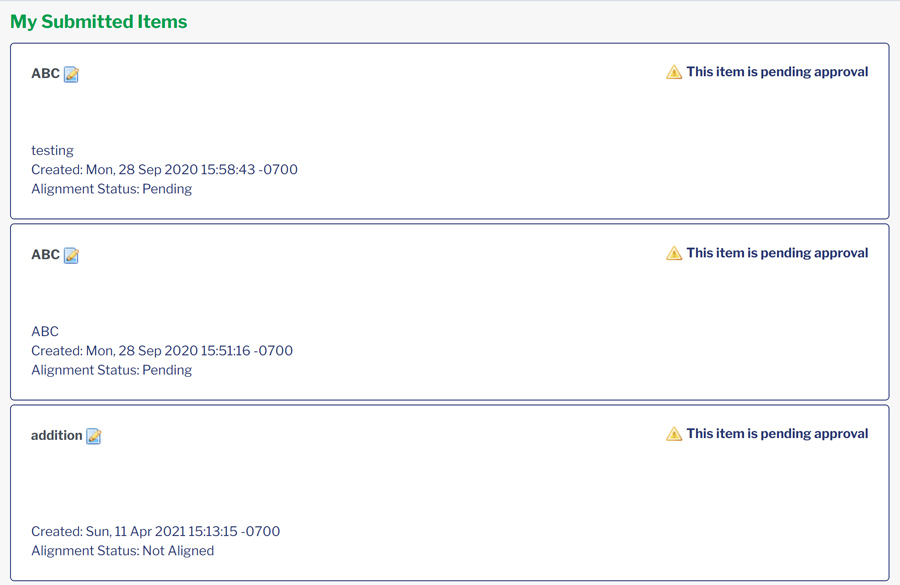
My Submitted Items
Using this link, you can view, edit or delete items that you have uploaded and aligned using the Submit a Resource link.
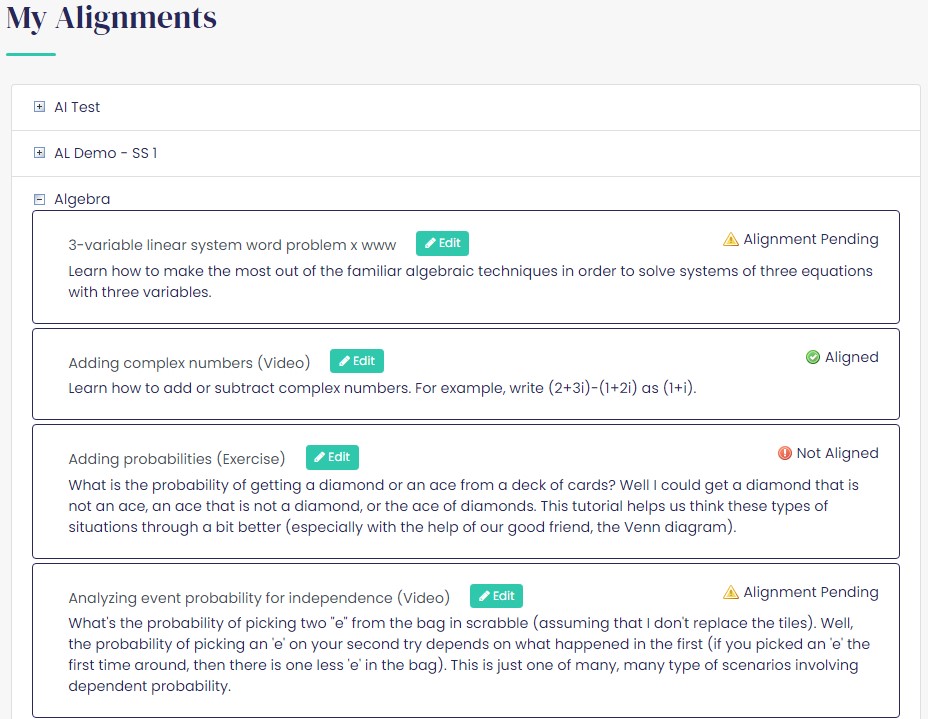
My Alignments
This feature lists the items and the alignment status of the items that you have aligned.
Log Out
Logs your session out of the ExACT application

Using the ExACT Alignment Tool
The ExACT Alignment Tool allows publishers to align content to educational standards using EdGate’s Concept Index. Once aligned, the aligned content can be displayed in alignment reports in ExACT and provided via other deliverables available via services contracted with EdGate which may include API, bulk deliverable, or Correlation User Interface (CUI). as outlined in the contract terms.
Creating an alignment in the ExACT Alignment Tool starts either with a search of the content or a search of the educational standards. Once an alignment is created, it is submitted to a Content Administrator for approval. The Content Administrator is someone within your organization who has been designated with this capability. The alignment process is efficient in that once a Concept Index term is applied to a content item, the content item is aligned to all standards in the client profile that have that same concept included for the specified grade range. As new standards are adopted, there is no need to perform a re-alignment, as the Concept Index terms applied will create alignments as applicable to the newly adopted standards. Refer to the Aligning Content tab for instructions on creating content alignments.
I want to Align
Browsing Content
After clicking I Want to Align, the display will include tabs for Content, Standards, Concepts and Auto Align (as applicable for the terms of the contract).
On the Content Tab, you will see one or more content groups. Each is clickable and contains the items your organization designated for inclusion. Your items may all be in one content list or if you have specified groupings of content. These are determined as part of the setup of your version of the ExACT Alignment Tool.

When you click on any of the content groups, a search results page will display.
For each item on this page, you can view the alignment status on the right hand side of the screen. You can also use the filter on the left hand side of the screen to show only items that are Aligned, Not Aligned, or Pending.
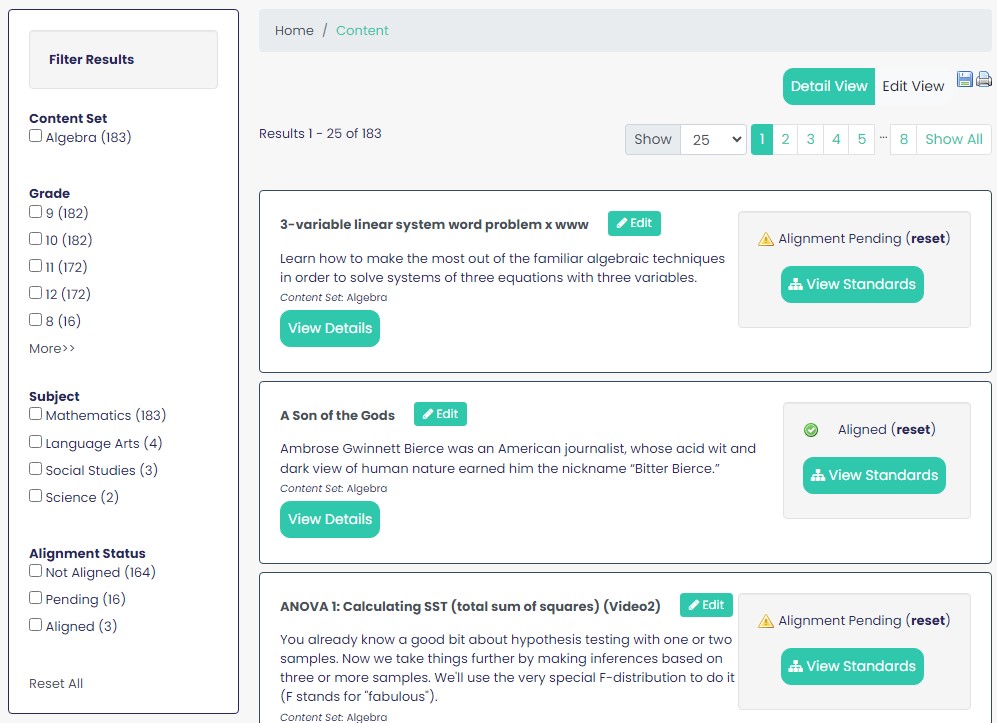
Edits can also be made to resource and metadata by clicking on the status. Refer to the Aligning Content tab for instructions on creating content alignments.
Browsing Standards
On the Standards tab, you can locate subject and grade specific standards. To search standards, you must select a grade and a subject from the dropdown menus. If your profile includes more than one set of standards you will also be prompted to select the standards that you want to view.
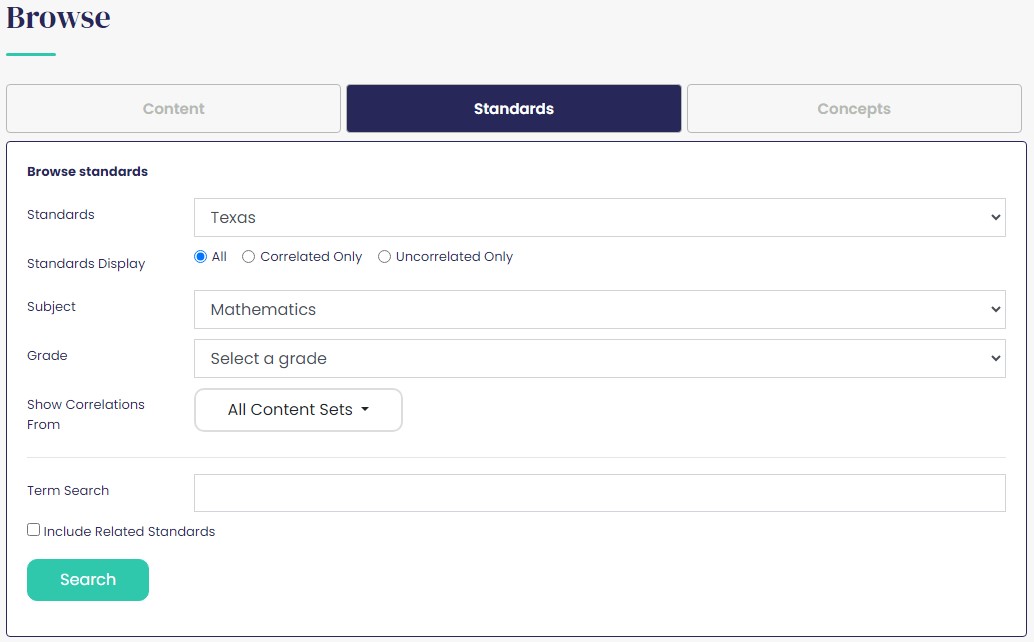
Browsing Standards Results Page
The search results will display standards for the grade and subject specified. The standards display in the order provided by your state and includes the labels and numbering system used by the state.
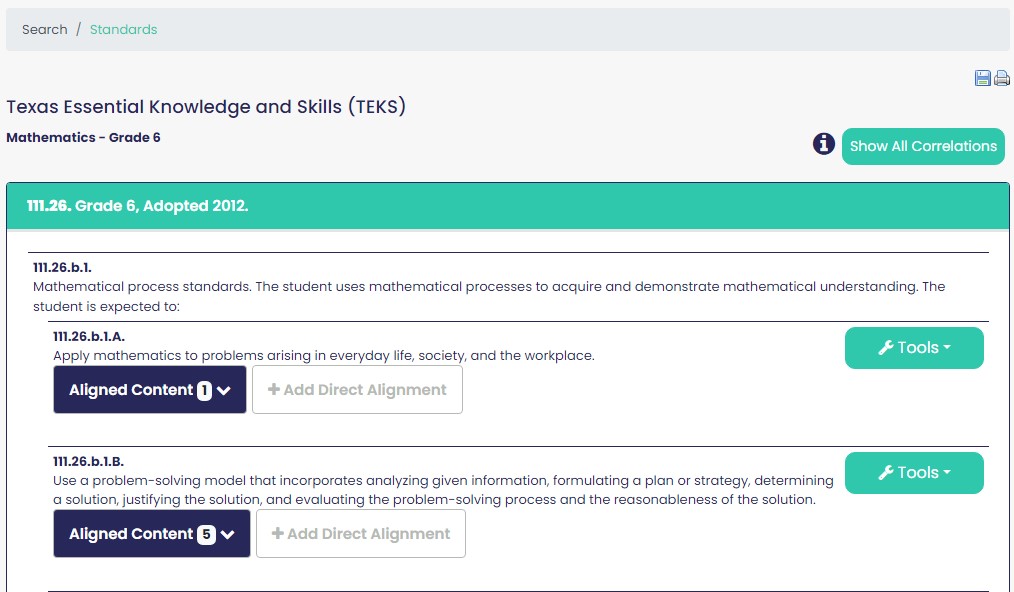
On this page, you have the options of viewing correlations or content that has been aligned to standards or performing actions related to each standard.
Correlations
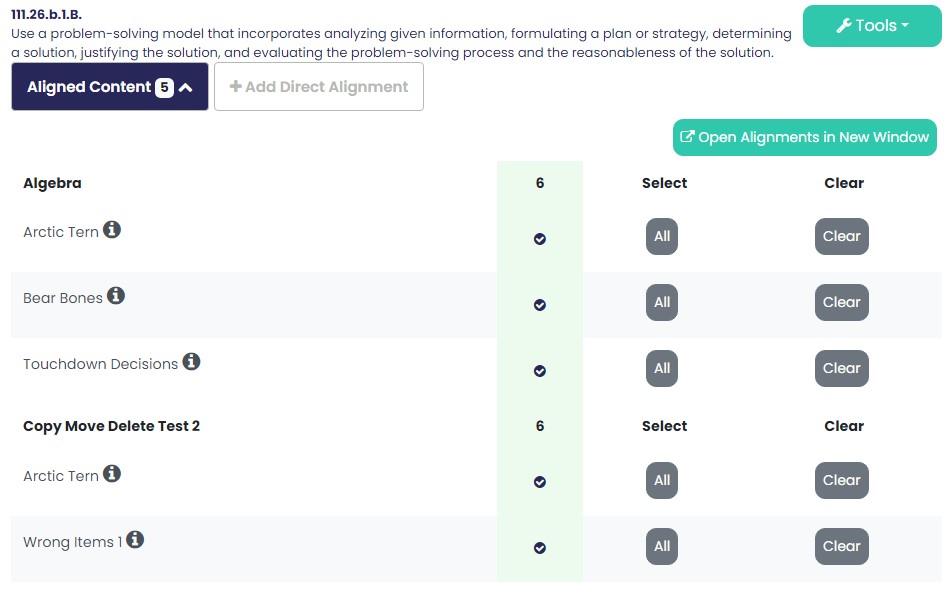
As content is aligned, links to the correlations will be included in the Correlations dropdown menu for each standard where an alignment has been created. The number next to Aligned Content represents the total individual pieces of content aligned to this standard. To access this content, click on the Aligned Content link.

This is the display from the Aligned Content link.
Tools
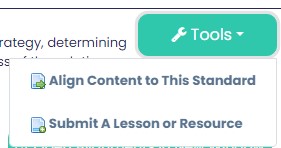
Using the Tools dropdown menu, you have the opportunity to 1) Align Content to this Standard or 2) Submit a Lesson or Resource. Refer to the Aligning Content tab for instructions on creating content alignments.
Browsing Concepts
EdGate staff have reviewed thousands of standards and established EdGate’s Concept Index (Curricular Concepts list) that aggregates content that meets these standards around specific curricular concepts. This is not free text searching like Google or many lesson plan search tools. The results will display a list of terms that have been identified by EdGate – called Curricular Concepts. The hierarchical structure reflects the breakdown of subjects taught in U.S. curriculum. The focus of the content that is associated with each concept will depend upon that hierarchy.
On the Concepts tab, the top of each concept hierarchy is displayed. To locate concepts drill down through the hierarchy to display the concept terms.
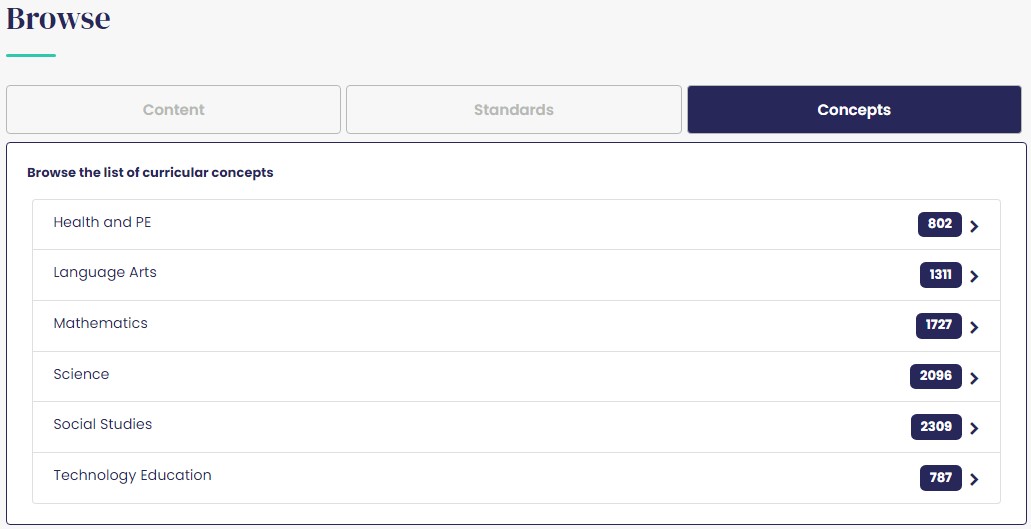
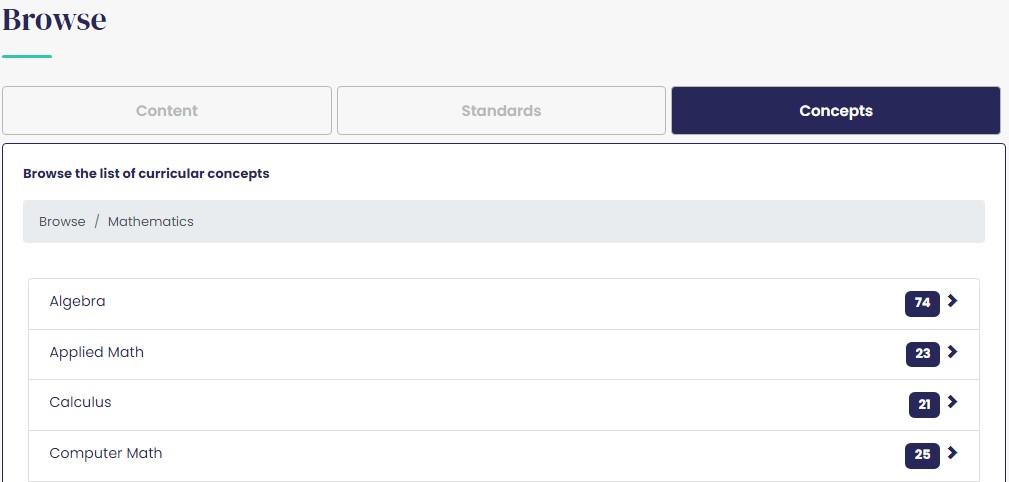
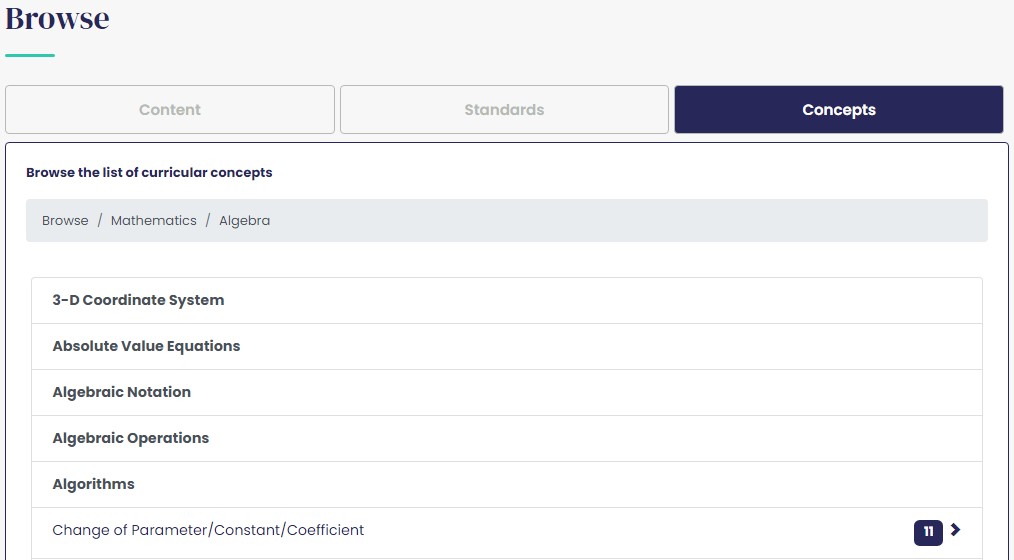
As you select additional levels in the hierarchy, they will display in the path for the concept.
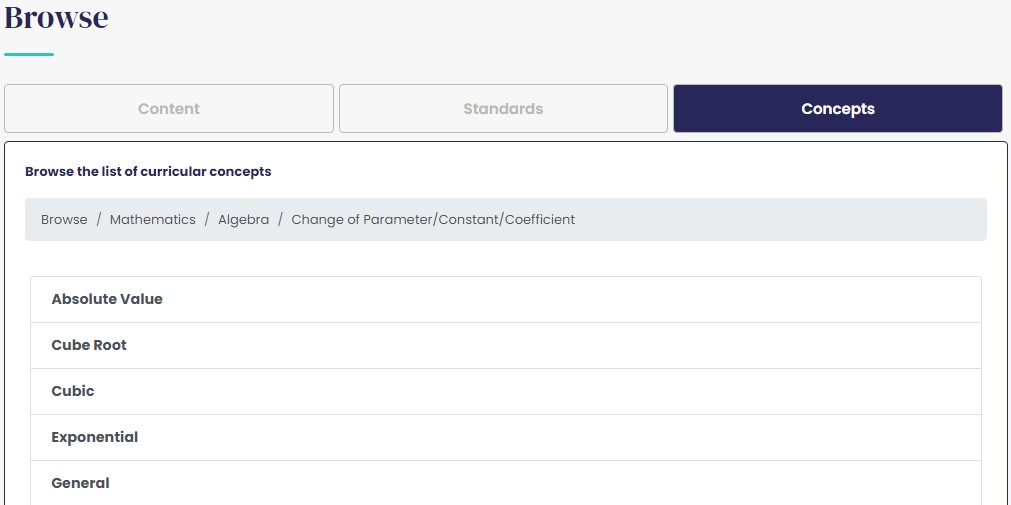
 The concepts links will display the list of content with that concept
attached.
Searching for Concepts
To find Curricular Concepts using the search field, type the term in search box and click the search button (magnifying glass). For this example, the term “decimal” is our search term.

Using the search field and searching for decimal will bring back results in Standards, Concepts, and Content.

Clicking on the Curricular Concepts link will display a list of 30 concepts that include the term “decimal”.
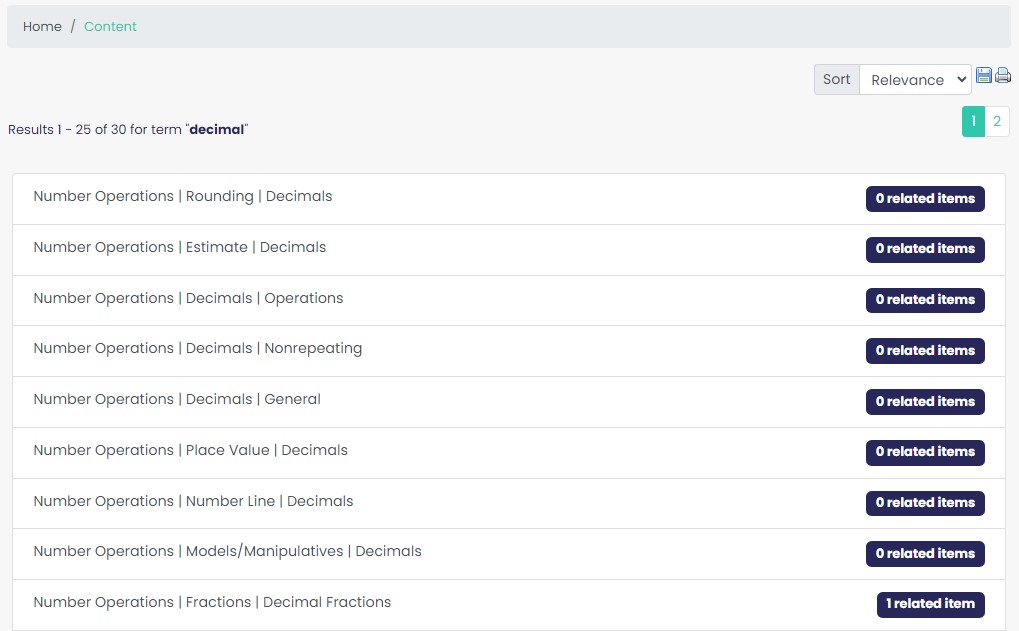
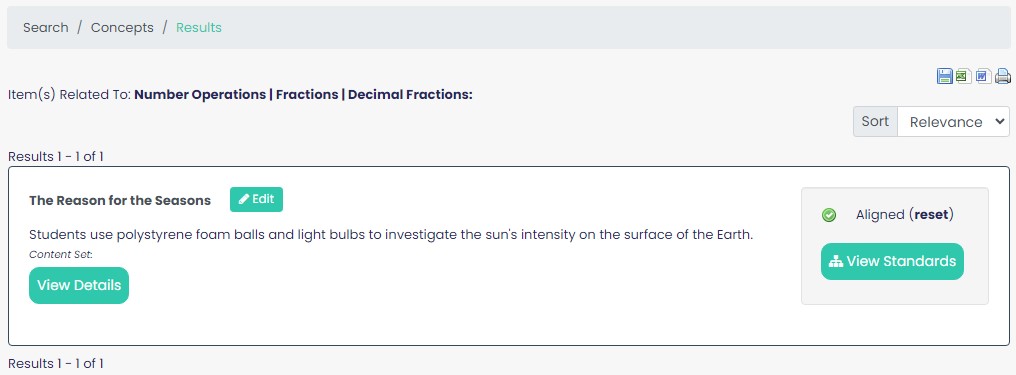
Clicking on the link for a Concept (i.e. Number Operations | Fractions | Decimal Fractions) will display a list of content units that have the concept attached.
Creating and Editing Content Set
If your service includes the ExACT Alignment Tool, you can create Content Sets. To create a new Content Set, click on the overflow menu button in the upper right-hand side of the My Content widget, then click on Create Content Set.

A modal window will display. Type in the name of your new Content Set and click Create.

Renaming Content Sets
If your service includes the ExACT Alignment Tool, you can rename Content Sets. To rename a Content Set, click on the Edit icon next to the Content Set you wish to rename.

A modal window will display. Type in the new Content Set name and save your changes.

Deleting a Content Set
If your service includes the ExACT Alignment Tool, you can delete Content Sets.
Note: You may only delete empty Content Sets that do not contain resources.
To delete a Content Set, click on the Edit icon next to the Content Set you wish to delete.

A modal window will display. Click Delete. You will be asked to confirm your choice.

Aligning Content with the ExACT Alignment Tool
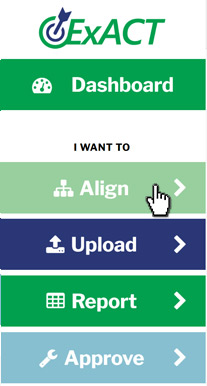
On the left navigation click on Align
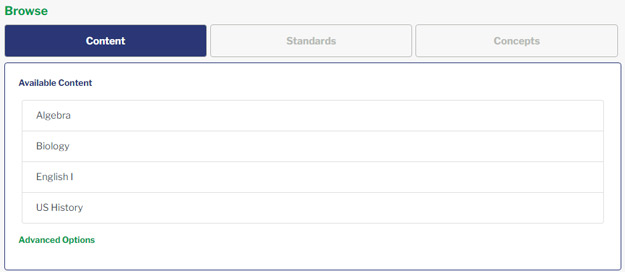
Choose the appropriate content set.
When you click on any of the content groups, a search results page will display.
Alignment Statuses provide the status of an alignment for a resource. Below is the list of statuses and a brief description of each.
Not Aligned

Content/resources that do not have any EdGate Concept Index terms associated with it and resources that have not been Directly Aligned.
Alignment Pending

Content/resources to which EdGate Concept Index terms have been added and have been submitted to a moderator. Note: for reporting purposes, Alignment Pending will report as Aligned. There are no flags in reporting for Alignment Pending content. It will display in the reports as aligned.
Aligned

Alignment Pending content that the client moderator has approved. Once approved the status of a Alignment Pending changes to Aligned.
ECS Aligned

Content/resources that EdGate aligned and loaded into the system.
Direct Alignment

Direct Alignment allows the client to directly associate a resource to an individual standard. Content that has been Direct Aligned and does not have any EdGate Concept Index terms associated with it will display as Direct Alignment. Direct Alignment is included with Alignment Manager and is a premium service. For more information on adding this feature please contact your Project Manager.
Resetting an Alignment

Once a resource has been aligned, the alignment can be reset by clicking on the Reset link next to the Alignment Status. CAUTION: when using this link to reset alignments, all the EdGate Concept Index terms will be removed from the resource and the resource alignment status will return to Not Aligned.
For each item on this page, you can view the alignment status on the right hand side of the screen. You can also use the filter on the left hand side of the screen to show only items that are Aligned, Not Aligned, or Pending.

Once you determine the content item you want to align, click on the Edit button. This will bring up the Alignment and Editing box.

Edits can also be made to resource and metadata by clicking on the Edit button.
Creating Alignments using the Concepts/Correlate Tab
Within Edit Item there is the Concepts/Correlate tab. On this tab you can align a resource via the Standards, Browsing Concepts, or a search of Concepts. Since most users are familiar with the standards, when aligning individual items using the Concepts/Correlate Tab is the most efficient way of identifying the standards and associated concepts for alignment. After selecting By Standard you can select the set of standards to be viewed in the dropdown menu.
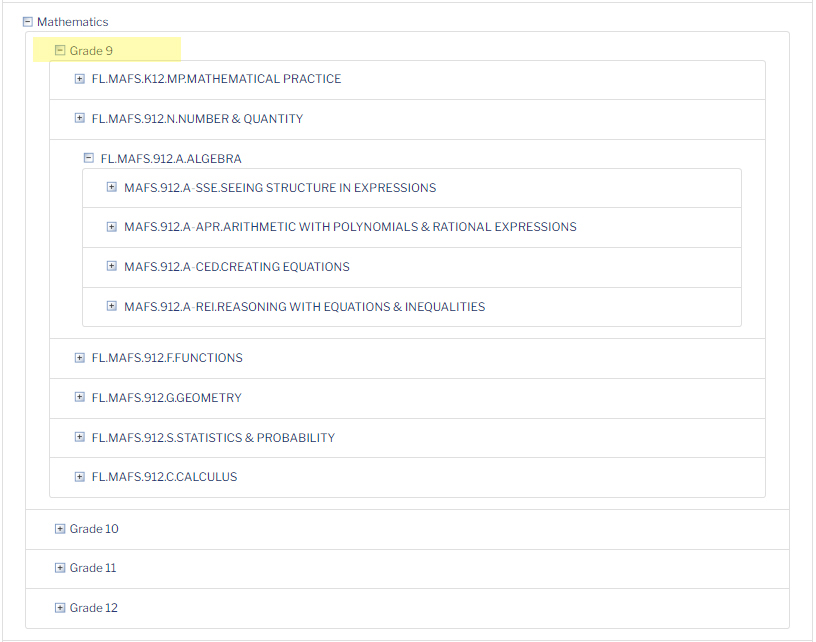
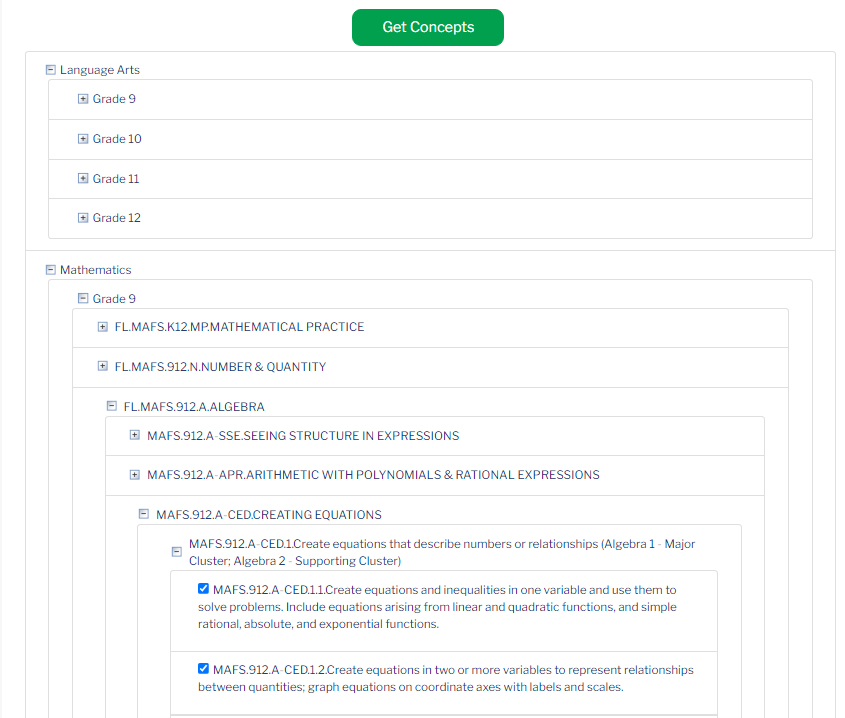
Standards for all subject areas in the content item’s grade range will be available for use in creating alignments, as content can be cross-curricular. To display the standards desired for the alignment, expand the list of standards using the icon next to the grade. In this case, we will expand the list of grade 9 Mathematics standards
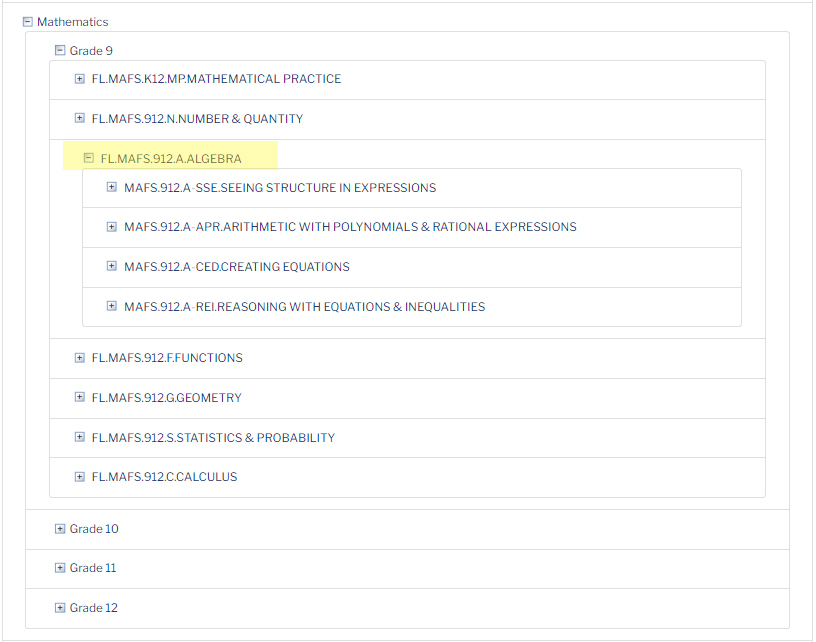
This will display the grade 9 Florida Math strands. To locate the standards for alignment, expand the strand(s) desired. In this case, we will expand Grade 9 FL.MAFS.912.A.ALGEBRA mathematics standards.
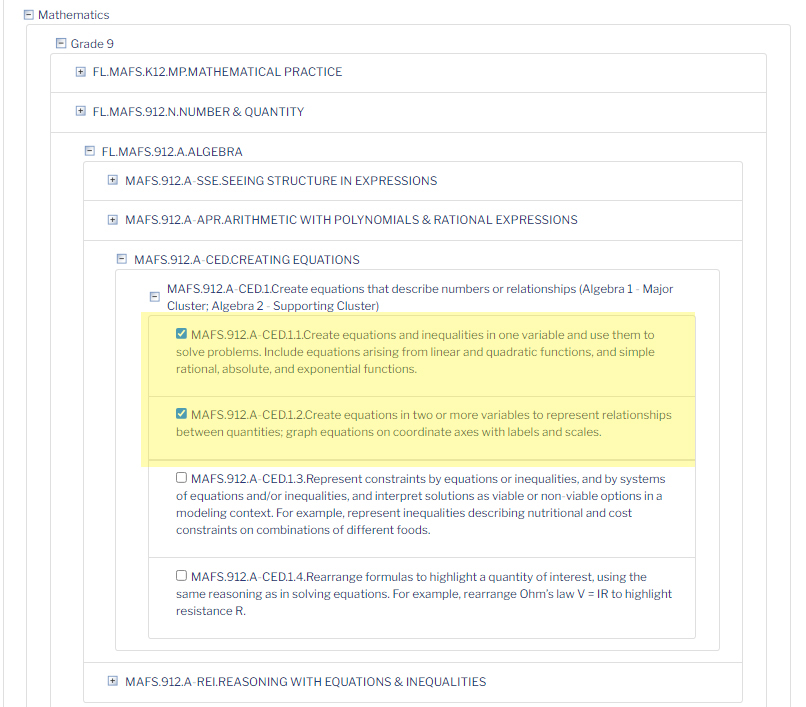
Select the standard(s) for alignment by clicking on the box for the standard. This will put a checkmark in the box. To remove the checkmark, simply click on the box a second time.
Once you have selected the standard(s) for alignment, scroll up and click the Get Concepts button.
The standard(s) will display with all concepts that are applied to it.
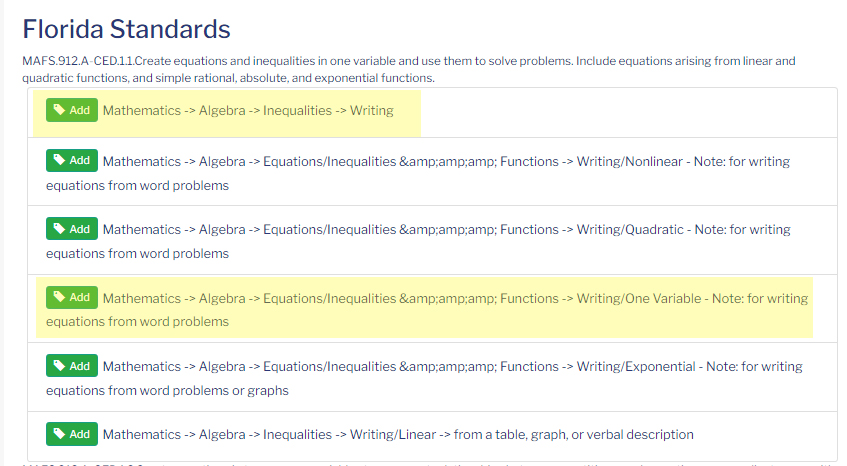
Choose the concept(s) to be applied to the content by clicking Add. In this case, we have chosen to include the concept Mathematics -> Algebra -> Inequalities -> Writing under standard MAFS.912.a-CED11. Also chosen is Mathematics -> Algebra -> Equations/Inequalities & Functions -> Writing/One Variable - Note: for writing equations from word problems.
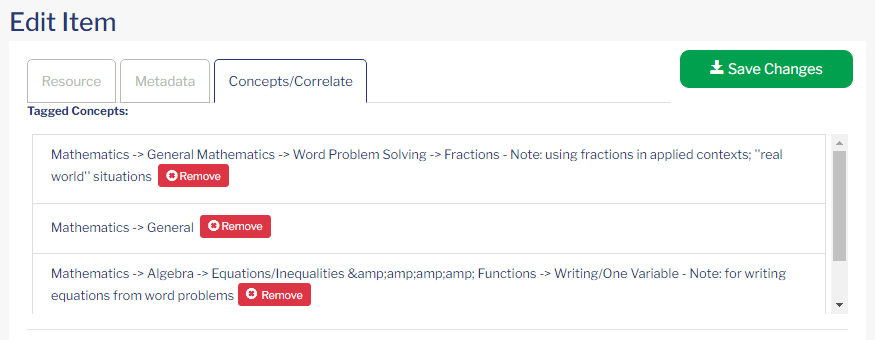
Added Concepts will display in the Tagged Concepts section. Concept can be removed by clicking the Remove button.
To create the alignments using the selected concepts, click Save Changes. The alignment will be submitted to the Content Administrator for your profile and this screen will display.

This message will close after a few seconds.
Creating Alignments Using the Concepts on the Concepts/Correlate Tab
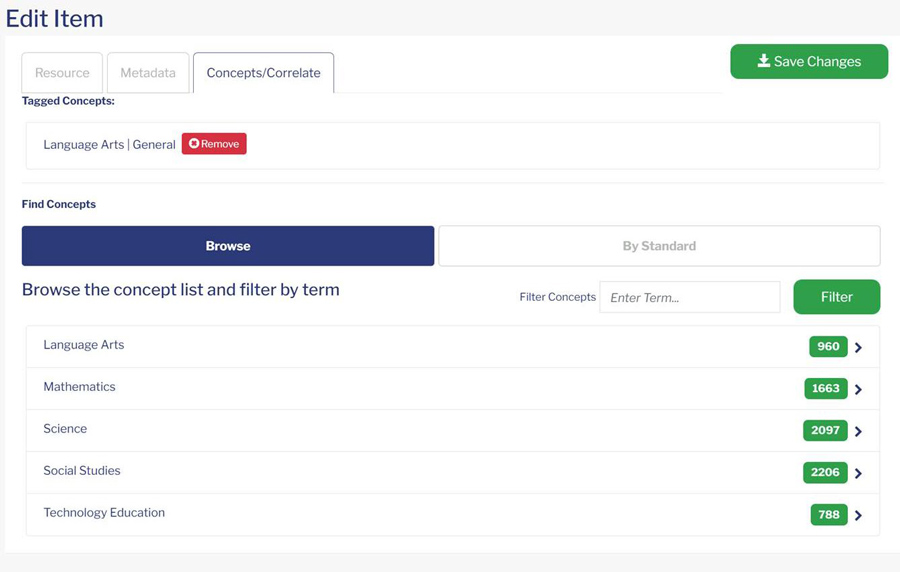
Within Edit Item there is the Concepts/Correlate tab. Here you can Browse Concepts or search of the EdGate Concept Index to locate terms and create the alignments. This type of search is generally used when a client is more familiar with EdGate’s Concept Index.
Browse Concepts
On the Browse tab, you can drill down through the subject tree to locate concepts. The instructions for this follows the Filter for Concepts information.
Filter for Concepts
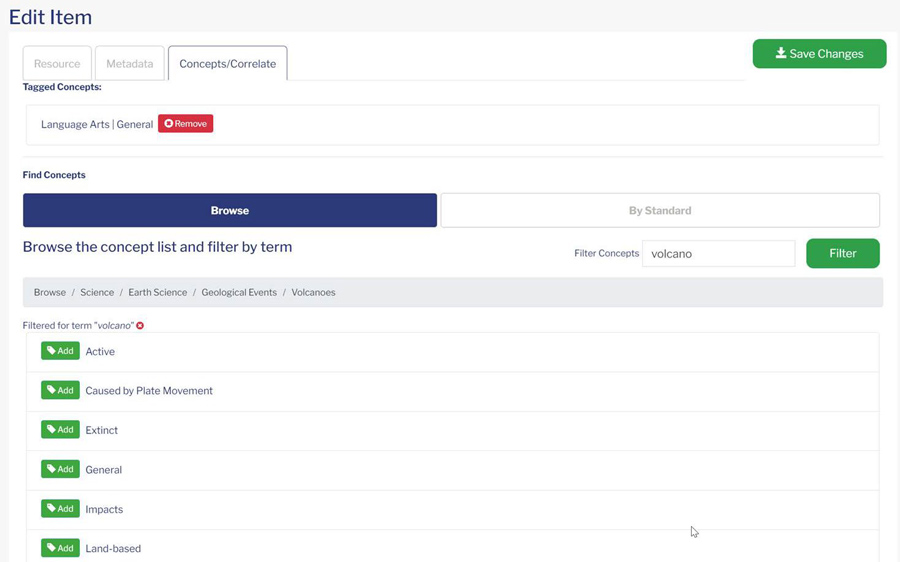
You can also input a term in the Filter Concepts. Inputting a term in the box and clicking Filter will filter the subject tree to the hierarchy that includes the term searched. In this example the search term is volcano.
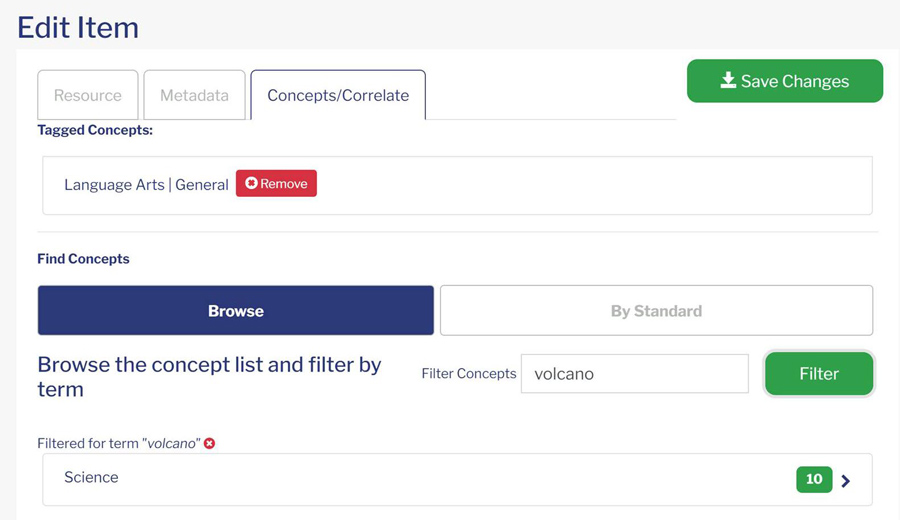
When the results display, click on the Subject (i.e. Science) and drill down through the hierarchy to add the applicable Concept Index term for Volcano. There are several terms available including a General taxonomy term. Click on Add to add the applicable term(s) to the resource.
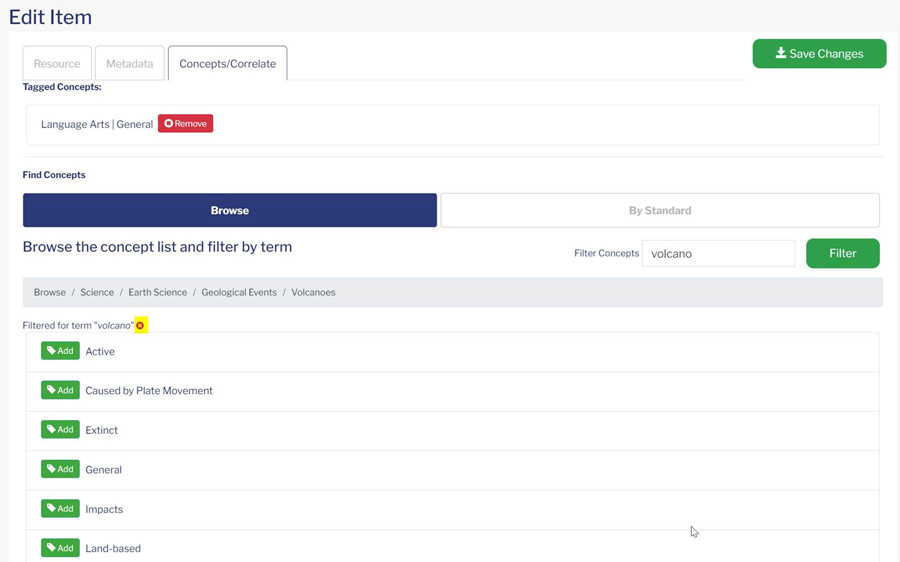
Disabling Filtering
To disable the filter, click the red X next to the filtered term.
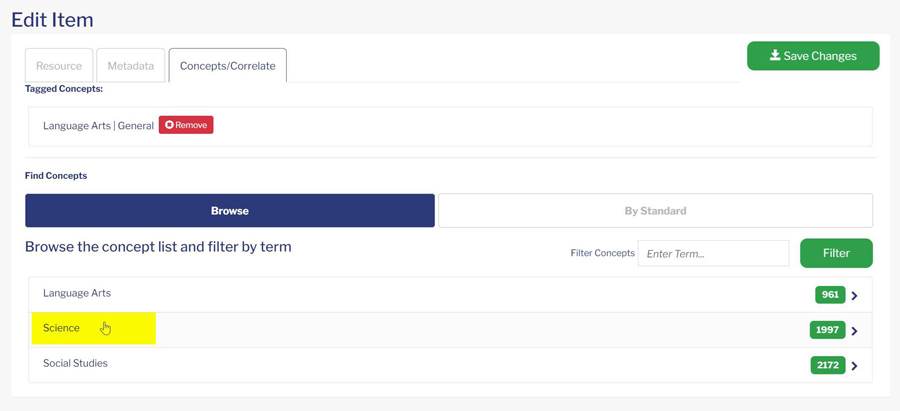
Browse Concepts
On the Browse tab, you can drill down through the subject tree to locate concepts. To use the Browse functionality, click on the subject for the appropriate Concept Index term(s).
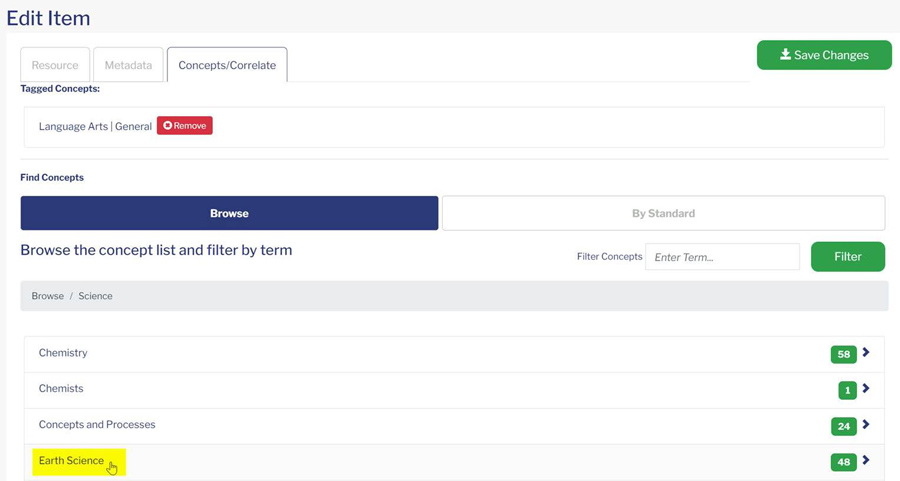
Continue clicking on the hierarchy of the Concept Index terms to drill down to the applicable Concept Index term(s).
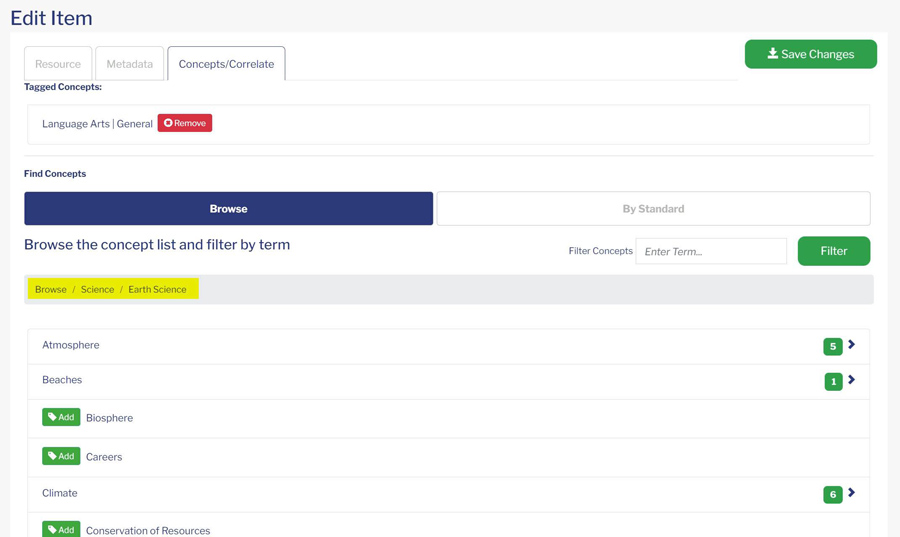
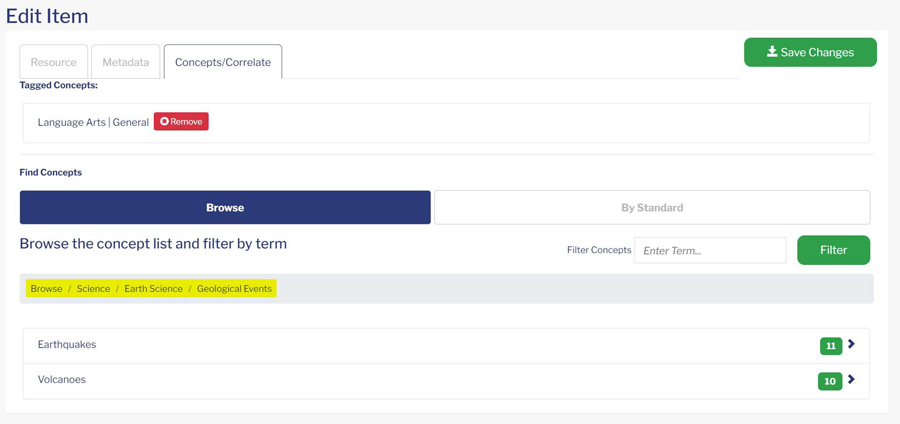
In this example for Volcano, there are several terms available including a General taxonomy term. Click on Add to add the applicable term(s) to the resource.
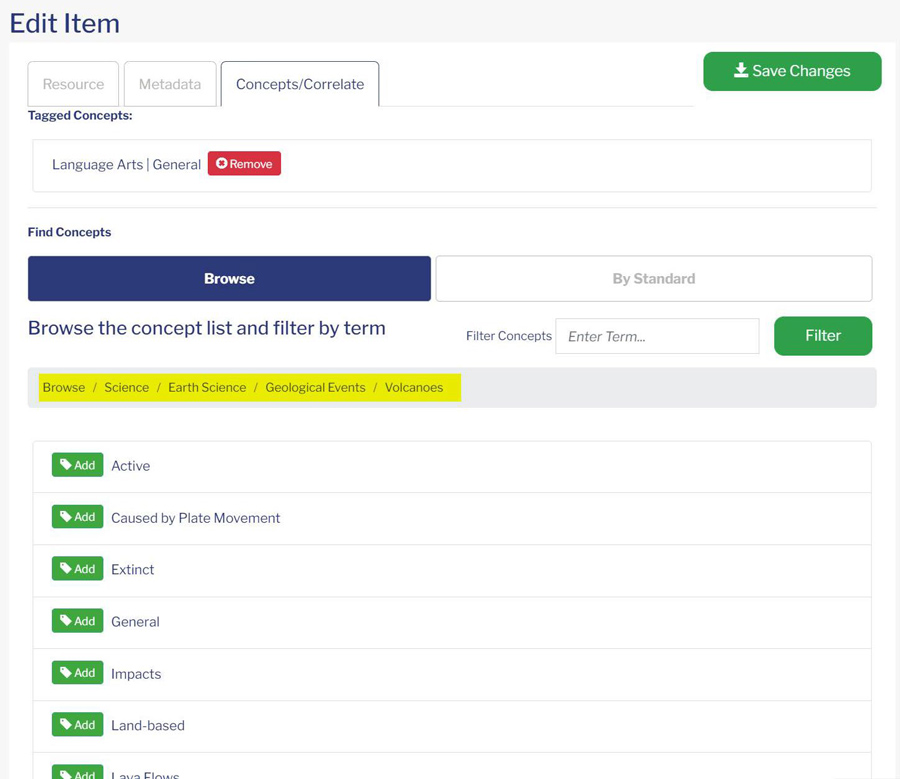
Once all changes have been made and the content item alignment has been created, click Save Changes on any of the tabs to save the changes and submit the alignment to the Content Administrator.

Creating Alignments using the Standards Tab
Multiple alignments to a single standard can be done at the same time from a search on the Standards tab.
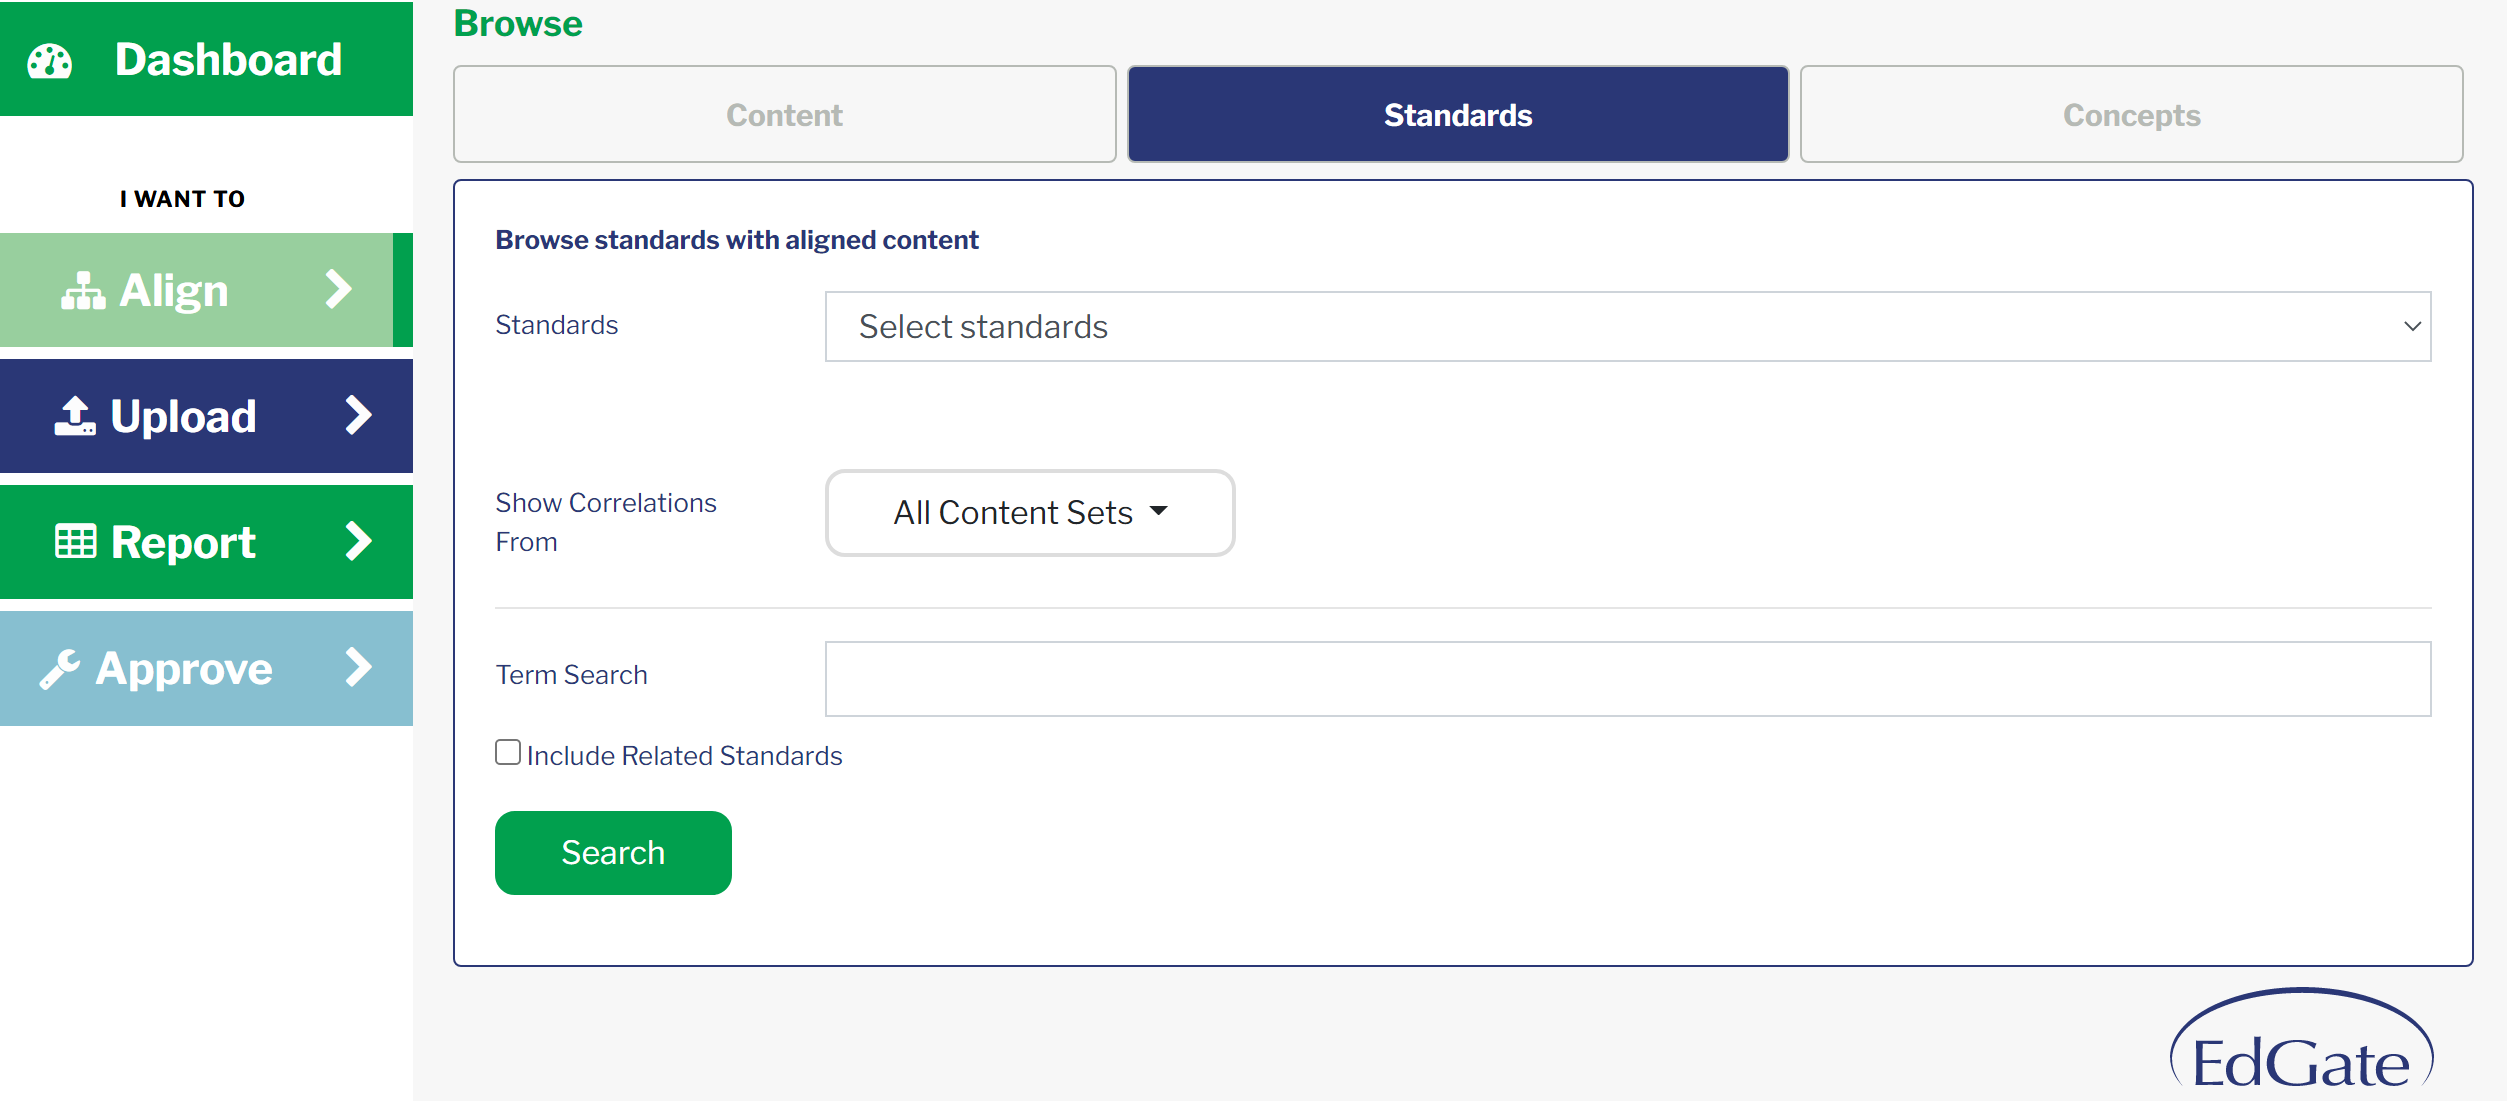
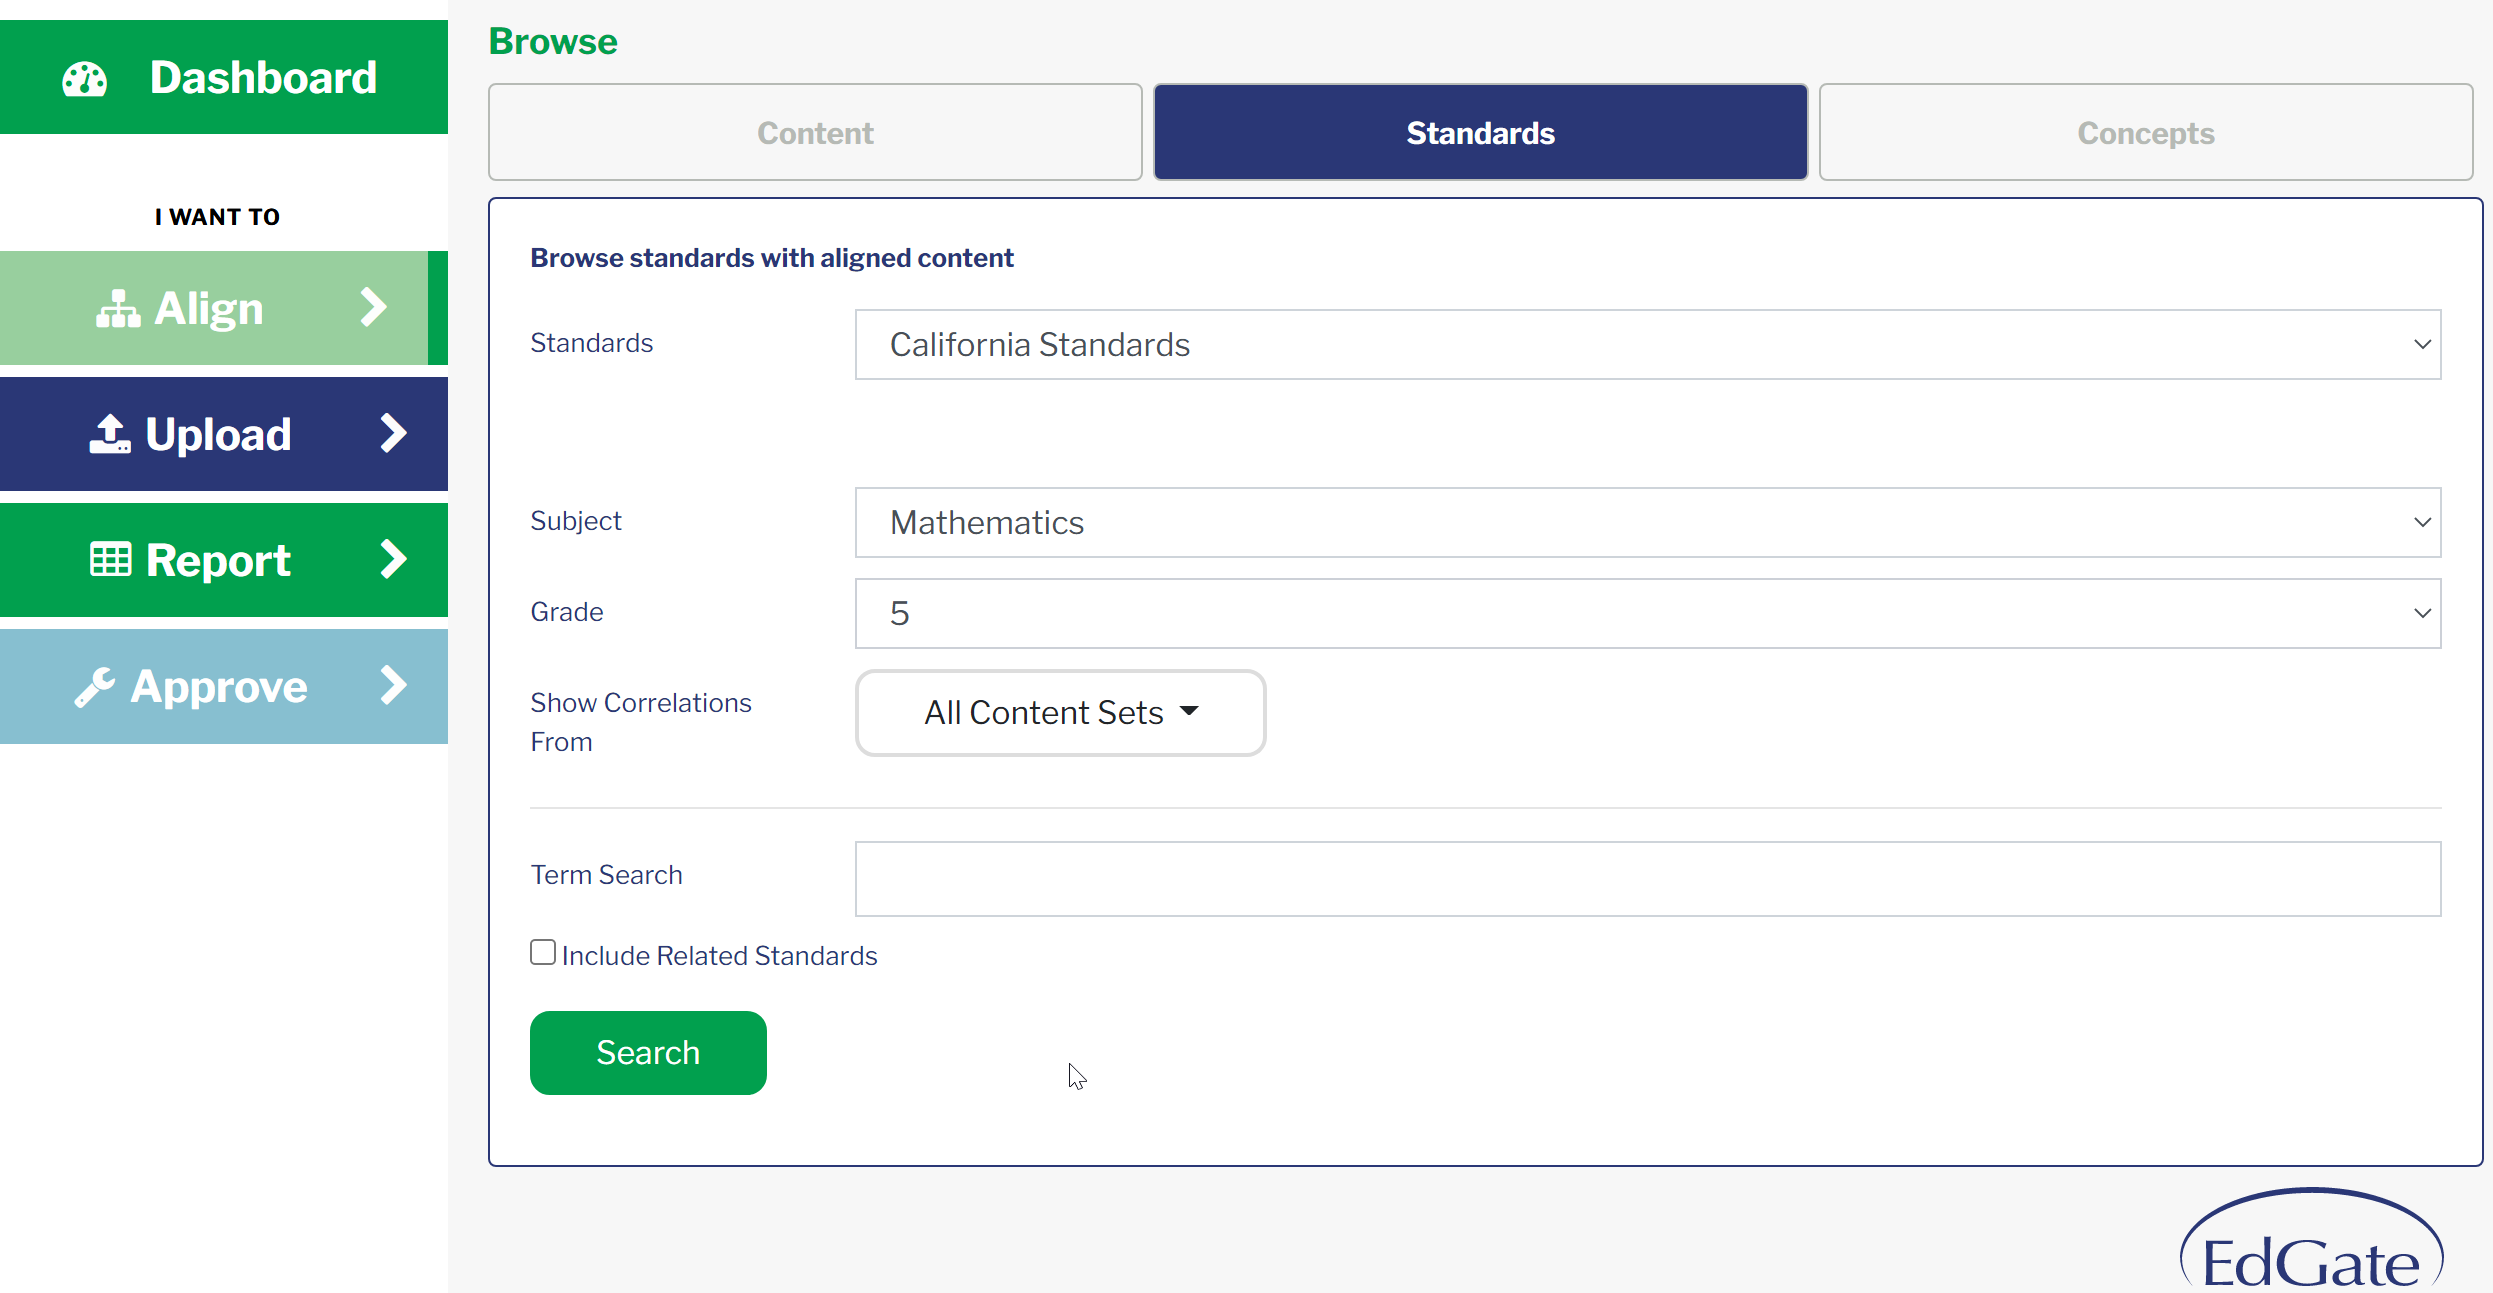
Using the dropdown menus for Standards, Subject, and Grade, select the set of standards from which alignments are to be created. For this example, we are using California Math standards for grade 5.
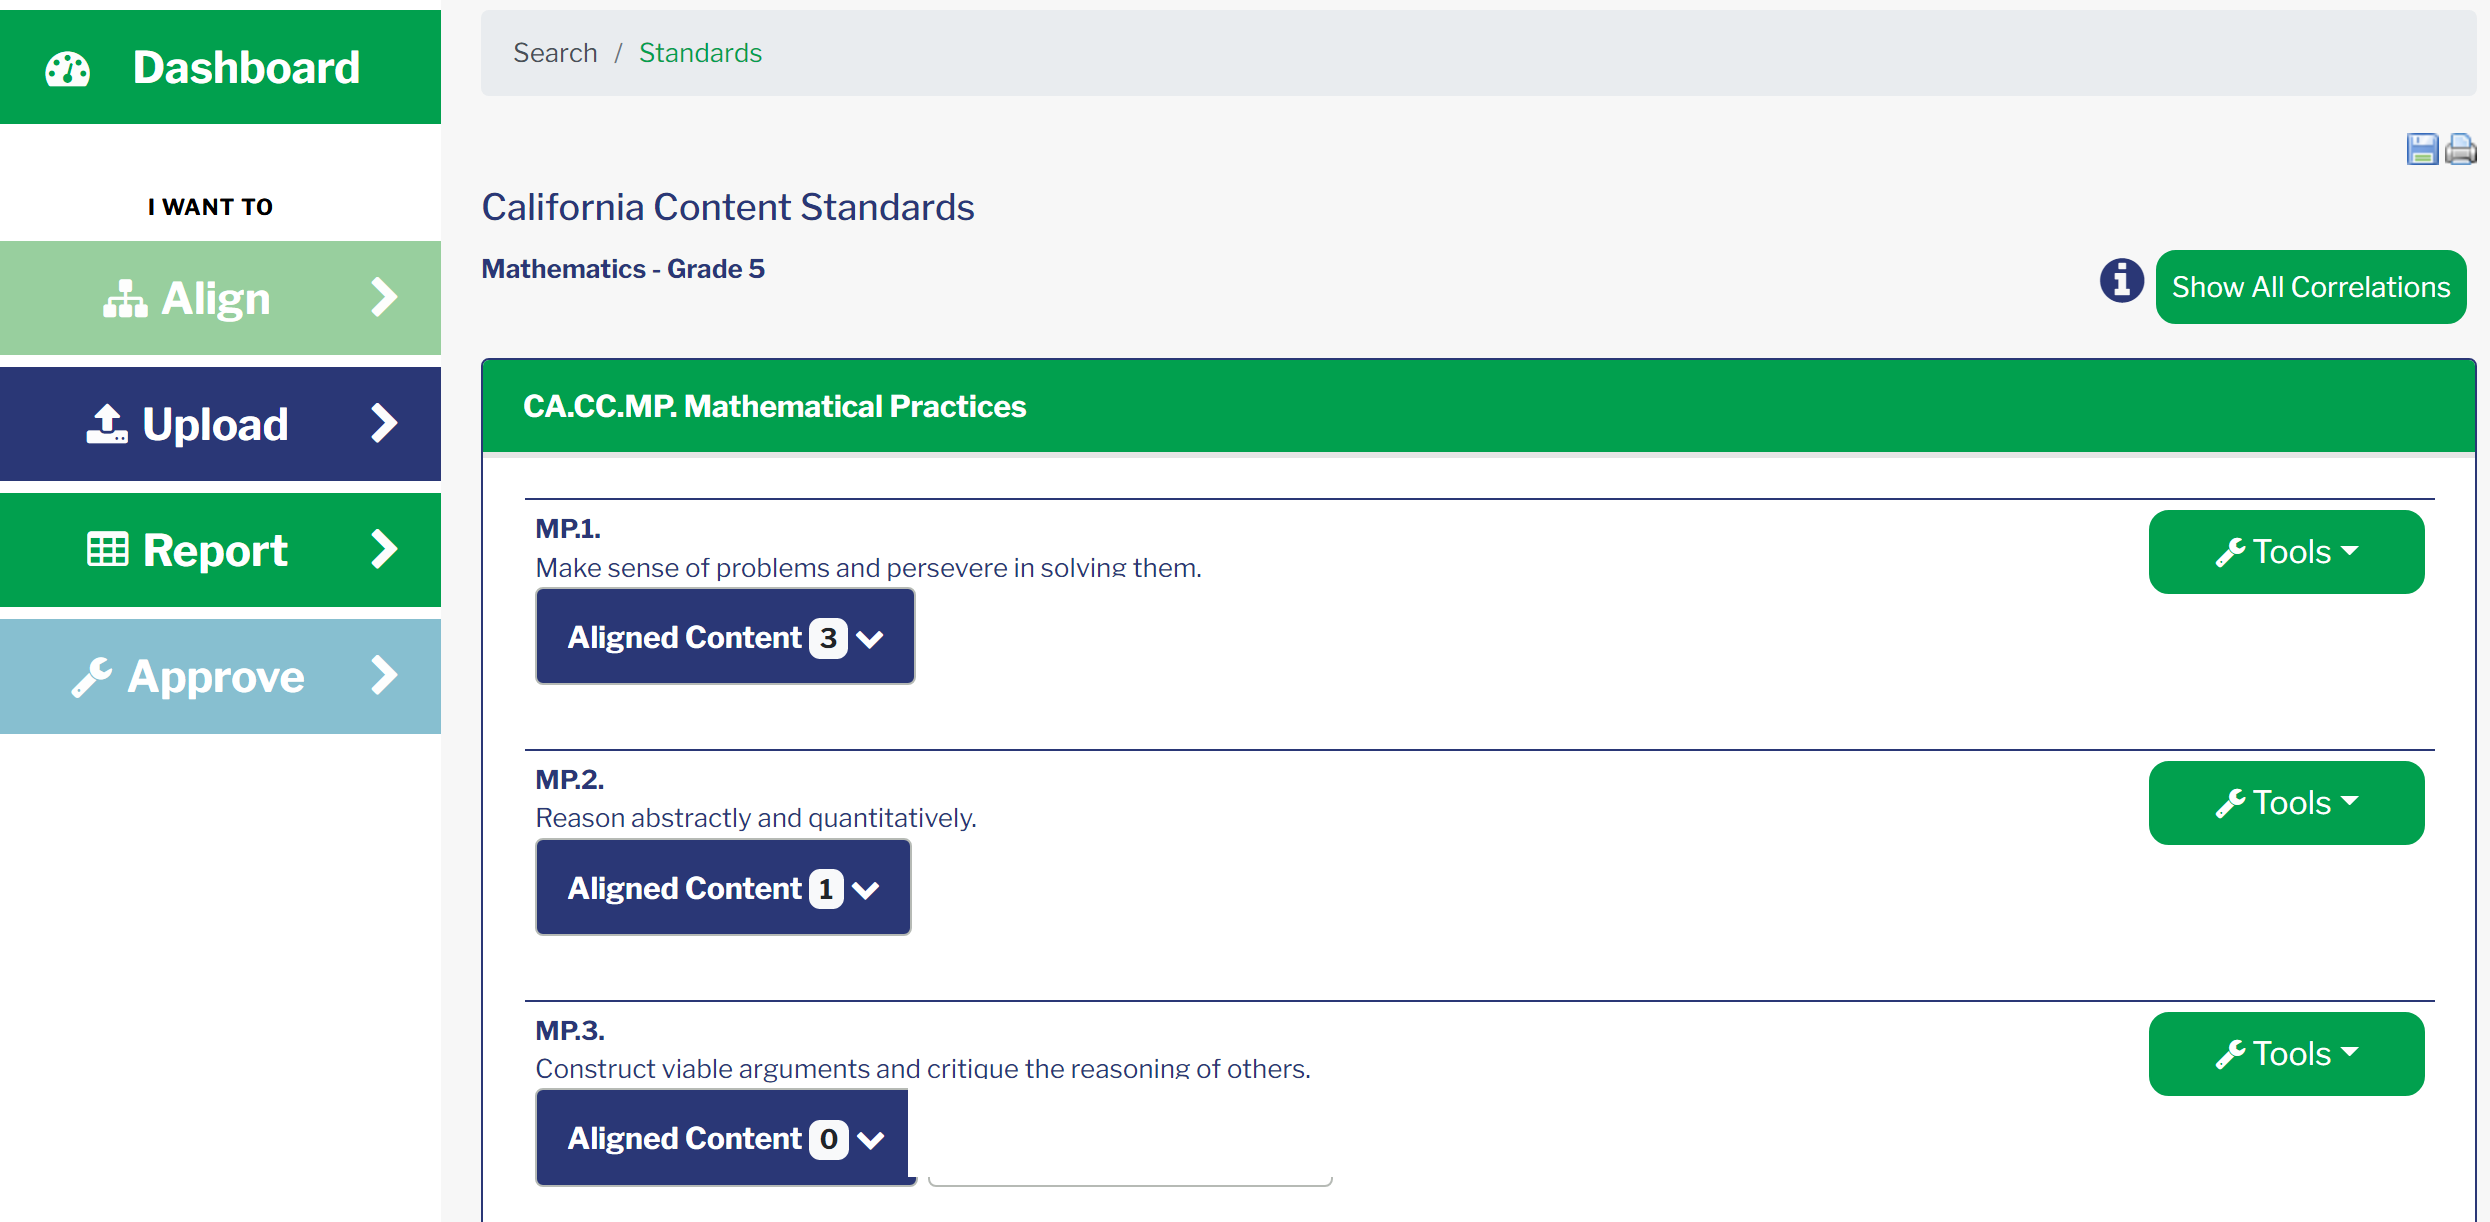
The California Content Standards for grade 5 math will display. Each of the child level standards have a link entitled “Tools”. Use the Tools dropdown for the standard where alignments are to be created. This will show a list of actions that can be performed. Choose “Align Content to This Standard”.

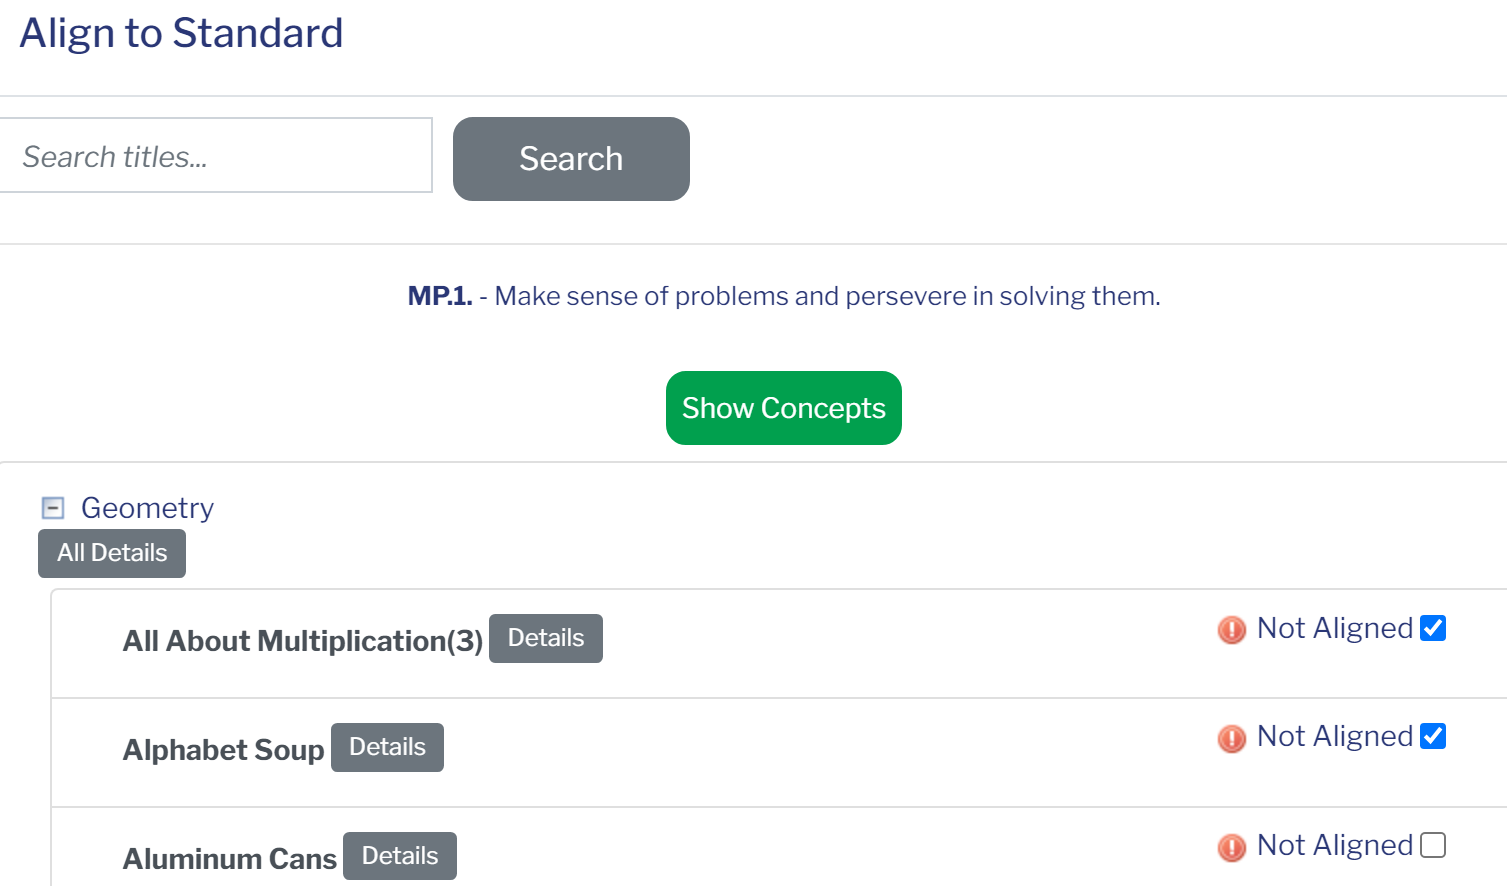
A popup window will open which lists all the content items that meet the search criteria: grade 5 math. Scroll through the list and place a checkmark in each box (by clicking on the box) for the content items to be aligned to this standard.
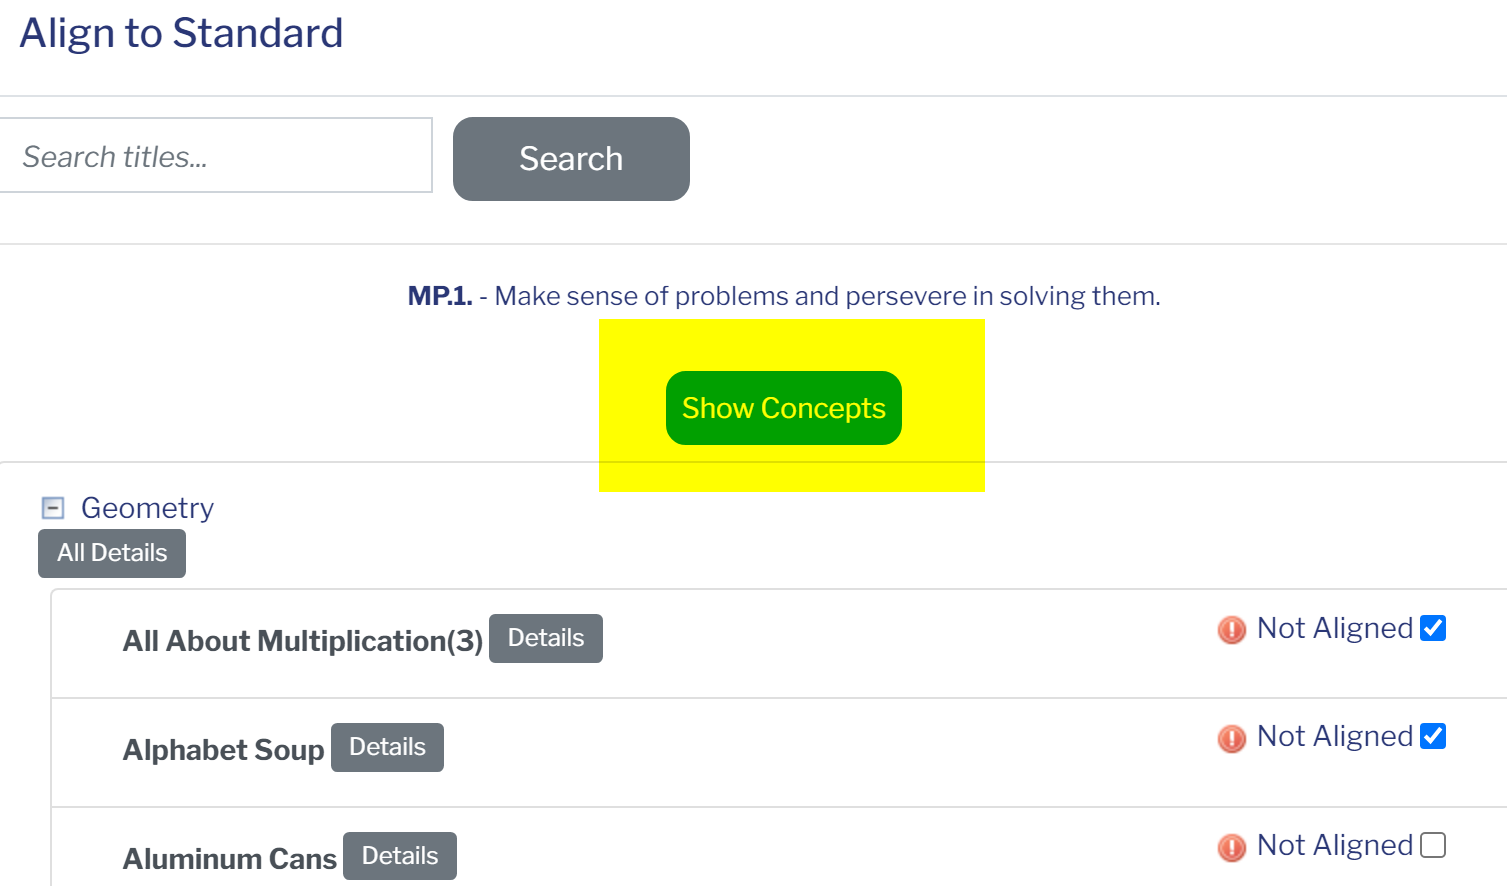
Then scroll to the top of the page and click the Show Concepts button.
All the concepts associated with the standard will appear under each Content Item. Uncheck the boxes (by clicking on each one) for those concepts that should not be applied to the content item. When you have applied the concepts for all the items, click Submit.
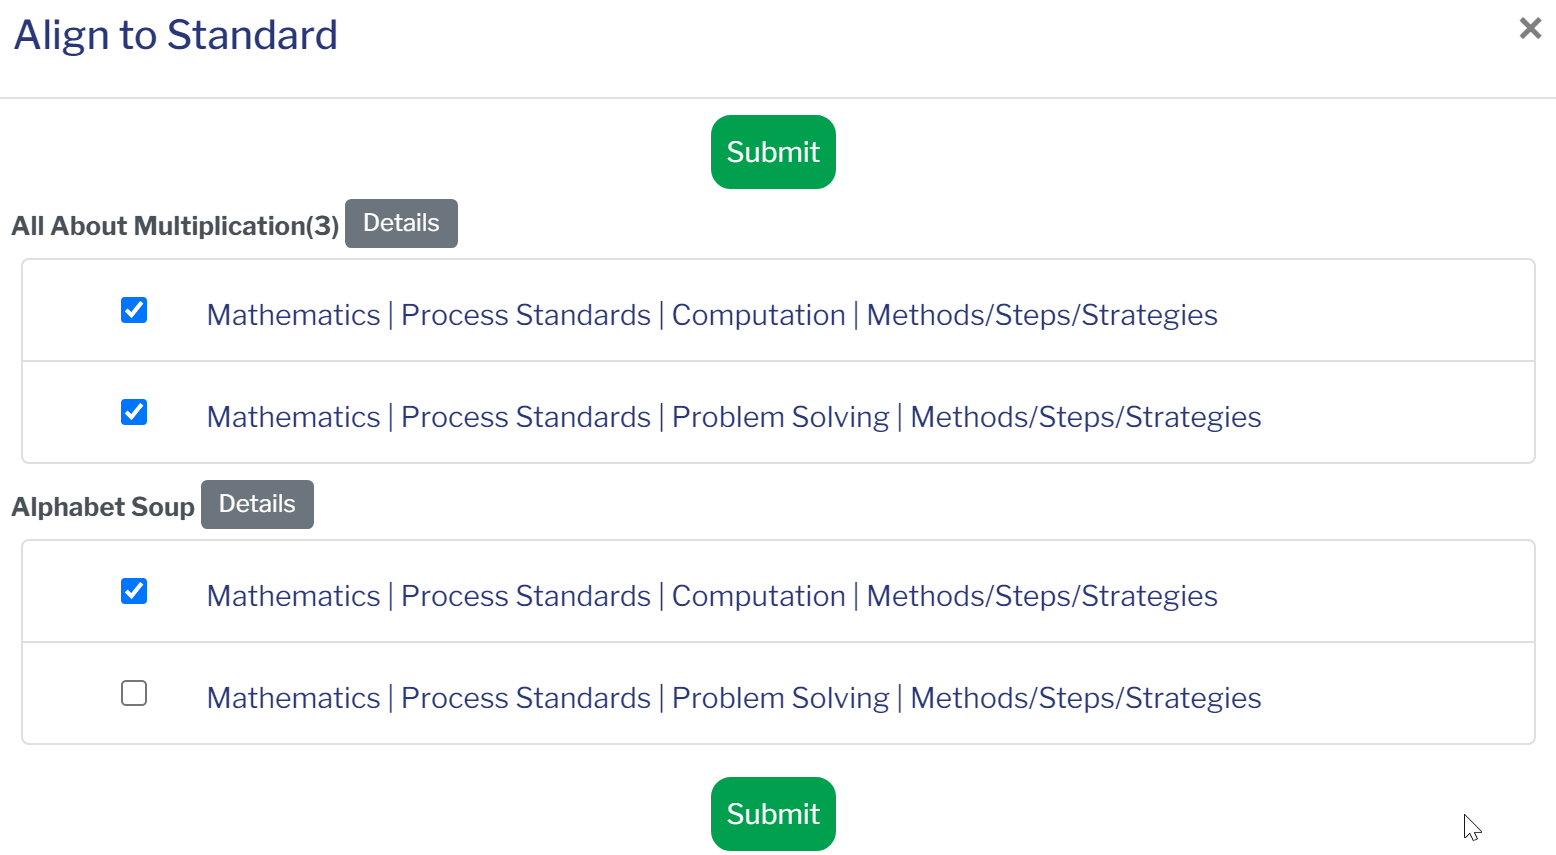
Note: To cancel this action, simply close the popup window using the X in the upper right hand corner.
The alignment(s) will be submitted to the Content Administrator for your profile and this screen will display. To close this screen, click on the X in the upper right hand corner.

Creating Alignments by Simultaneously Adding Concepts to Multiple Resources
(Requires ExACT Alignment Tool licensing)
To simultaneously add a concept(s) to multiple resources at the same time, follow the steps for Move, Copy, Mass Edit, Delete Content or Tag Concepts to select the resources to add concepts to. Once the resources are selected, use the Actions dropdown and select Tag Concepts.
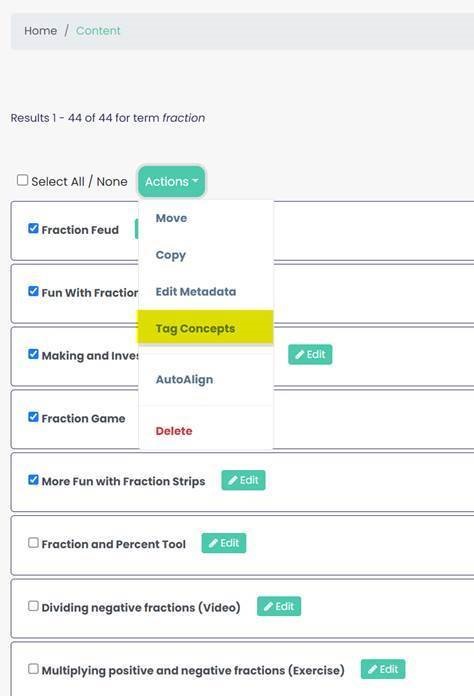
The Tag Concepts modal window will open.
Filter for Concept
You can also input a term in the Filter Concepts. Inputting a term in the box and clicking Filter will filter the subject tree to the hierarchy that includes the term searched. In this example the search term is “fraction”.
You can also drill down through the subject tree to locate concepts without including a search term.
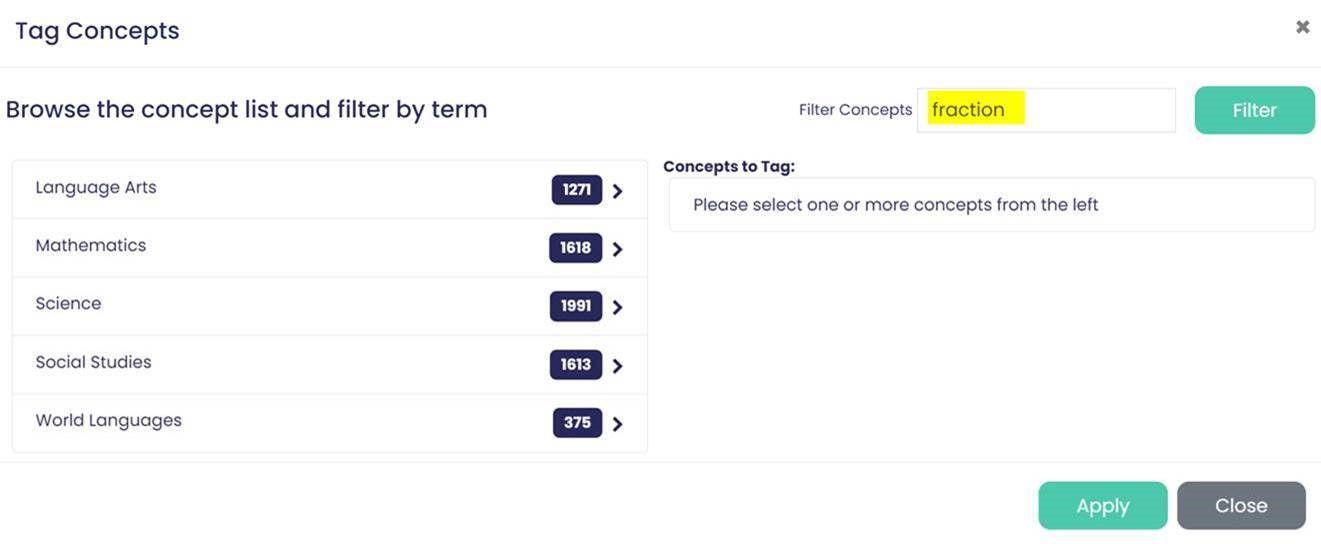
When the results display, click on the Subject (i.e. Mathematics) and drill down through the hierarchy to add the applicable Concept Index term for Mathematics | Number Operations | Fractions | Addition | Like Denominators. Click on Add to add the applicable term(s) to the resource.
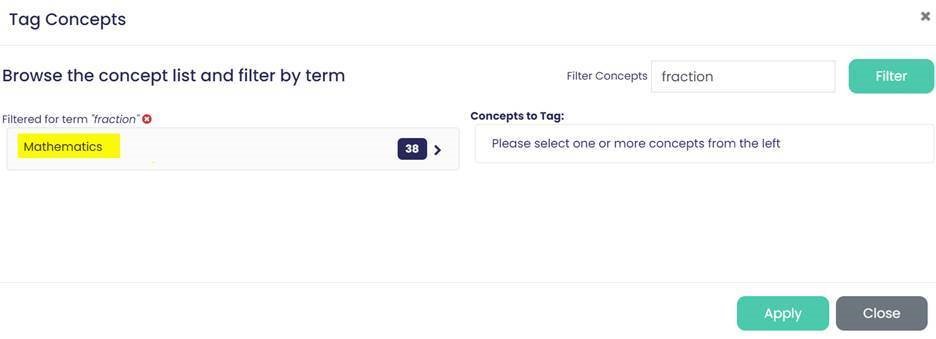
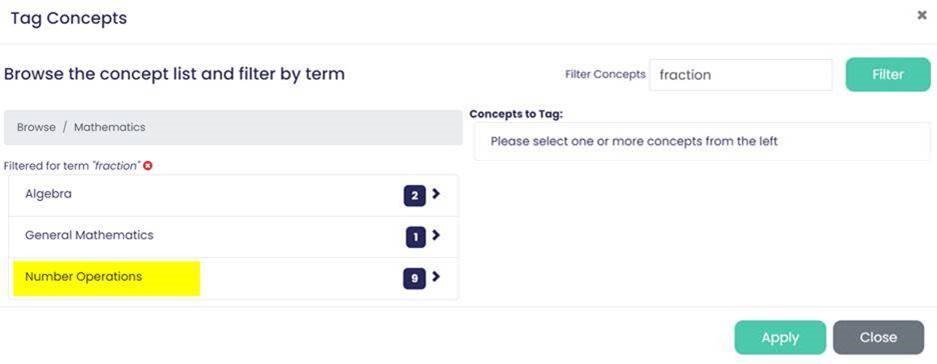
Click on the Add button for the concept(s) needed.
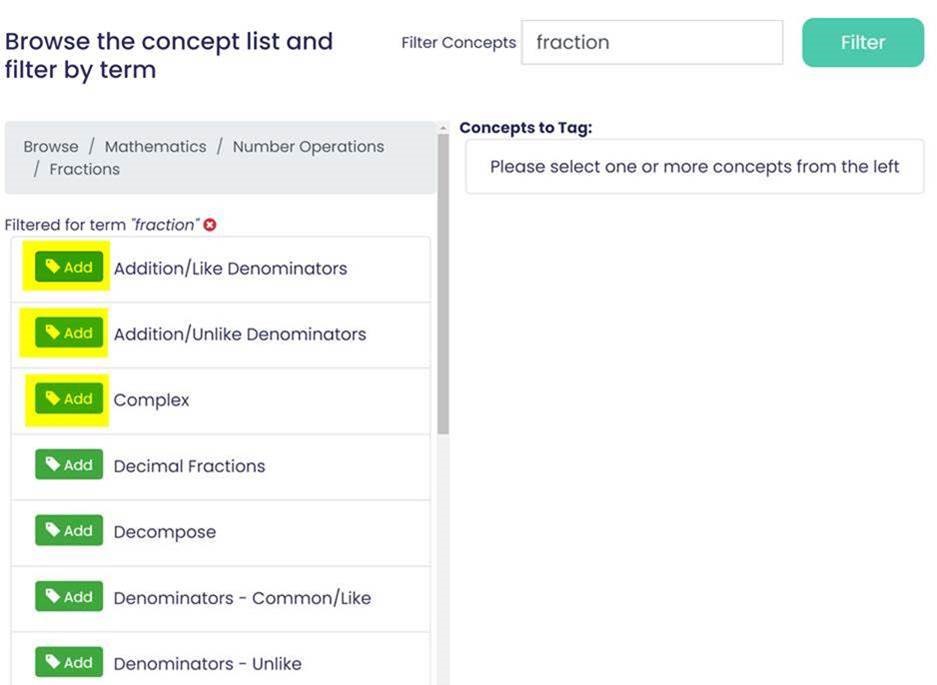
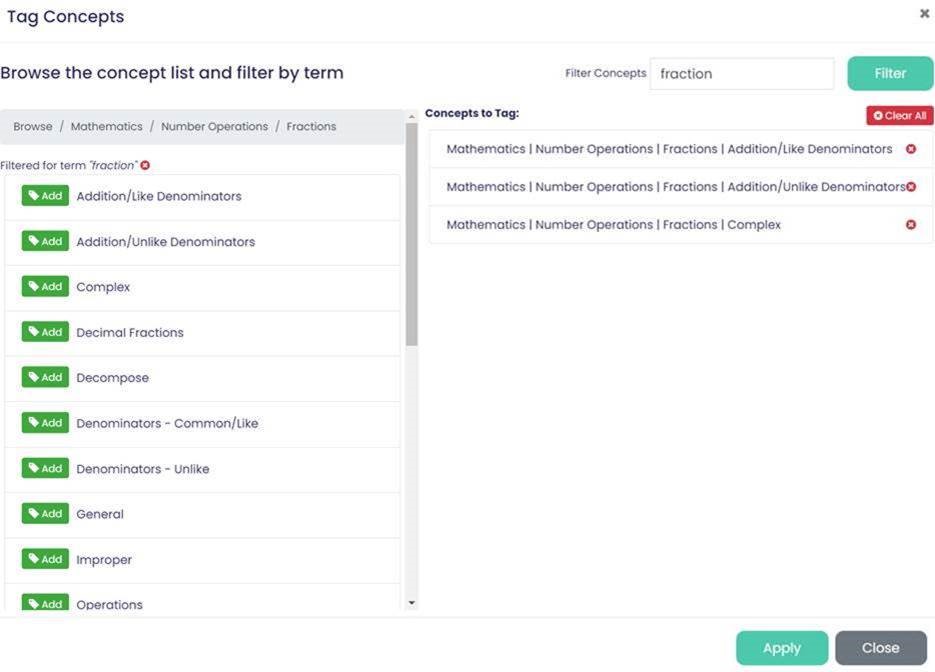
The concepts will populate in the Concepts to Tag window. You can remove concepts by clicking on the red X. To clear all Concepts, use the Clear All button.
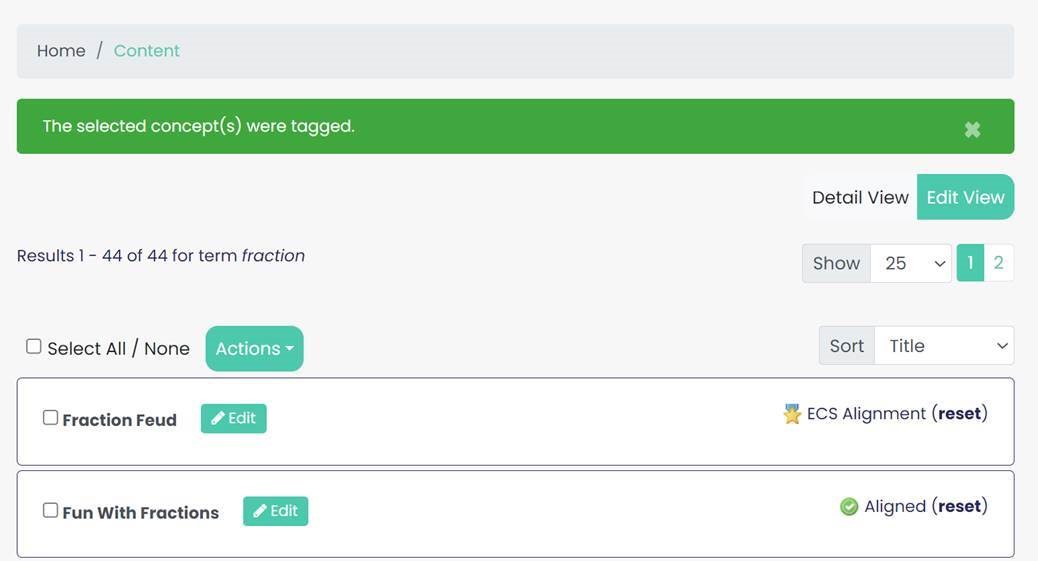
Once the needed Concepts are added, click Apply and a message will display noting that the selected Concept(s) were tagged to the content.
Content Editing
To edit the metadata for a resource, click on the status icon for the resource. You can also export all the resources in a Content Set to make multiple edits. See Exporting Content on the Dashboard tab.
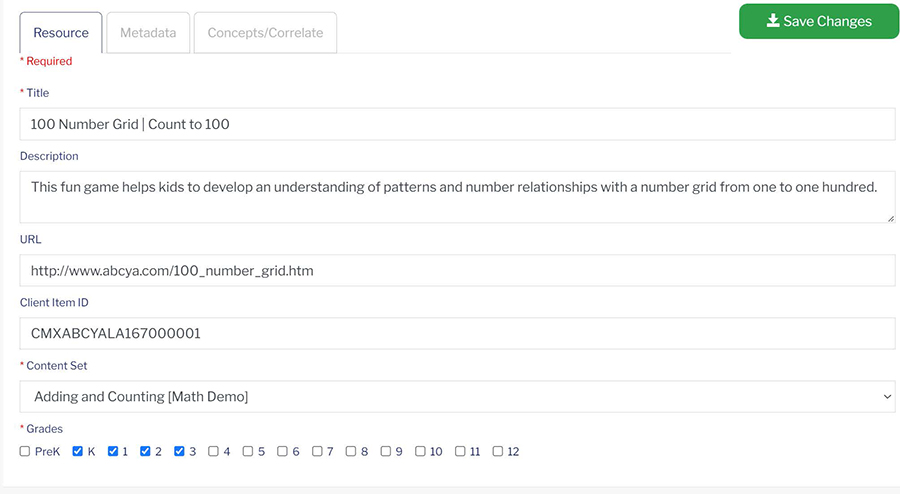
In this edit screen you can make edits to the metadata for a resource. Simply click in the field for Title, Description, or URL or Client Item ID to make needed edits.
Using the Content Set dropdown, you can move content to a different Content Set.
You can add or delete grades by clicking in the box next to the grades to be added/deleted. A checkmark in the box indicates the grade is included.
After all edits have been completed, click Save Changes to save the edits.
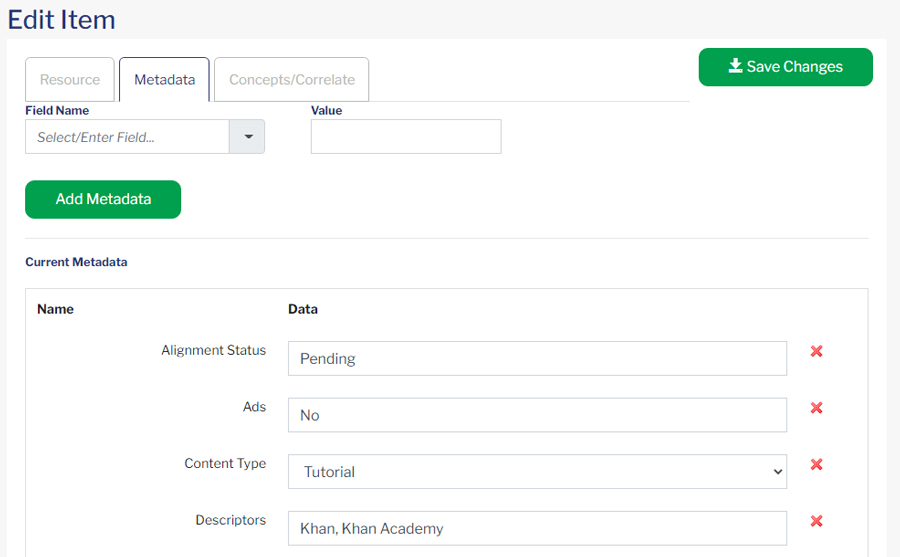
Metadata for the content item can be added/deleted using the Metadata tab.
There is a dropdown box for Field Name that includes popular metadata fields.
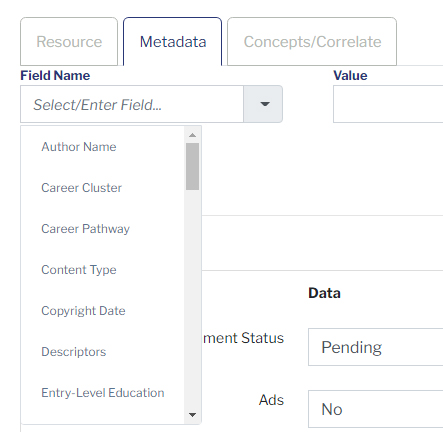
You can use this list or create a new metadata field of your own by simply typing in the Field Name box.

To delete any of the metadata fields, use the red X next to the field to be deleted.

Move, Copy, Mass Edit, Delete Content or Tag Concepts
You can Move, Copy, Mass Edit, Delete and Tag Concepts to multiple resources on the Content Display screen. To navigate to this location, click on the Align tab.
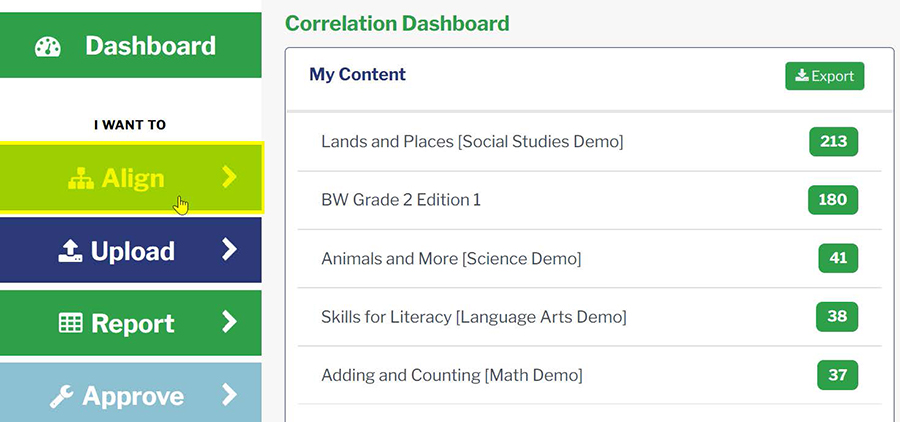
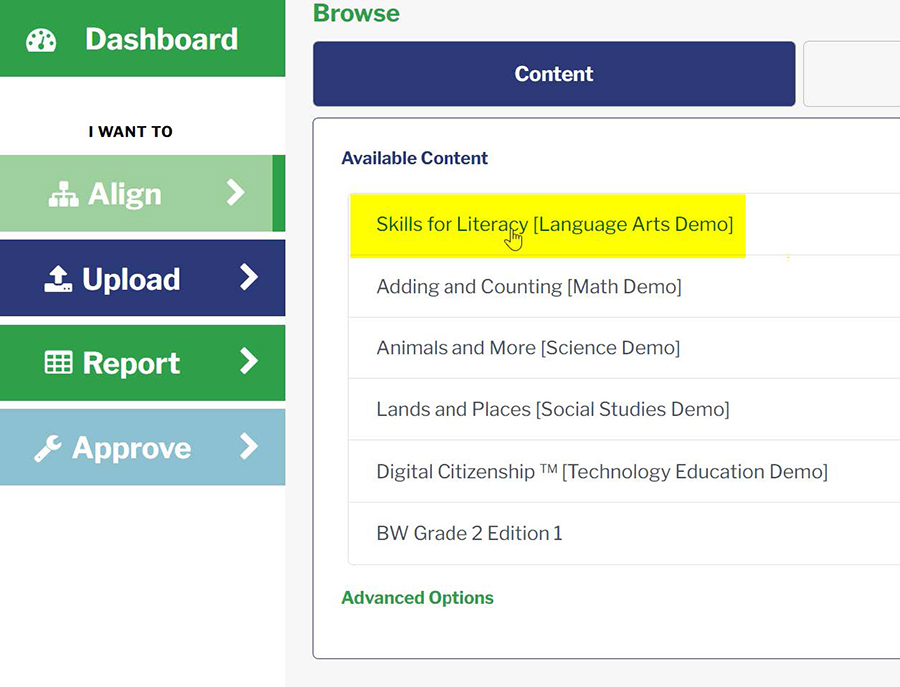
On the Browse screen, select the Content Set from which you would like to Move, Copy, Edit or Delete a resource.
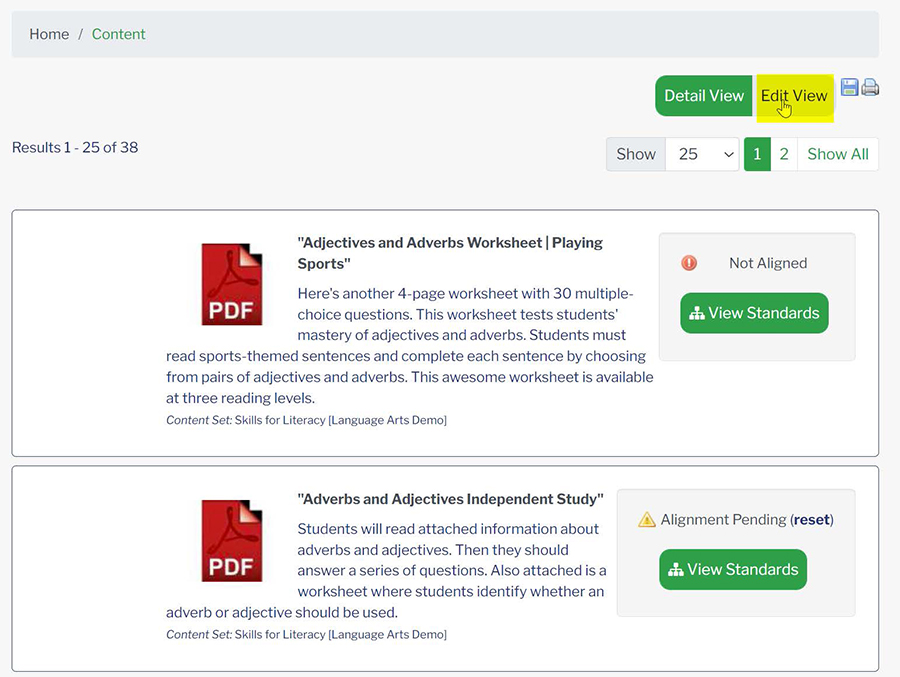
When the resource list displays, select Edit View.
Select the resource(s) that you would like to edit. Up to 100 resources can be edited at a time. To select up to 100 resources, use the dropdown to change 25 to 100.
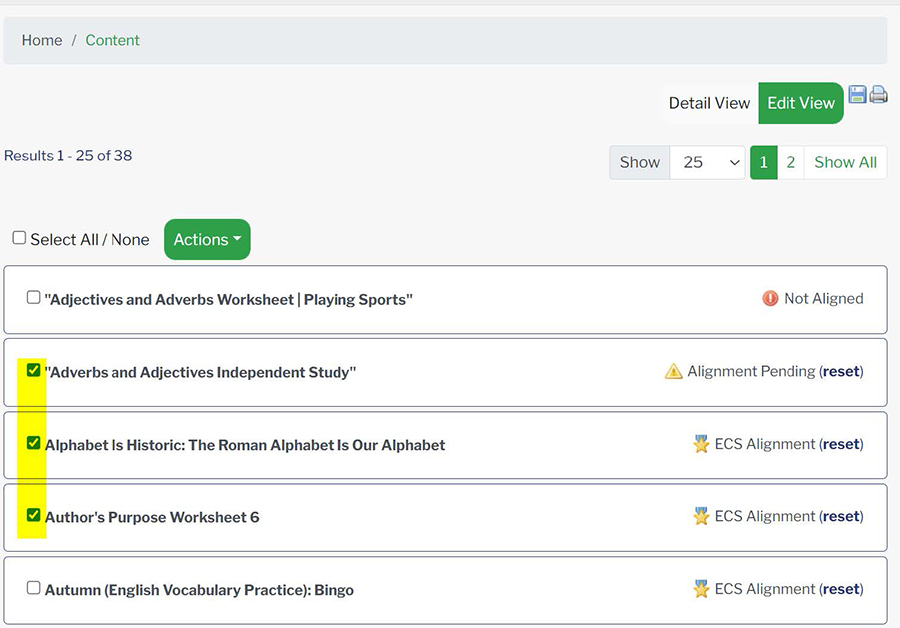
Once you select the resource(s) refer to the section below to Move, Copy, Edit Metadata or Delete a resource.
Moving Content
Use the Actions dropdown and select Move.
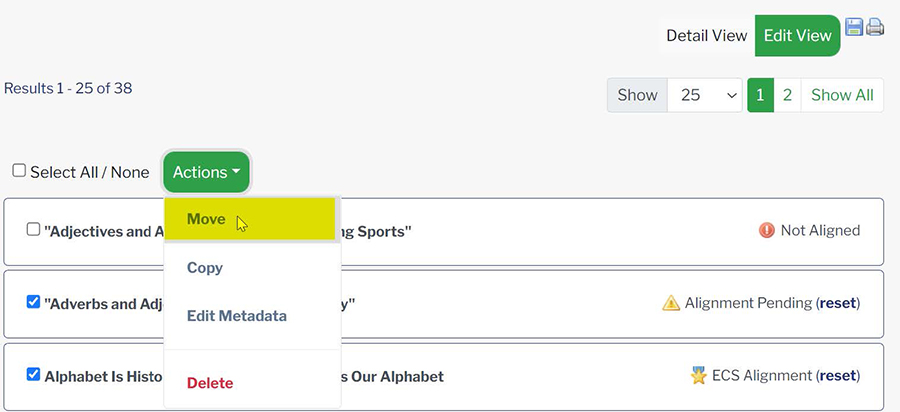
In the modal window that opens, choose the Content Set where you would like to Move the resource(s).

Once the Content Set is selected, click the Move button. The resource(s) will be moved to the selected Content Set along with any associated alignments.

Copying Content
Use the Actions dropdown and select Copy.
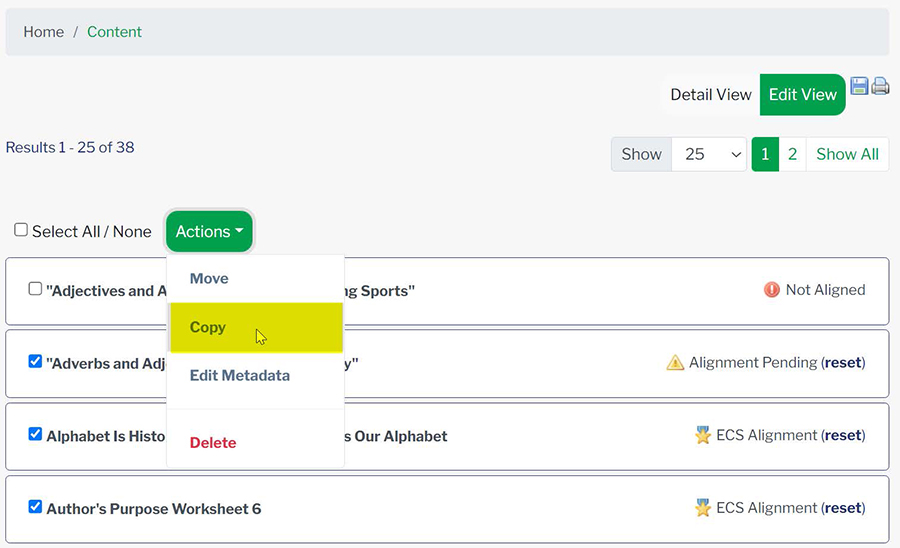
In the modal window that opens, choose the Content Set where you would like to Copy the resource(s).

Once the Content Set is selected, click the Copy button. The resource(s) will be copied to the selected Content Set along with any associated alignments.

Edit Metadata
Use the Actions dropdown and select Edit Metadata. To make edits to metadata for a resource(s), choose the field to edit from the dropdown.
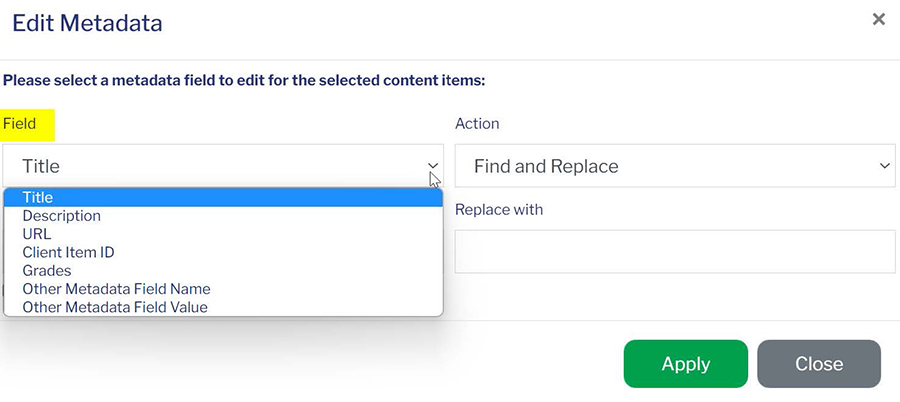
From the Action Dropdown, choose the desired Action.
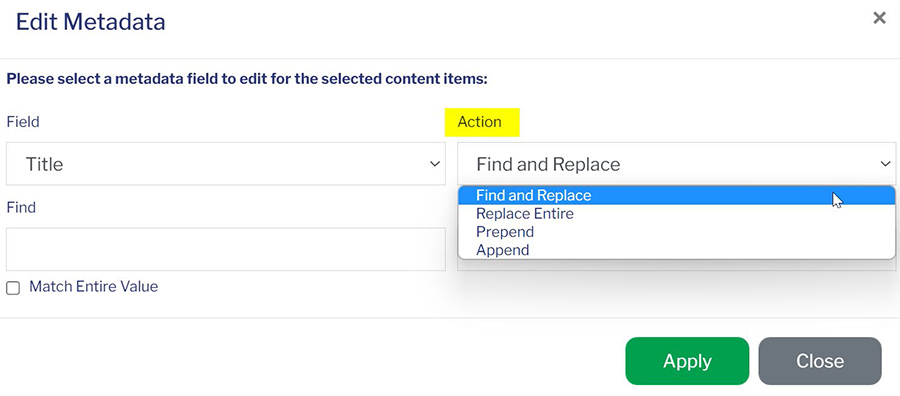
Enter a value in the fields that display. In the example below, choosing Match Entire Value will edit only those titles that exactly match “Vocabulary Practice”.
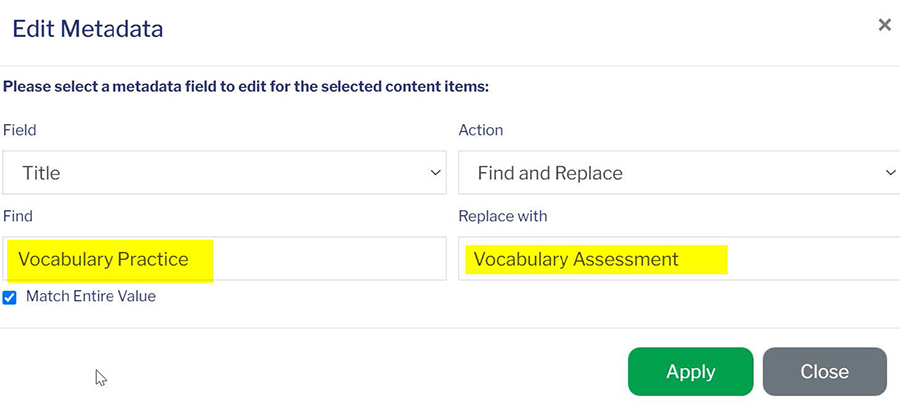
Click Apply to apply the changes.
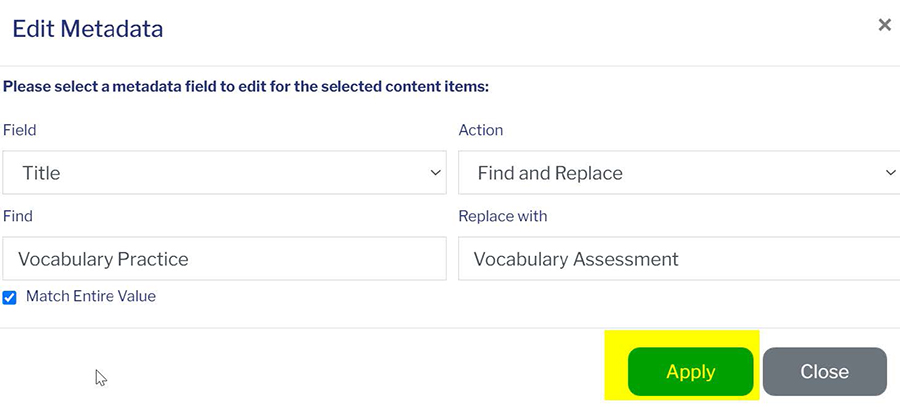
Deleting Content
Use the Actions dropdown and select Delete.
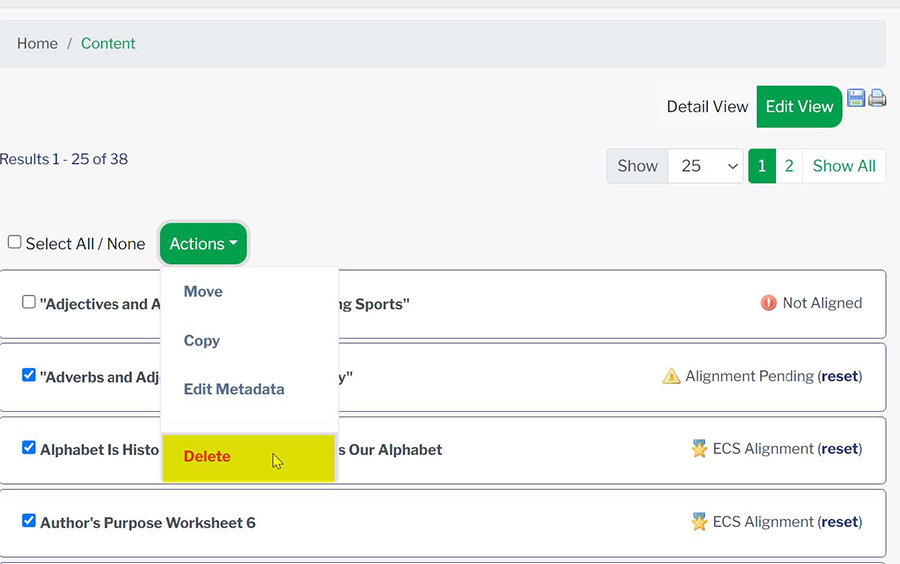
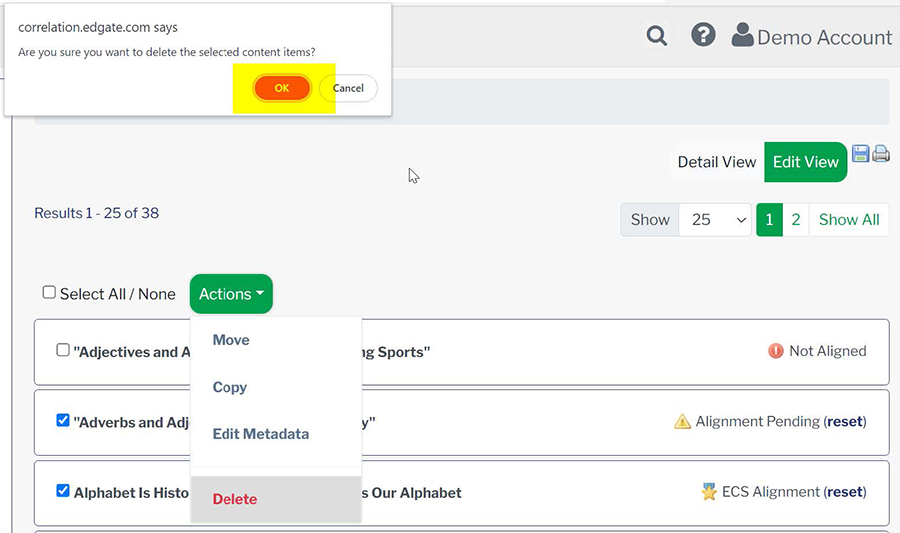
You will be prompted to confirm this action. Click OK and the resource(s) will be deleted.
Approve Content Alignments
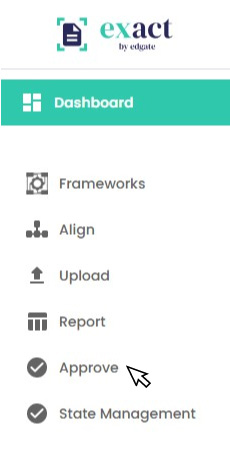
Approve content alignments from the Approve Link
Content Administrators and the Alignment Approval Process
After an alignment has been created, it is submitted to a Content Administrator for approval. The Content Administrator is an individual identified by your team who is responsible for finalizing the alignment process. The Content Administrator will have a separate login to the ExACT Alignment Tool. The Content Administrator account will have an additional link on the left navigation menu for approving aligned content.
When an item alignment is submitted for approval, the Content Administrator receives an e‑mail indicating items have been submitted for approval. When the item alignment has been approved, the submitter receives an e-mail notification that the item has been approved (or rejected).
Pending Alignments
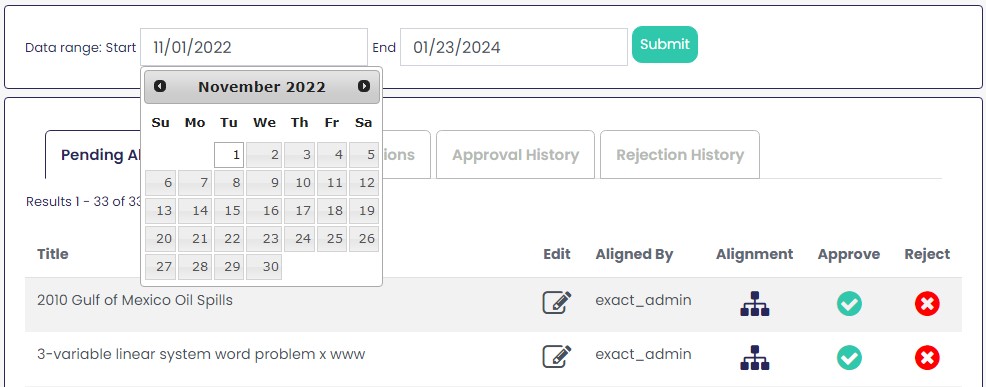
On the Content Administrator screen, the Pending Alignments will display. In addition to approving the aligned content, the Content Administrator can also edit the content and its alignments; contact the person who created the alignment; preview the pending alignment; and reject the alignment.

Dates can also be adjusted in the Date Range options
Editing Pending Alignments
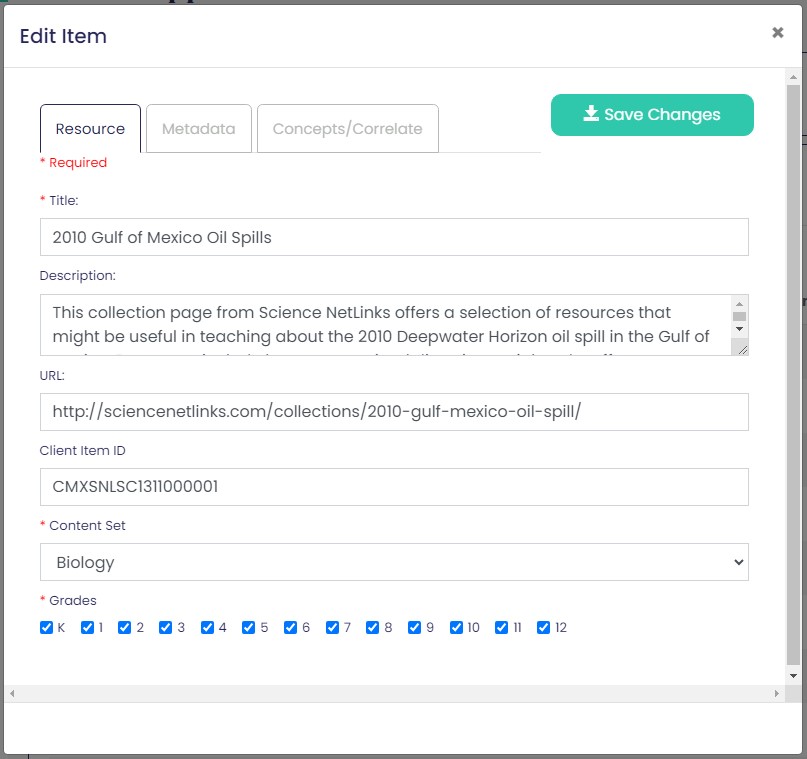
Using the Edit icon, the Content Administrator can edit both the content item and its alignments using the same tools used in the original alignment.

Contacting the Submitter of an Alignment
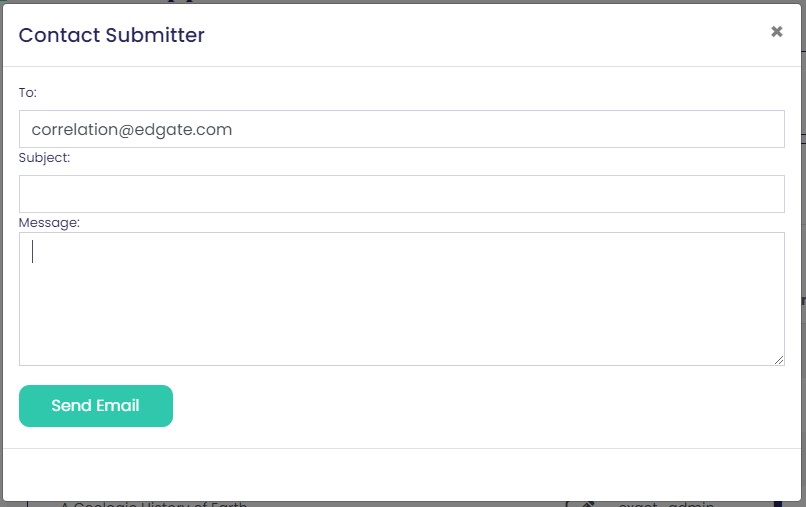
The Content Administrator can contact the person who created the alignment via e-mail using the link to the submitter’s e-mail address. This feature gives the Content Administrator the opportunity to ask clarifying questions prior to the approval.

A modal window will pop up with the submitter's information and an email form.
Previewing Pending Alignments
Using the Preview Alignment icon, the Content Administrator can preview the alignments that have been created for the content.

Using the dropdown menu, in this case, the Content Administrator can view the pending alignments to the standards included in the profile. The standards available to the Content Administrator are specified in the contract terms.
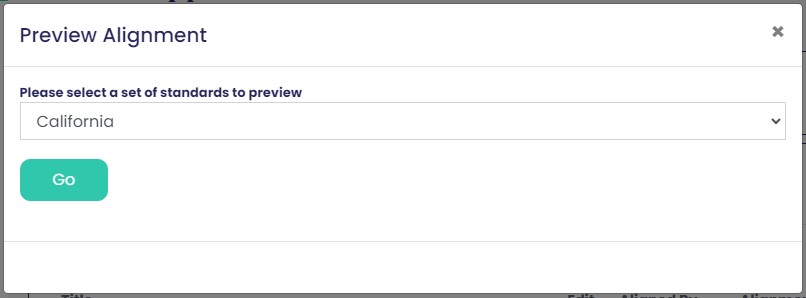
After choosing the desired standards, click “Go” and the aligned standards will display.
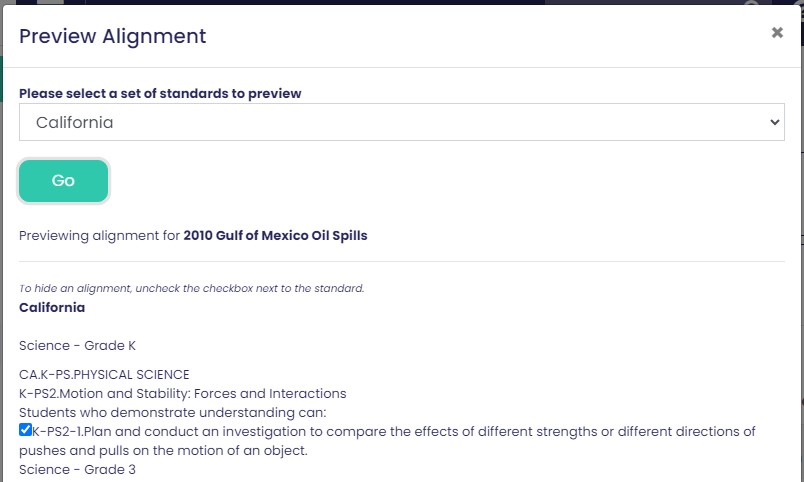
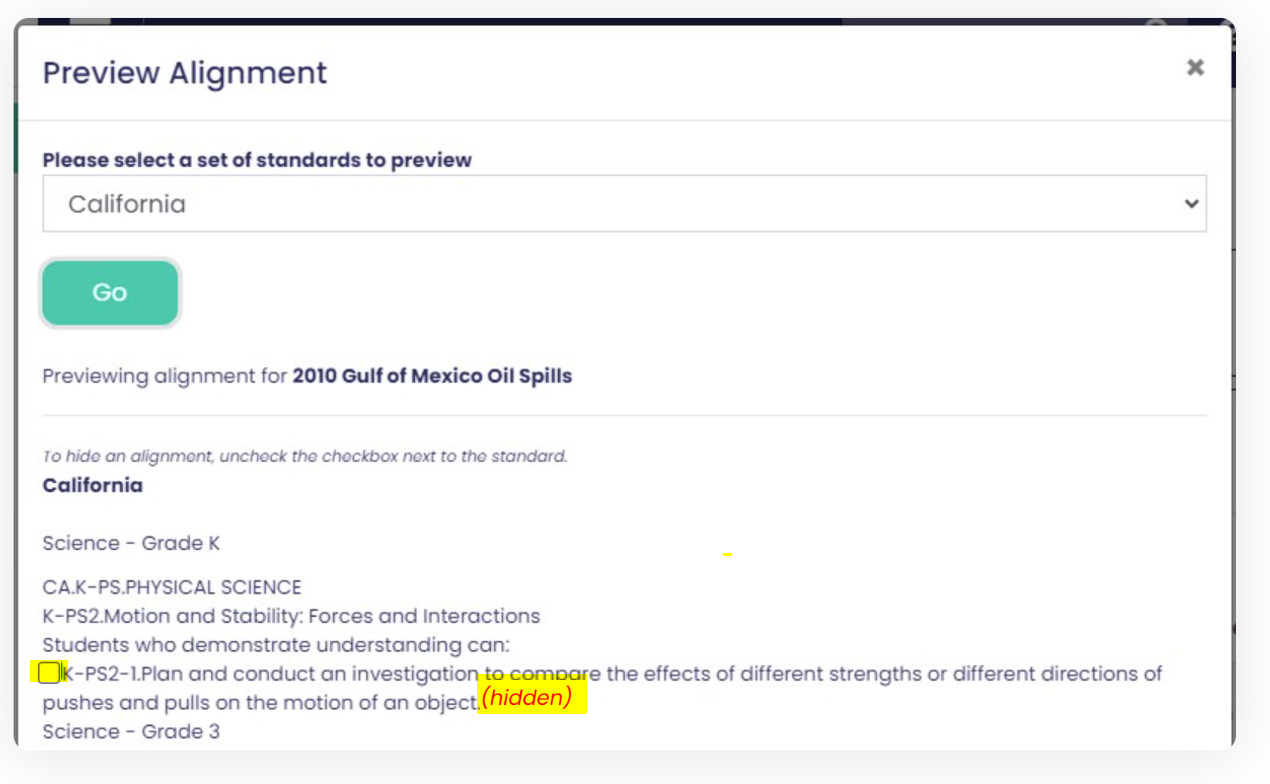
In the Approval process when viewing standards alignments, users can Hide alignments to individual standards by unchecking the box next to the respective alignment. When doing so, the alignment to the respective standards will no longer show in deliverables (is Hidden).
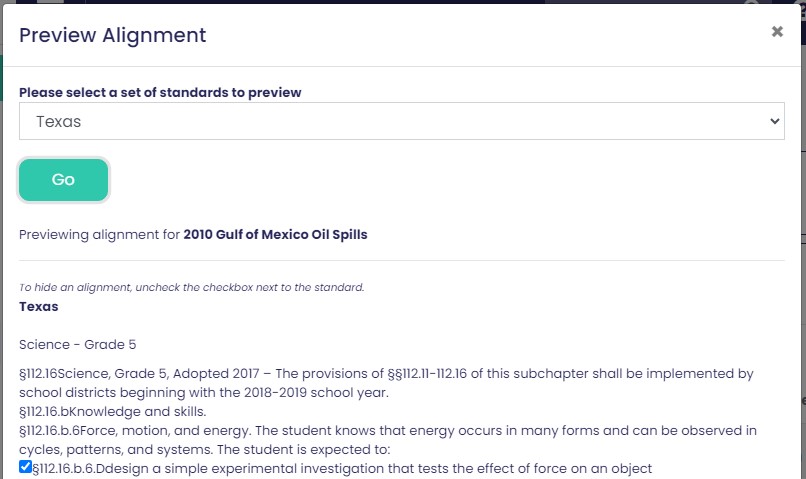
By making another selection and clicking “Go”, the Content Administrator can view pending alignments to other standards.
Approving Pending Alignments
To approve (or reject) a pending alignment, the Content Administrator simply clicks the respective icon.

Status of Alignments
Once Content Alignments have been approved, the status of the alignment is updated in the search screens. Using the Search link and recreating the initial search on the Content List tab, the alignment status of “ActItOut!” now reads Aligned.

Upload Content
Submit a Resource or Upload a Document from the Upload Link
Submit a Resource
This feature allows the user to submit and align an individual content item.
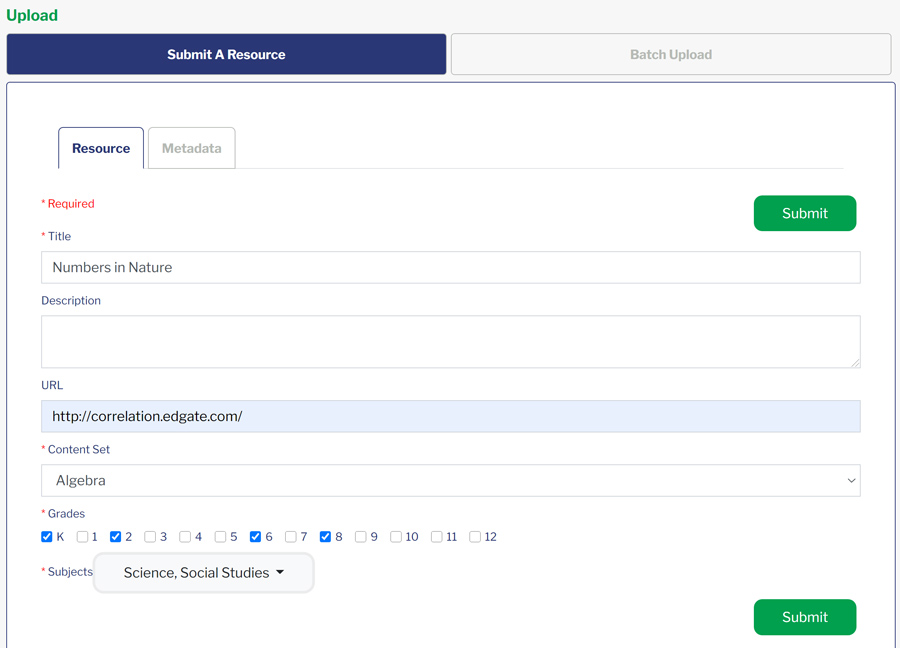
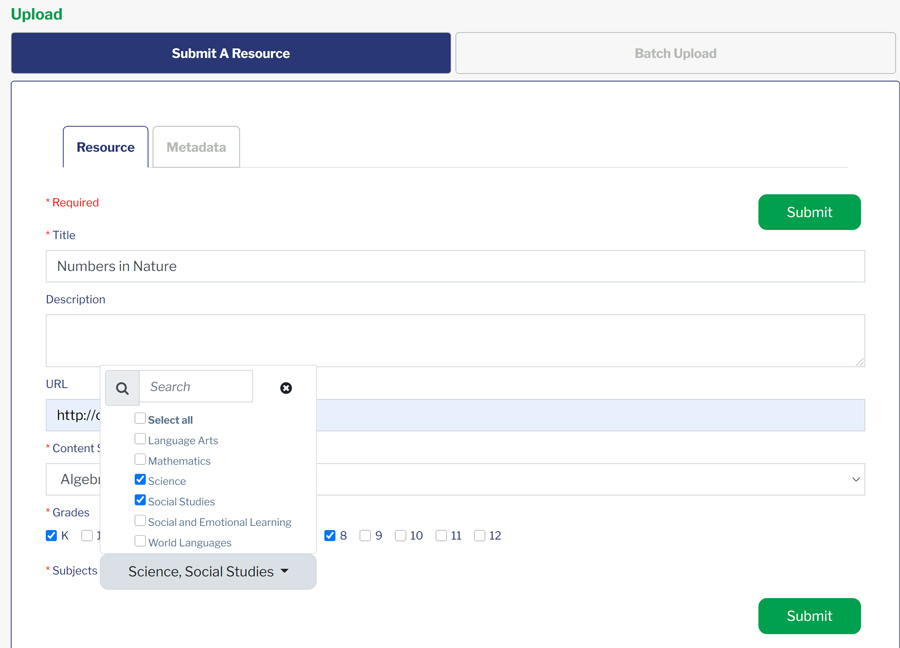
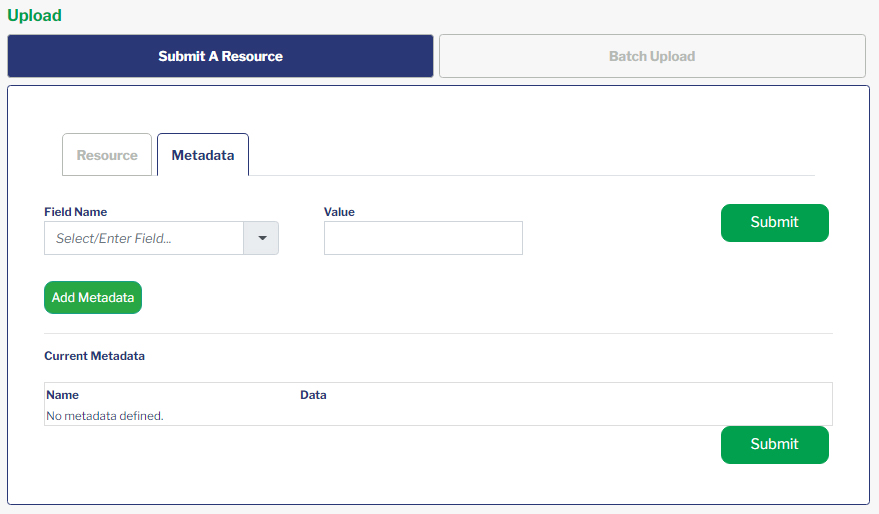
On the Resource tab, input the Resource title, description (optional), url (optional). Select the Content Set to which the resource should be added. Select the grade(s) for the resource and the subject. You can also use the Metadata tab to include metadata for the resource. Once all the information is input, click Submit. The resource will then be available in the list of resources in the chosen content set.
Where Do I View Links that I have Submitted?
A user has access to review, modify or delete any lessons that he/she has submitted to the system. The list of submitted content is viewable as part of the User Navigation: My Submitted Items.
Any items that have been submitted by you will display in an alphabetical list by title under “My Submitted Items”. You may edit the item by clicking on the paper icon to the right of the title. If you change any field and click Submit – when refreshing the screen a message will display that reads “This item is pending approval.”
Any item that you have submitted will identify the day and time when you submitted to the system.

Any item that you have submitted will identify the day and time when you submitted to the system.
All items that you submit can be viewed, aligned and edited by other users in the ExACT Alignment Tool profile.
Batch Uploading Content in ExACT
Using the Upload Link, users can upload content in batches. There are three required fields for batch uploading content in ExACT: Subject, Grade, and Title. Other information can be included as well.
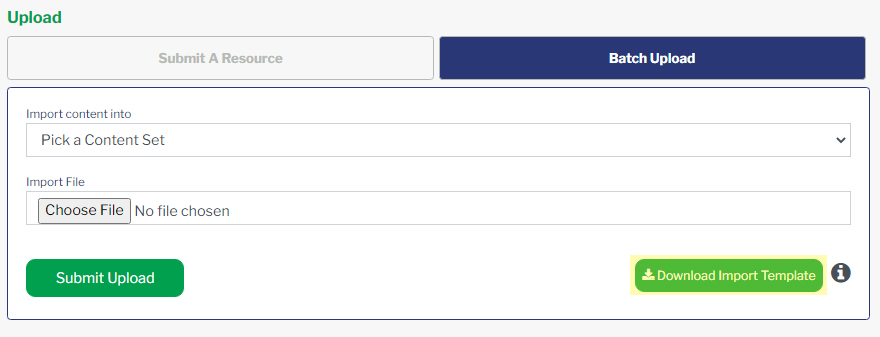
Download a copy of the Import Template
You can export a copy of the Import Template by Clicking Download Import Template on the Batch Upload tab.
Import Template Information
Clicking on the information icon opens this link for instructions for populating information in the Import Template.
Import Template
The template is an Excel file with specific headers for six columns. When uploading the template, it must contain these six fields regardless if all are populated.
- Learning Object ID (Client provided unique ID also referred to as ClientID) – Required Field for Importing Alignments – when populating this field, use product IDs or other unique identifiers that your company uses to reference the resource. Note: Learning Object IDs are case sensitive. When Batch Uploading for the purpose of Importing Alignments the case (upper/lower) of the Learning Object IDs loaded in the Content Set must match the case of the Learning Object IDs in the Import Spreadsheet.
- Subject (see Subject section below) – Required field
- Grade (see Grade section below) – Required field
- Title – Required field – input a unique title for resource. Titles can be up to 250 characters in length.
- Description – Optional field – A description can be included for each resource up to 2,000 characters in length.
- URL – Optional field – URLs for a specific resource or a URL to a generic marketing page can be used for the URL up to 250 characters in length.
- Metadata – optional fields (see Metadata section below)
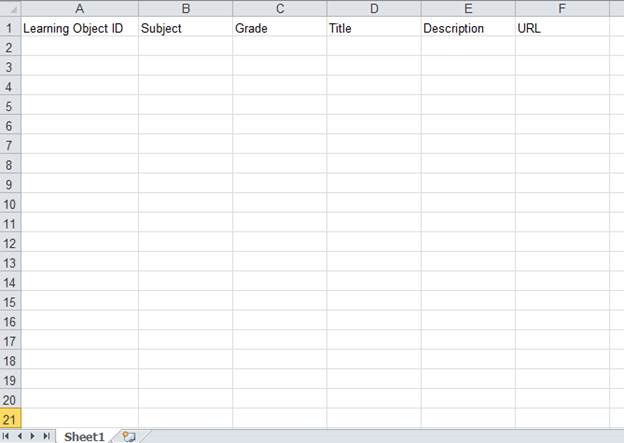
Import Template example.

Subjects
When including a subject(s) for a resource, choose from the list below. Use the same spelling and case per below. For batch uploading resources, if including multiple subjects, separate the subjects with commas. Note: you should choose only subjects that are included in your ExACT profile. If you use a subject that is not included in your profile, the system will reject the load.
- Arts Education
- Career Development
- Early Childhood Education
- English Language Learners
- Financial Literacy
- Health and PE
- Language Arts
- Library Media
- Mathematics
- Science
- Social and Emotional Learning
- Social Studies
- Technology Education
- World Languages
Grade
Use the standard alpha or numeric references to US grades. PreK = prekindergarten, K = kindergarten, 1 = grade 1, etc. See detailed list of the grade values below which includes international grades.
When including multiple grades, separate the grades with commas. See examples in the screenshot below.
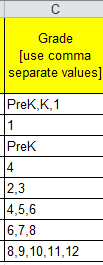
Detailed list of grades:
Use Grade on the left to represent value on the right.
US Grades PreK | Pre K
- K | K
- 1 | 1
- 2 | 2
- 3 | 3
- 4 | 4
- 5 | 5
- 6 | 6
- 7 | 7
- 8 | 8
- 9 | 9
- 10 | 10
- 11 | 11
- 12 | 12
UK Key Stages KS1 | Key Stage 1
- KS2 | Key Stage 2
- KS3 | Key Stage 3
- KS4 | Key Stage 4
Early Childhood Education
- EC1 | Ages Birth to 12 months
- EC2 | Ages 13 to 24 months
- EC3 | Ages 25 to 36 months
- EC | Ages 3-5
College CU | Undergraduate
- CG | Graduate
Professional Development
- P | Professional
New Zealand Years
- Y1 | Year 1
- Y2 | Year 2
- Y3 | Year 3
- Y4 | Year 4
- Y5 | Year 5
- Y6 | Year 6
- Y7 | Year 7
- Y8 | Year 8
- Y9 | Year 9
- Y10 | Year 10
- Y11 | Year 11
- Y12 | Year 12
- Y13 | Year 13
Adult Learning
- A | Adult Learning
Metadata
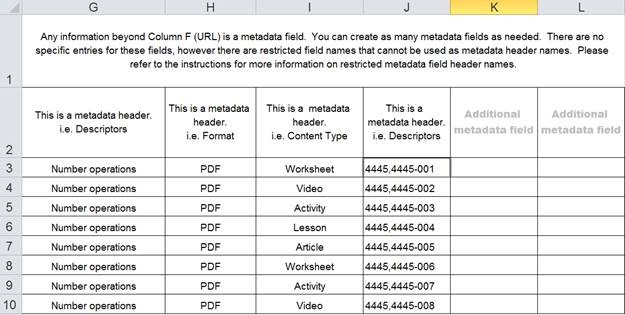
Columns beyond the URL (beginning at column G) can be used for including metadata. See examples in the screenshot below. Each field should be labeled with a header name. Although there are no specific rules for header names for metadata fields, there are some restrictions. Here’s a list of restricted header names: Title, Description, URL, Grade. Grades. Subject. Subjects, Keyword, LOID, UUID, ID, and Unique ID.
When inputting values in the metadata field use a comma to separate multiple values.
Batch Uploading
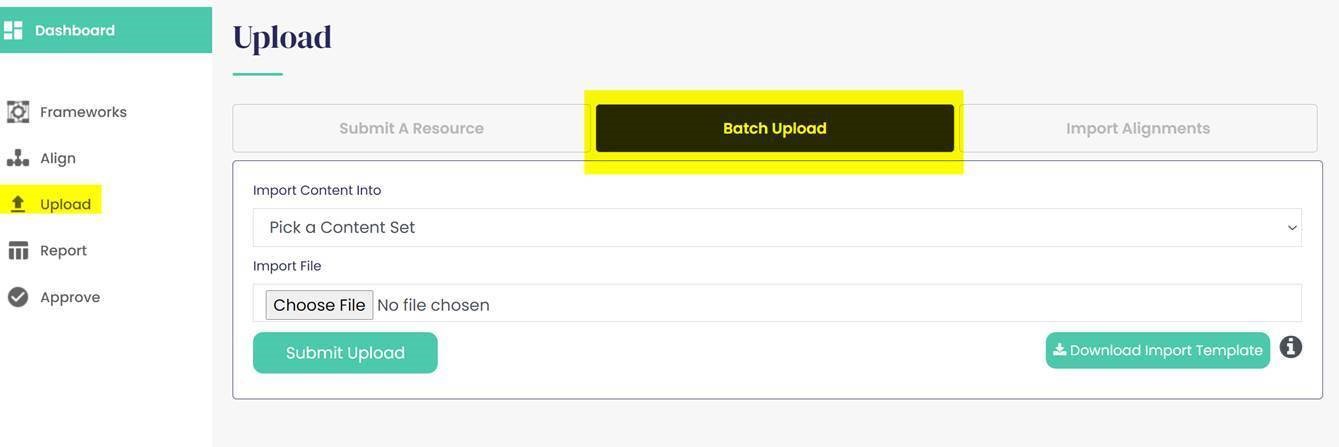
Once all entries have been made in the Import Template, click on Upload in the left hand navigation. On the Batch Upload tab, use the Import Content Into dropdown to select the Content Set to where the resources should be loaded.
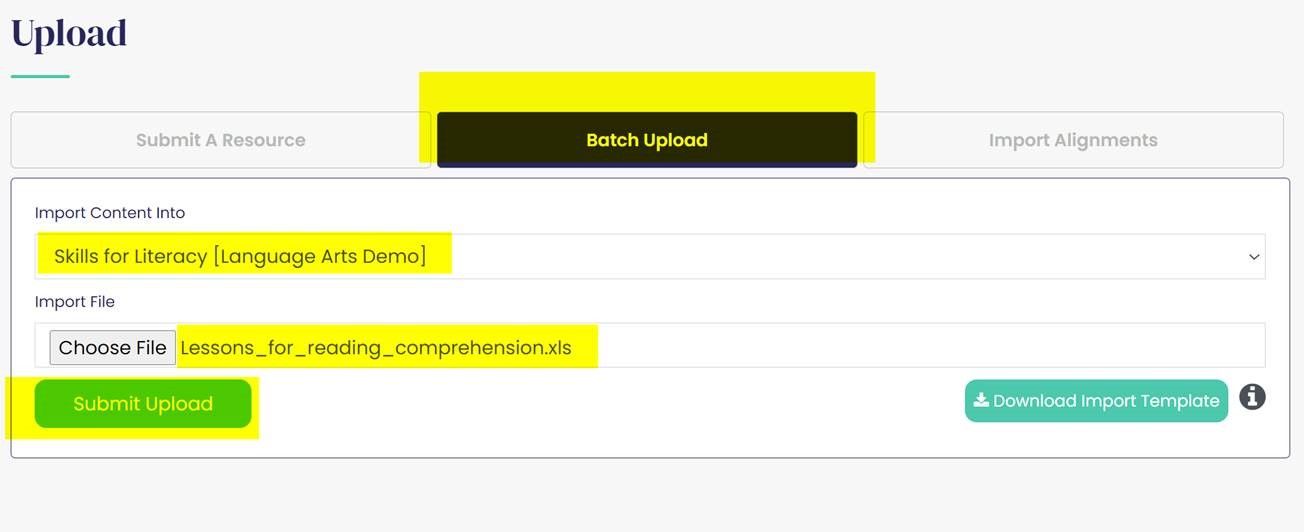
Click the Choose File button to select the file for uploading. Then click Submit Upload.
There will be a validation process and providing the needed fields are populated, select Confirm to upload the metadata.
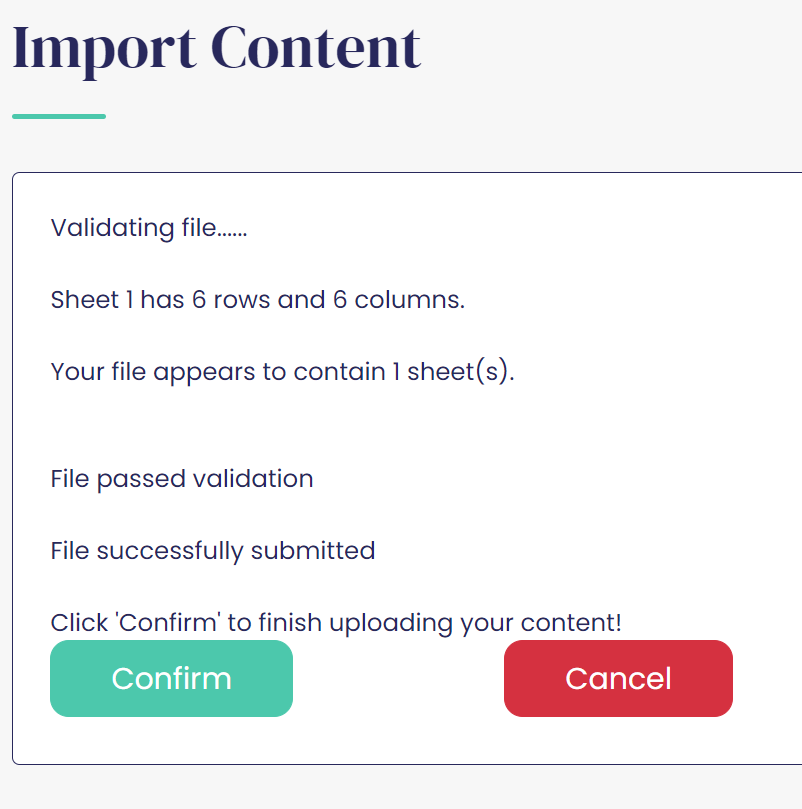
An Import Content confirmation page will display.
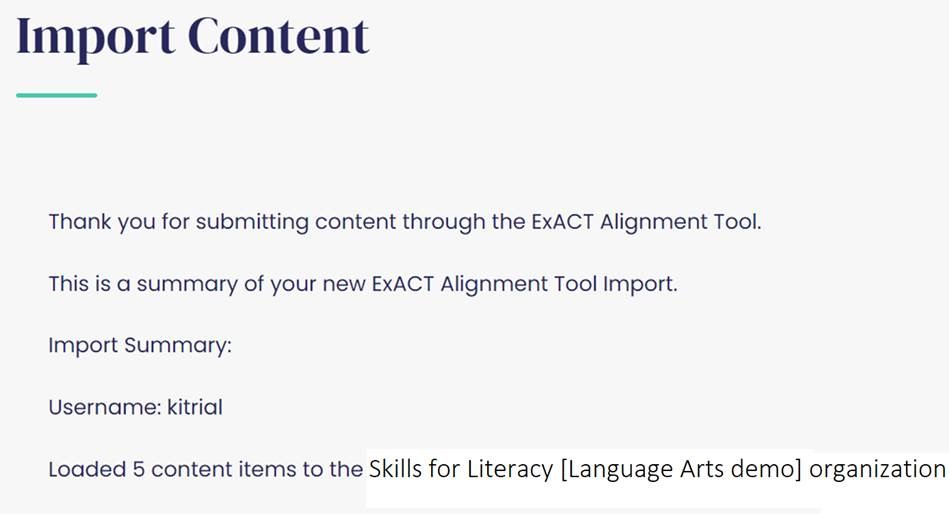
Once the resource metadata is loaded, to create alignments for the newly upload resources, on the left navigation click Align and follow the instructions on this link.
Exporting Standards
Export Standards is a premium feature available in ExACT. If your company has contracted for the Export Standards service you can export the standard sets that are included in your profile.
To export standards, click on the Export icon next to the standard set you want to export.
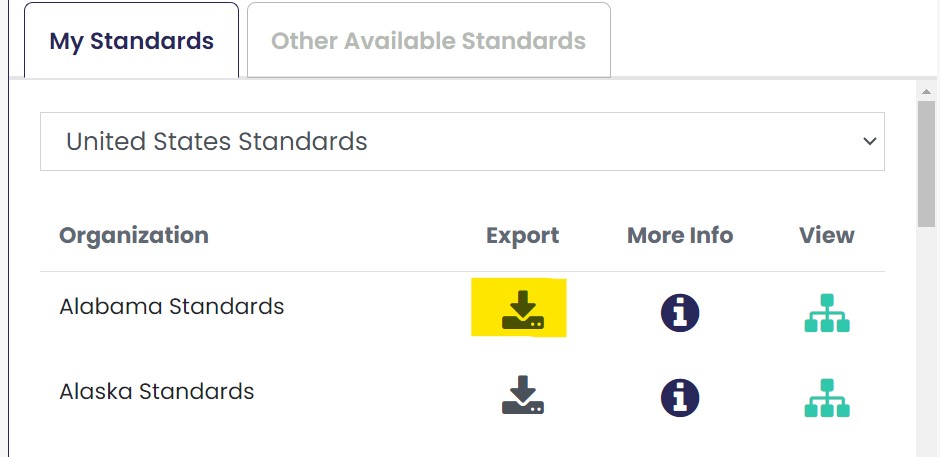
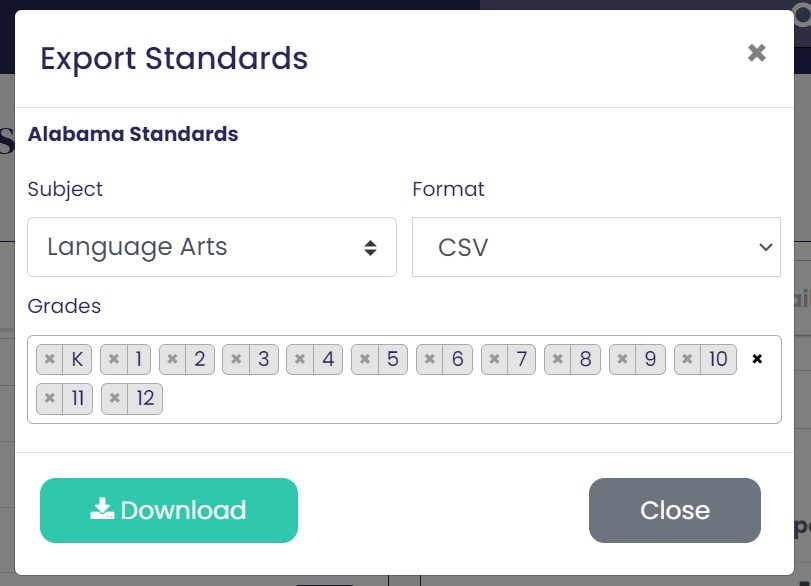
A modal window will display.
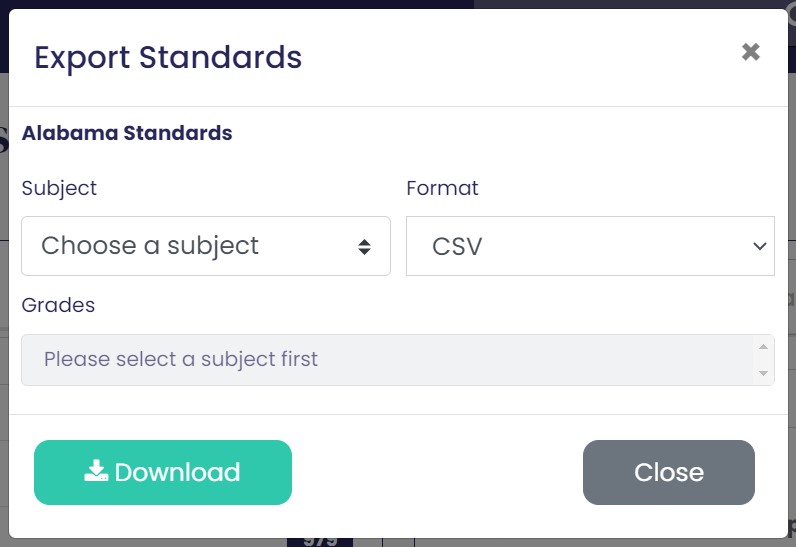
Choose the subject and grade(s) you wish to export. All grades are selected by default. De-select unwanted grades by clicking on the X next to the grade.
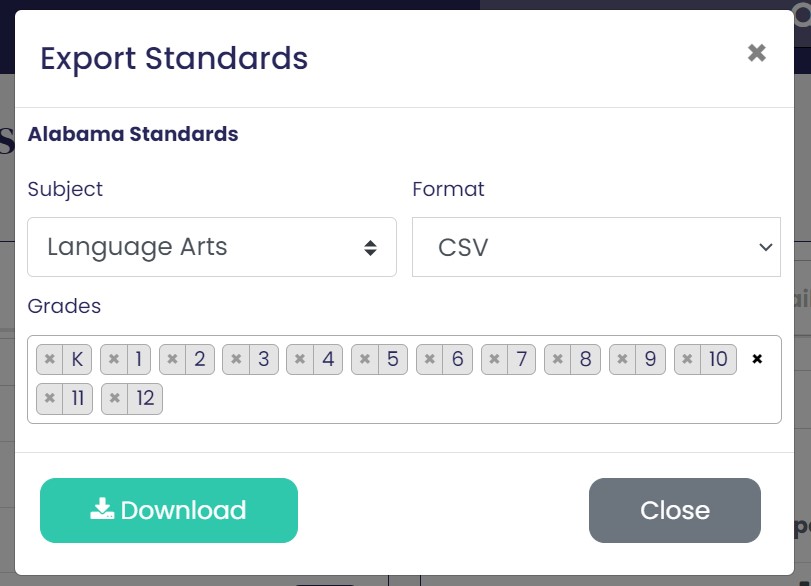
Choose the file format: CSV or JSON.
Click Download.
Once downloaded, the CSV file can be saved as an Excel file by choosing File - Save As and changing the file type to Excel Workbook.

CASE IDs – If your company subscribes to Standards Export, you can also request access to the 1EdTech CASE IDs be added to the Standards Export. The 1EdTech CASE IDs provide interoperability across different learning management systems and can easily be integrated into third party platforms
Running Reports in ExACT
Alignment Reports
To run alignment reports, use the left hand side navigation and choose Report. Running a Content Unit report allows you to see resources with the respective standards alignments listed underneath each resource. A standards report will list the standards with the aligned resources listed underneath each standard. As a general rule, the more criteria chosen, the longer it will take to run the report.
Content Unit Reports
To run a Content Unit report, select Basic Content Report.
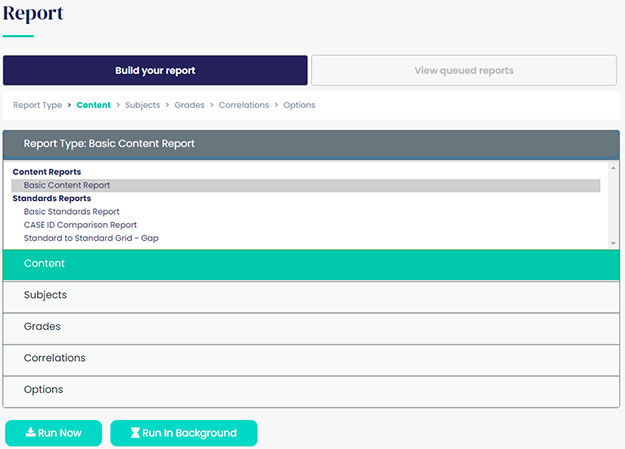
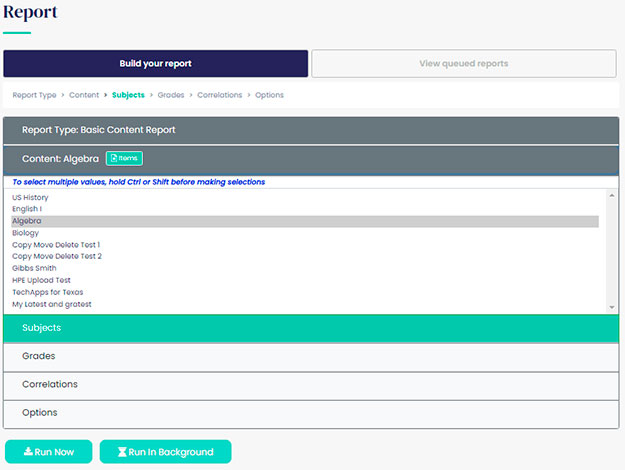
The next selection, Content, will display. This will be a list of the Content Sets in the your company’s ExACT profile. When choosing a Content Set the Subjects list will display. If you would like to choose more than one Content Set, click on Content and use the Shift or Control key to choose additional Content sets. Note: by default all resources in the Content Set will be included in the search criteria. To generate a Content report for one or more resources please see the Item Reporting section below.
Item Reporting
To create a Content Report for a single resource or specific resources, select the Items button.
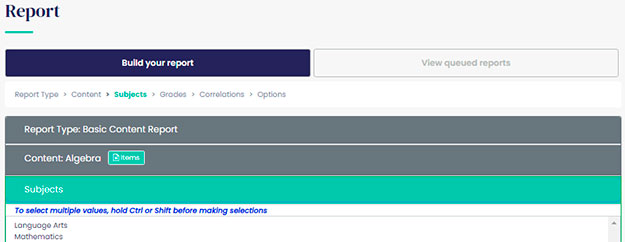
This will open a separate window.
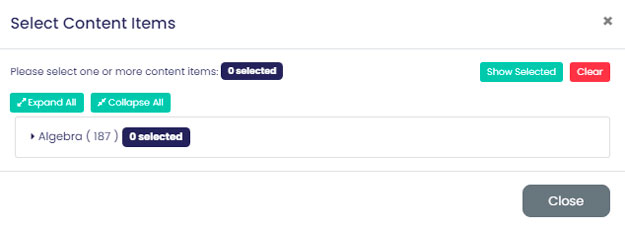
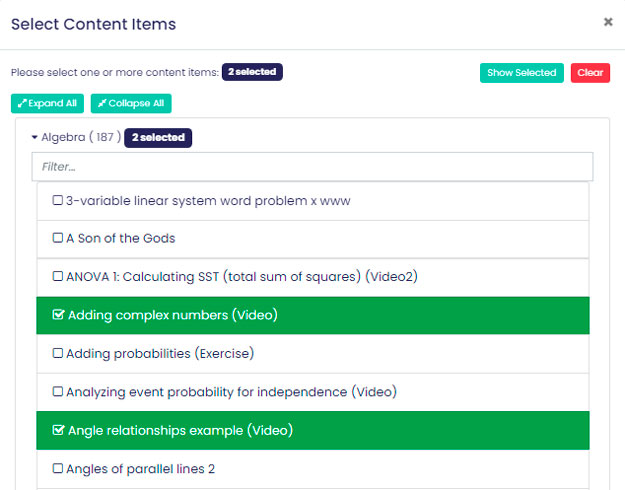
Choose Expand All. The list of resources in the selected Content Set will display. You can select titles in the list or input search terms in the Filter to locate specific titles. Once selected, the count will display for the number of items selected. Close the window by clicking Close in the bottom left hand corner or by clicking on the X in the upper right hand corner.
Select the subject for the report.
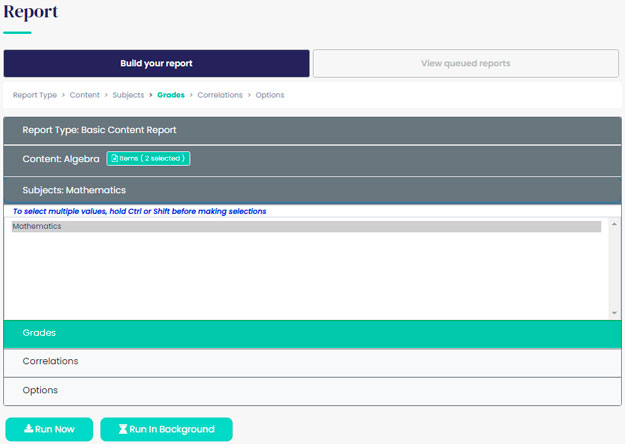
Grades is the next selection criteria and as above when the state list appears under Correlations, you can select grades again to add other grades.
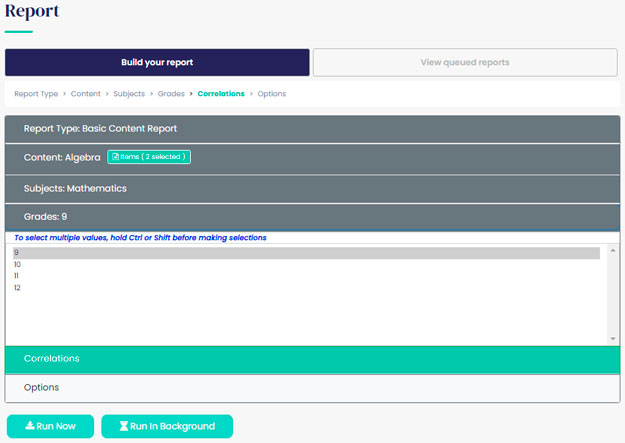
In the Correlations list, choose the state for the report. Again multiple states can be chosen by selecting Correlations to add other states.
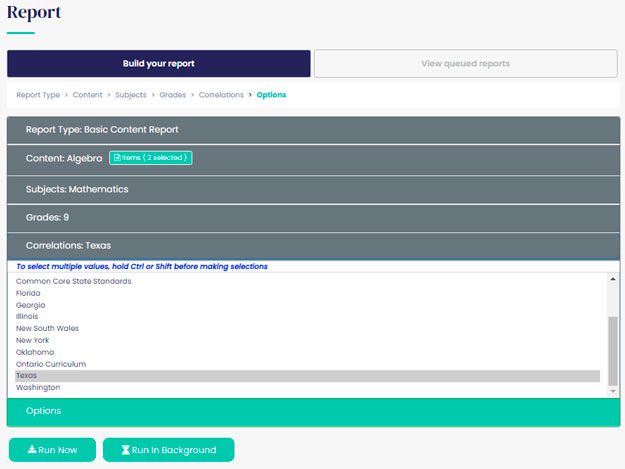
Content Report Options
In the Options section, you can choose from Display options for inclusion in the report.
Gap is a premium service. If your company has contracted for gap services, you will have the options to select Show All, Correlated Only, or Uncorrelated Only and you can also include Correlation Statistics. If you would like more information on gap services, please contact one of our account representatives.
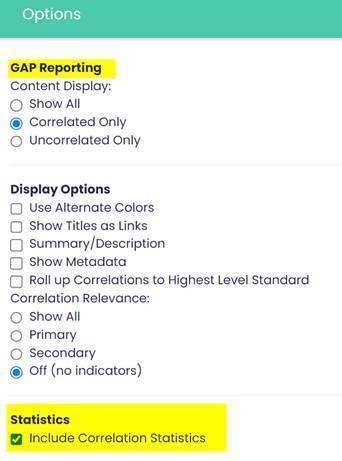
With gap services, you can also get Statistics in the report by checking the Include Correlation Statistics box.
Display Options
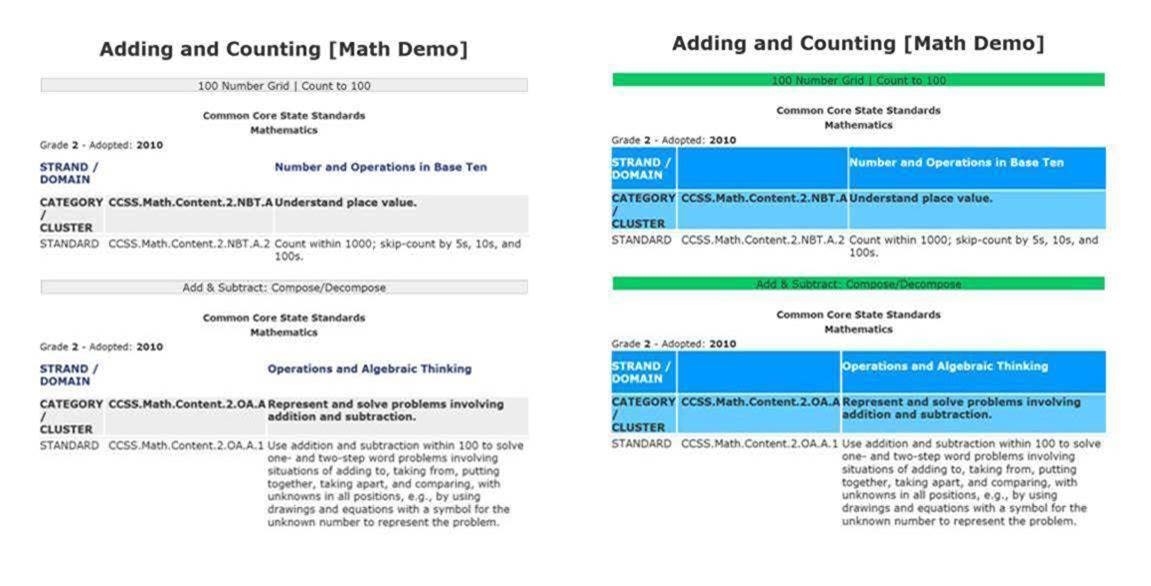
Use Alternate Colors – when selecting this feature the different levels will display in varying colors.
Show Titles as Links
When Content is loaded into the repository, if urls are included in the metadata, using this option will result in the titles displaying as url links in the report. When clicking on the title’s url, the link will open in a browser window.
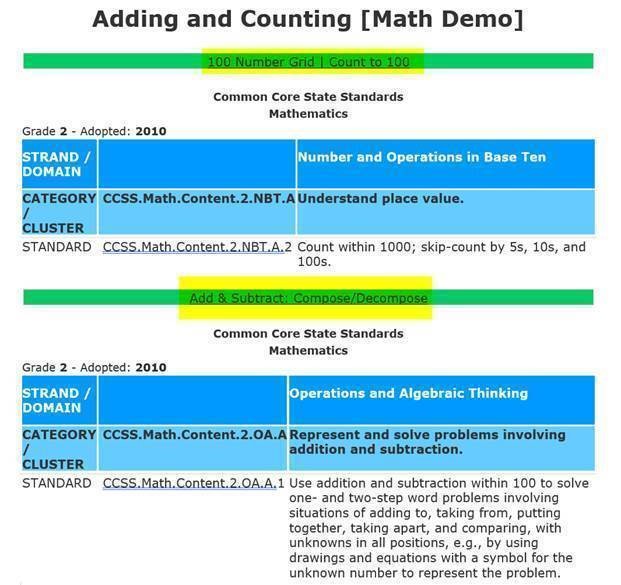
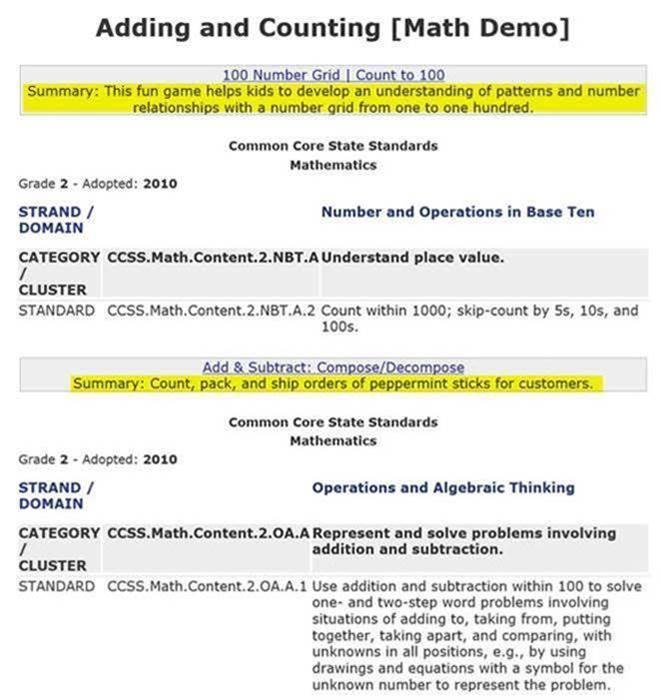
Summary/Description
When selecting this option, the report will include the summary/description for each resource. Note: for this Option, resource descriptions must be included in the repository.
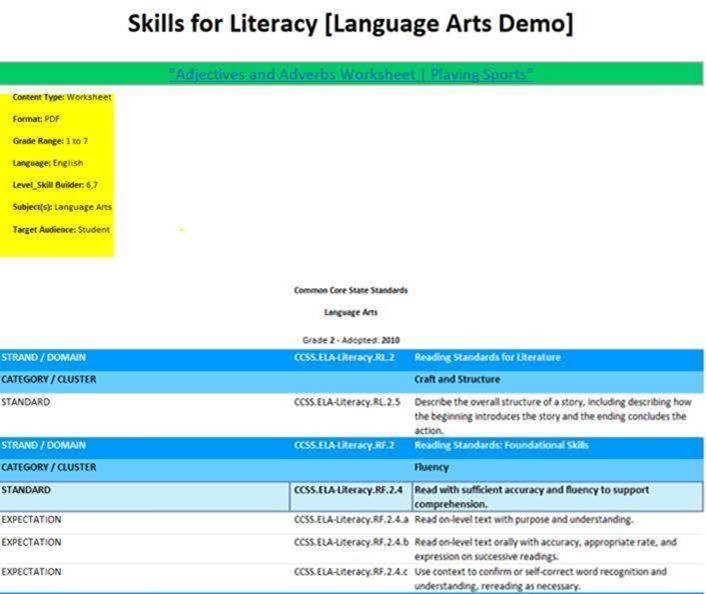
Show Metadata
For resources that are loaded in the repository with metadata included, the metadata will list in the report.
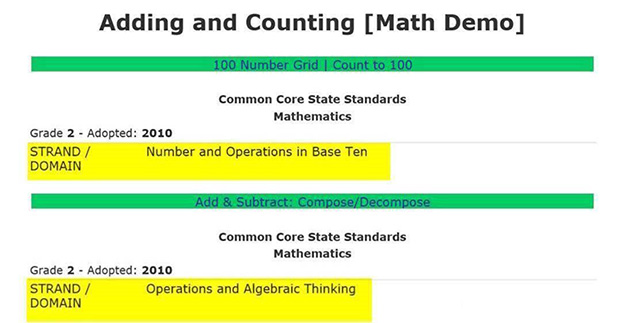
Roll up correlations to Highest Level Standard
Using this option, rather than displaying alignments at the lowest level standard, the alignments will display at the highest level of the standard.
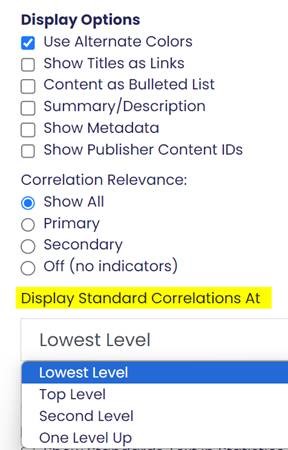
Correlation Relevance
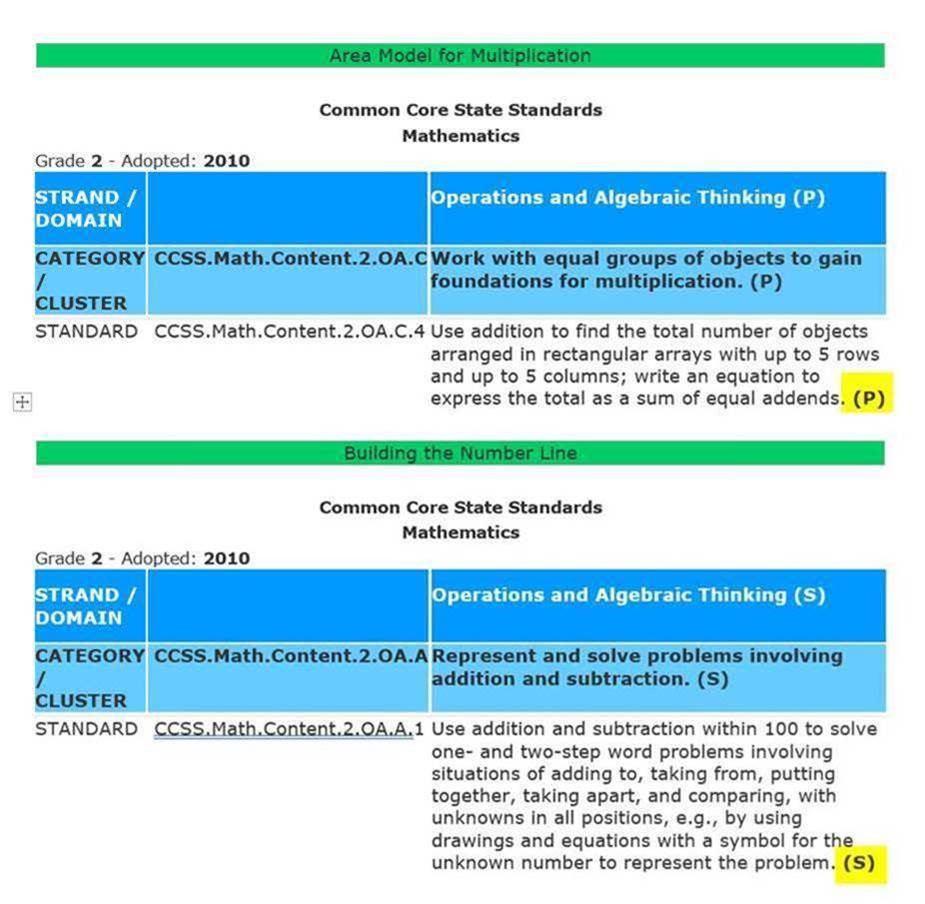
Correlation Relevance is a premium service, and is a way of identifying the primary and ancillary alignments for content. When content is aligned to standards, very often there are primary or main concepts that an item addresses. These would be considered primary concepts and will result in Primary (P) alignments. For other concepts mentioned in the content, these may be more of ancillary or secondary concepts and therefore would will result in Secondary (S) alignments. If your company subscribes to Correlation Relevance, you can choose to run a report to see the Primary (most relevant) alignments by choosing Primary. Other options are Show All (both Primary and Secondary) or Secondary. Note, the default for Correlation Relevance is Off and does not display until a Relevance option is enabled.
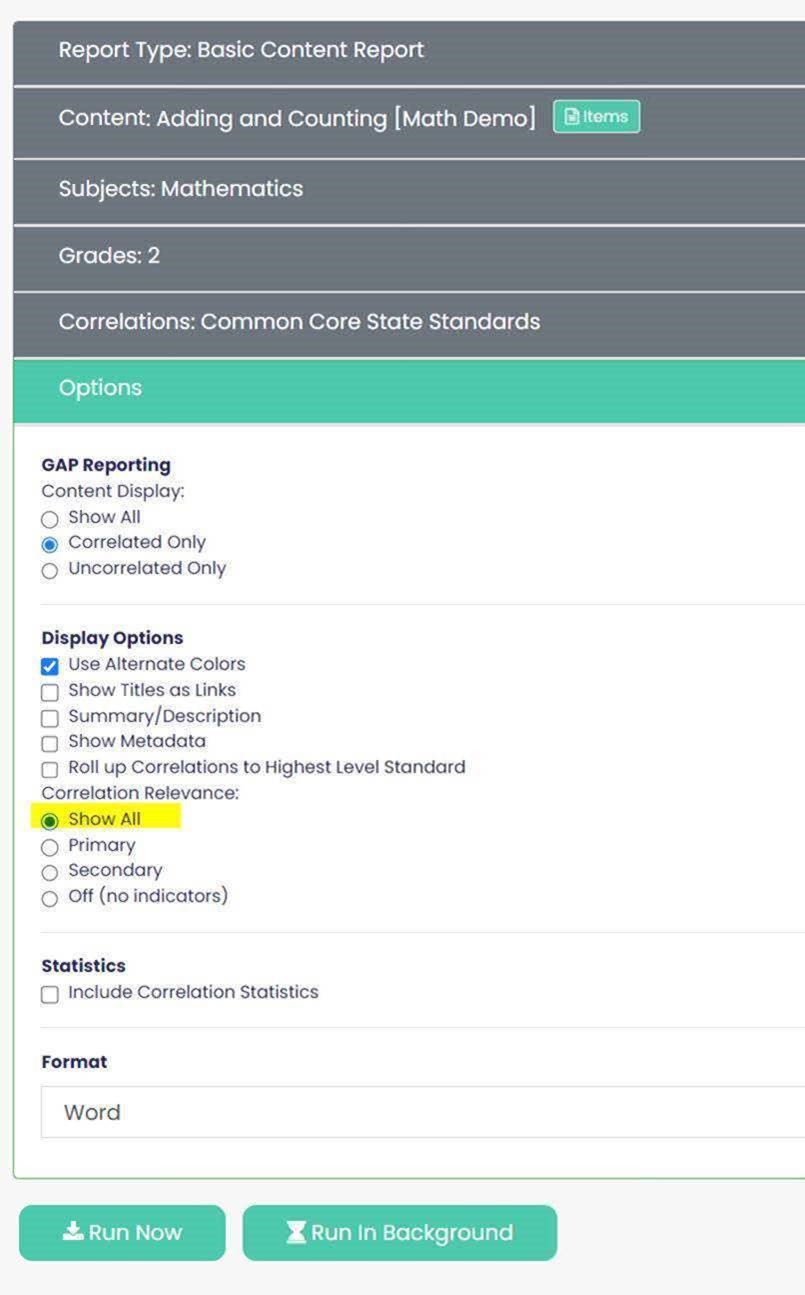
- Show All – will display both Primary (P) and Secondary (S) alignments
- Primary – will display the Primary (P) alignments
- Secondary – will display the Secondary (S) alignments
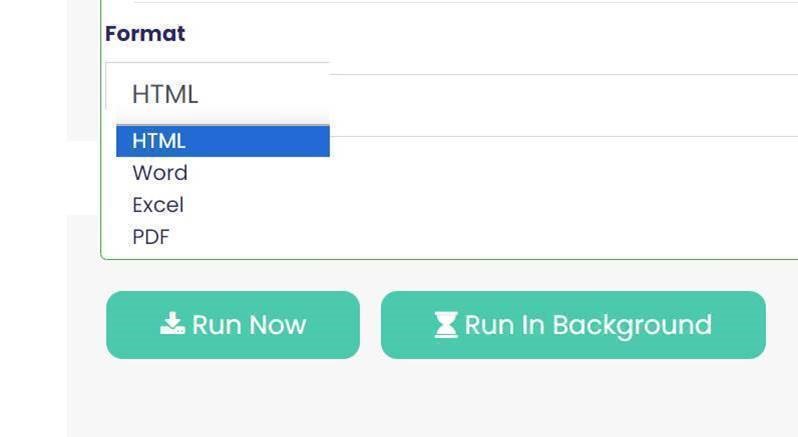
Before Running the report, choose the Format.
Once all the criteria selections have been made, you can choose Run Now or Run in Background. When you select Run Now, it will take several seconds for the report to generate. When complete if using Google Chrome, a download link will appear in the browser, otherwise a popup will display if using other browsers. Open the report by clicking on the downloaded file. Note: Files that are generated from the EdGate database via a browser are by default a Web Page export. When running a report and selecting Excel or Word as the report format, after downloading the file, it can be saved as an Excel/or Word file. Click on the Save As type, for Excel select Excel Workbook and for Word select Word Document from the dropdown menu. This will convert the file into an Excel spreadsheet or Word document respectively.
Standards Reports
Select the subject for the report. Similarly you can return to Subjects to choose additional subjects using the Shift or Control key.
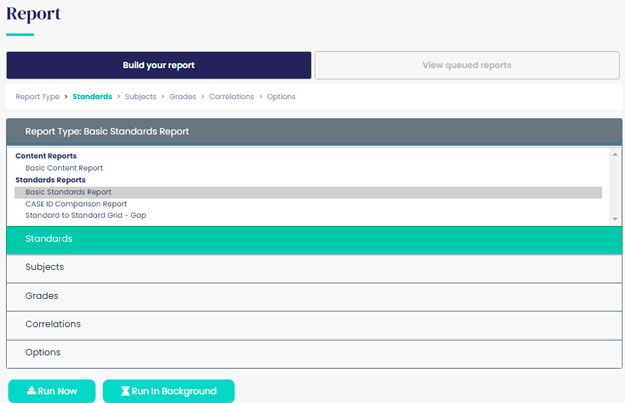
In the Standards list, choose the state for the report. Multiple states can be chosen by selecting the Standards section again to add other states using the Shift or Control key.
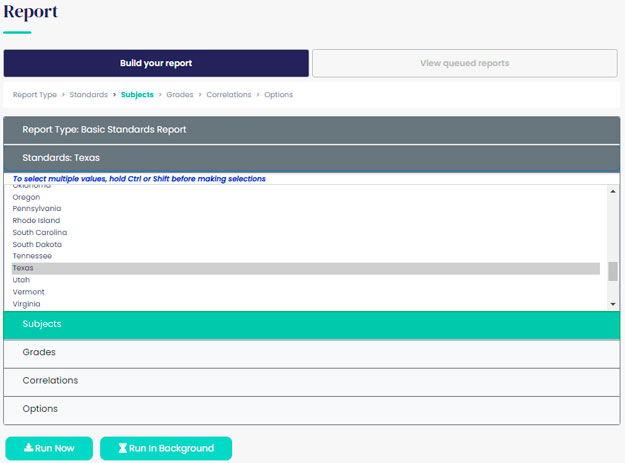
Select the subject for the report. Similarly you can return to Subjects to choose additional subjects using the Shift or Control key. To make a Course selection see Course Reporting instructions below.
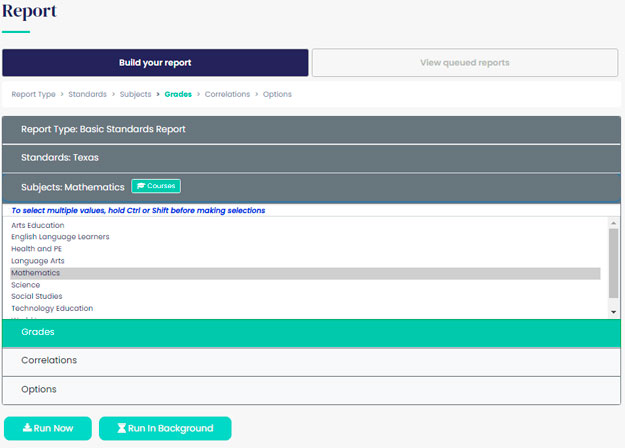
Grades is the next selection criteria and as above when the state list appears under the Standards list, you can select Grades again to add other grades.
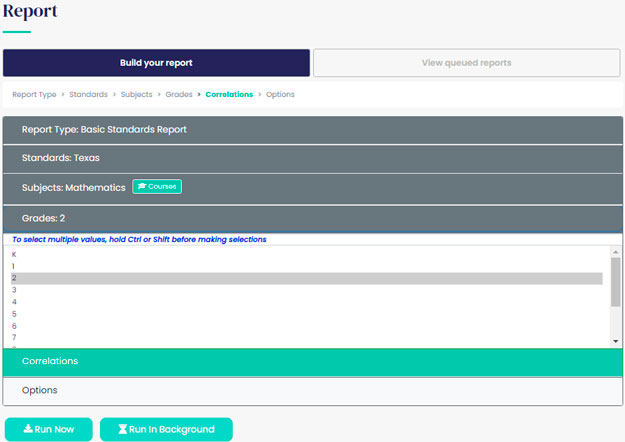
The next selection, Correlations, will display. This will be a list of the Content Sets in the your company’s ExACT profile. If you would like to choose more than one Content Set, click on Correlations and use the Shift or Control key to choose additional Content sets.

Standards Report Options
In the Options section, you can choose from Display options for inclusion in the report.
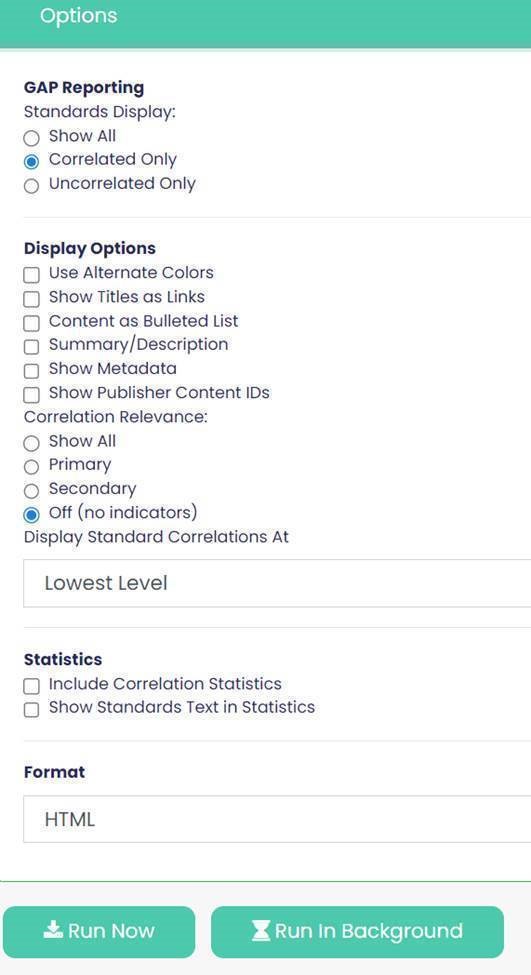
Gap is a premium service. If your company has contracted for gap services, you will have the options to select Show All, Correlated Only, or Uncorrelated Only and you can also include Correlation Statistics. If you would like more information on gap services, please contact one of our account representatives.
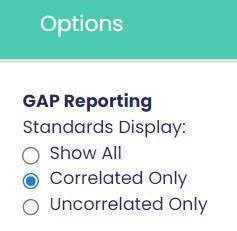
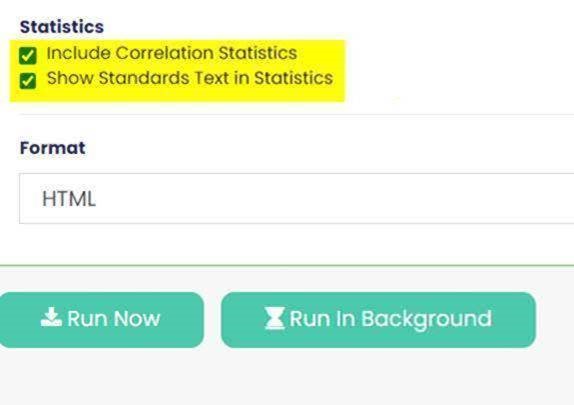
With gap services, you can also see Statistics in the report by checking the Include Correlation Statistics box. You can also select to have the text of the standard Included in the Correlation Statistics in addition to the standard number by checking the box for show Standard Text in Statistics.
Display Options
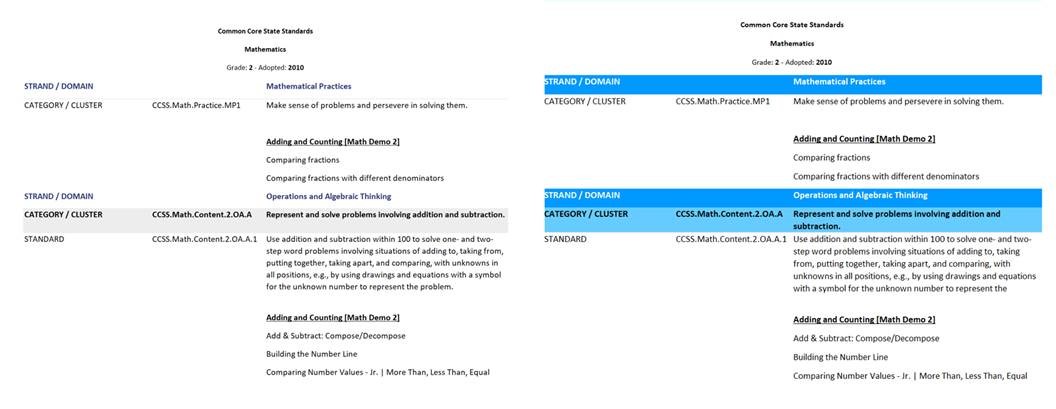
Use Alternate Colors – when selecting this feature the different levels will display in varying colors.
Show Titles as Links
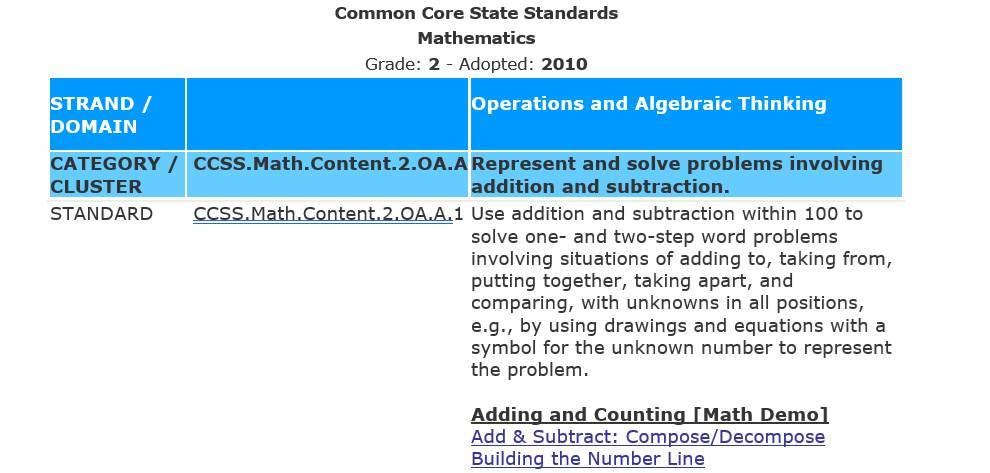
When Content is loaded into the repository, if urls are included in the metadata, using this option will result in the titles displaying as url links in the report. When clicking on the title’s url, the link will open in a browser window.
Content as Bulleted List
Selecting this option will display the aligned resources in a bulleted list.
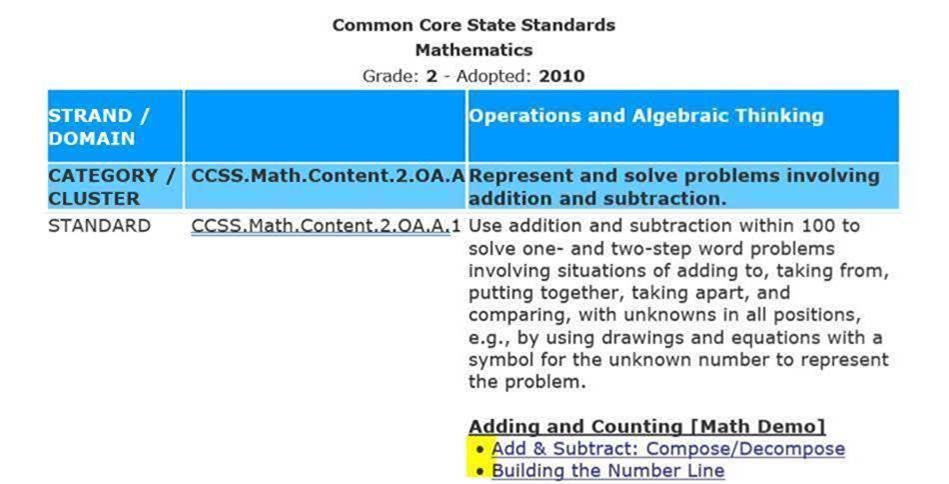
Summary/Description
When selecting this option, the report will include the summary/description for each resource. Note: for this Option, resource descriptions must be included in the repository.
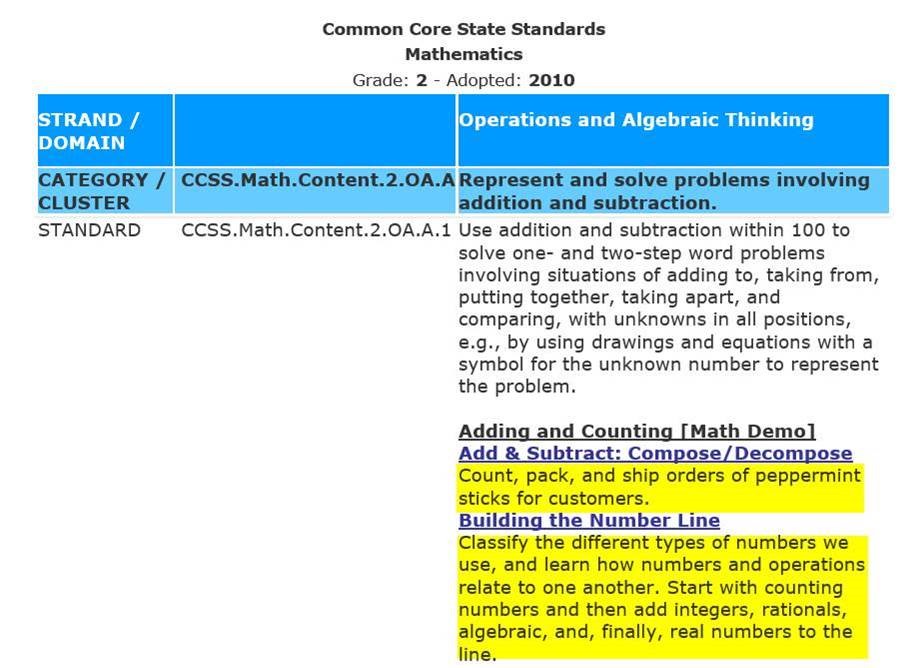
Show Metadata
For resources that are loaded in the repository with metadata included, the metadata will list in the report.
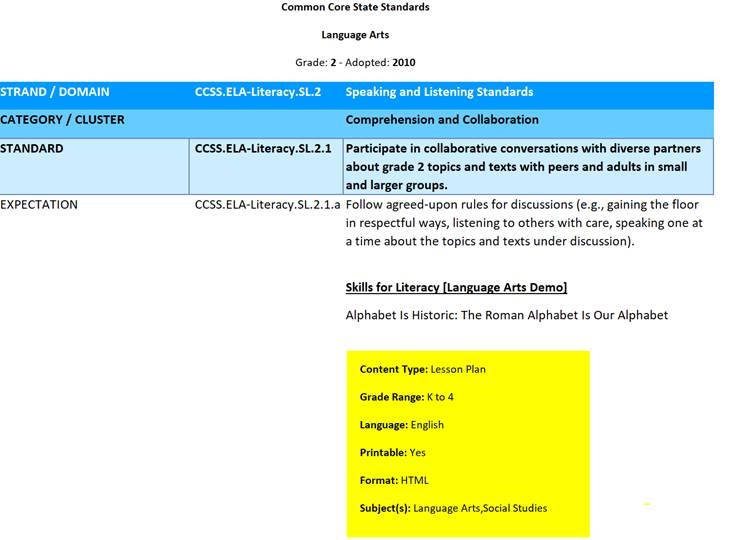
Show Publisher Content IDs
For resources that are loaded in the repository with Publisher Content IDs included, these will list in the report.
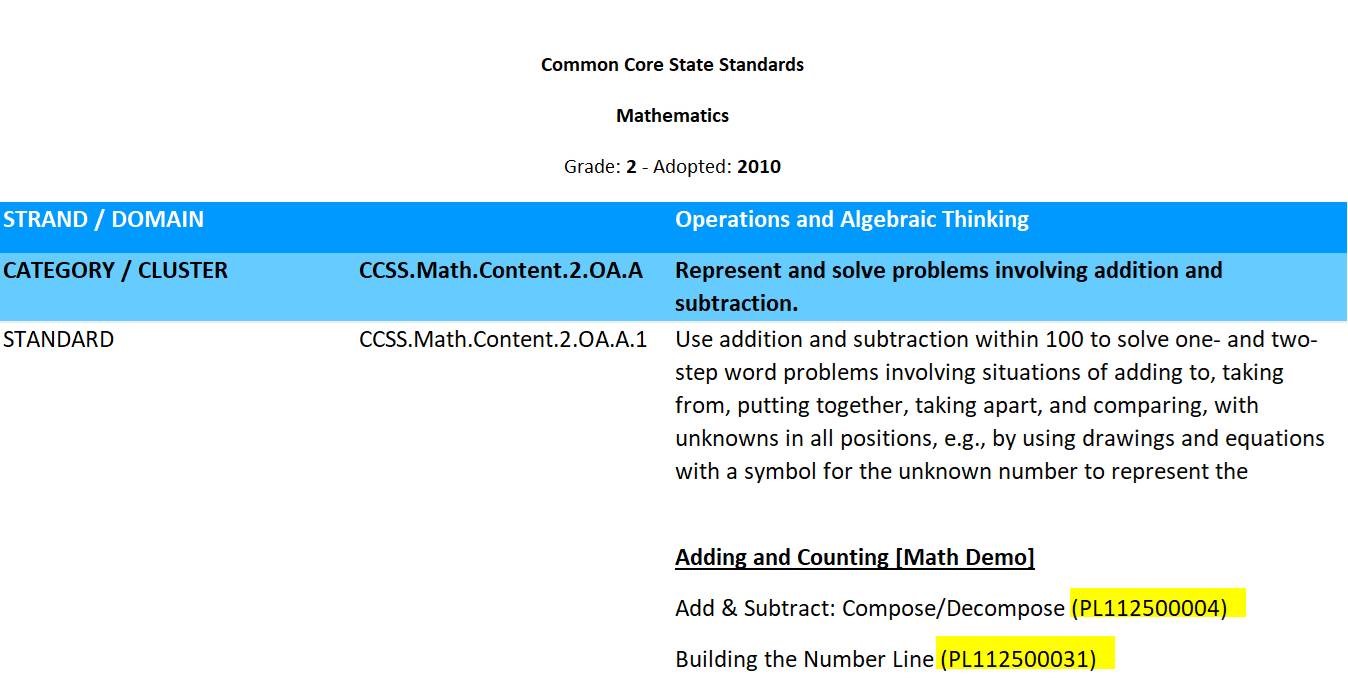
Correlation Relevance
Correlation Relevance is a premium service, and is a way of identifying the primary and ancillary alignments for content. When content is aligned to standards, very often there are primary or main concepts that an item addresses. These would be considered primary concepts and will result in Primary (P) alignments. For other concepts mentioned in the content, these may be more of ancillary or secondary concepts and therefore would will result in Secondary (S) alignments. If your company subscribes to Correlation Relevance, you can choose to run a report to see the Primary (most relevant) alignments by choosing Primary. Other options are Show All (both Primary and Secondary) or Secondary. Note, the default for Correlation Relevance is Off and does not display until a Relevance option is enabled.

- Show All – will display both Primary (P) and Secondary (S) alignments
- Primary – will display the Primary (P) alignments
- Secondary – will display the Secondary (S) alignments
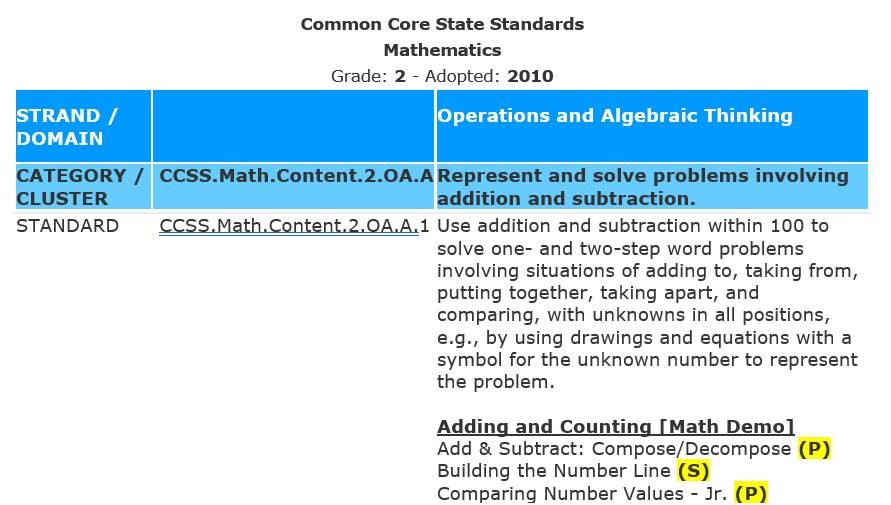
Display Standards Correlations At
In the report you can choose which different levels of the standards to view alignments. The default is the lowest level standard. Using the dropdown, you choose to view the alignments One or Two levels up or the Top level.
Before Running the report, choose the Format.

Once all the criteria selections have been made, you can choose Run Now or Run in Background. When you select Run Now, it will take several seconds for the report to generate. When complete if using Google Chrome, a download link will appear in the browser, otherwise a popup will display if using other browsers. Open the report by clicking on the downloaded file. Note: Files that are generated from the EdGate database via a browser are by default a Web Page export. When running a report and selecting Excel or Word as the report format, after downloading the file, it can be saved as an Excel/or Word file. Click on the Save As type, for Excel select Excel Workbook and for Word select Word Document from the dropdown menu. This will convert the file into an Excel spreadsheet or Word document respectively.
Course Reporting
Course reporting is now available in ExACT. If your profile includes Course reporting, when selecting a subject, the Course button will display if applicable.
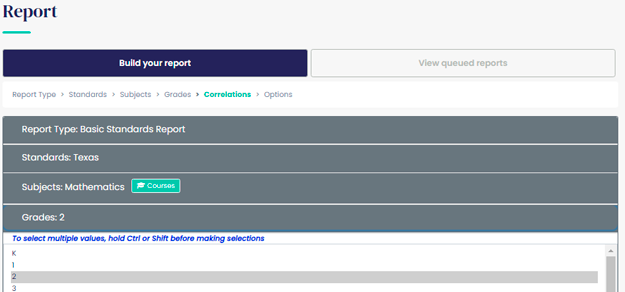
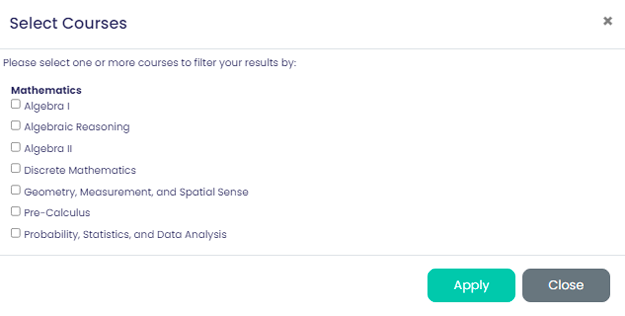
To choose a course, click on the Course button. Make a selection(s) by checking the box next to the course(s) and click Apply.
After making the course selection(s), continue with the grade and option selections.
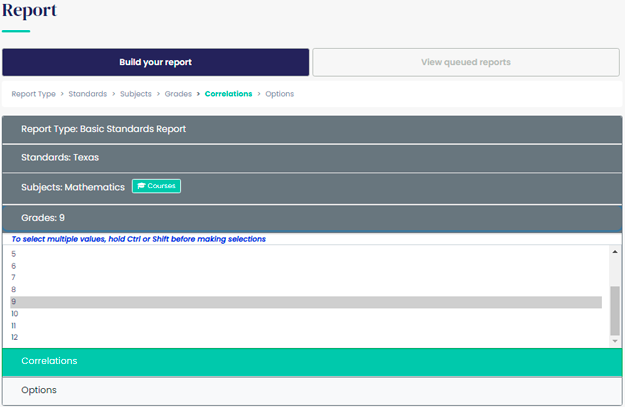
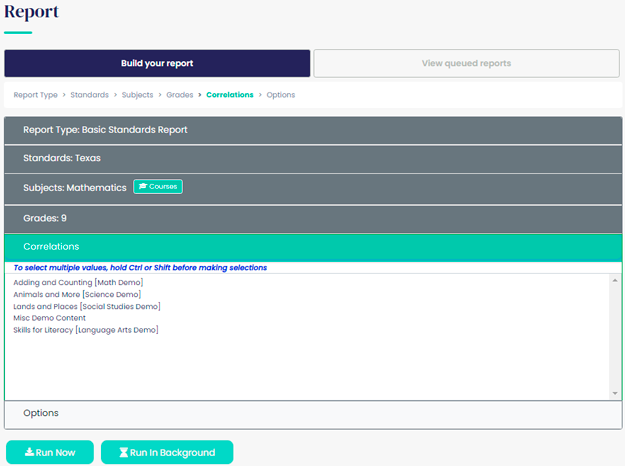
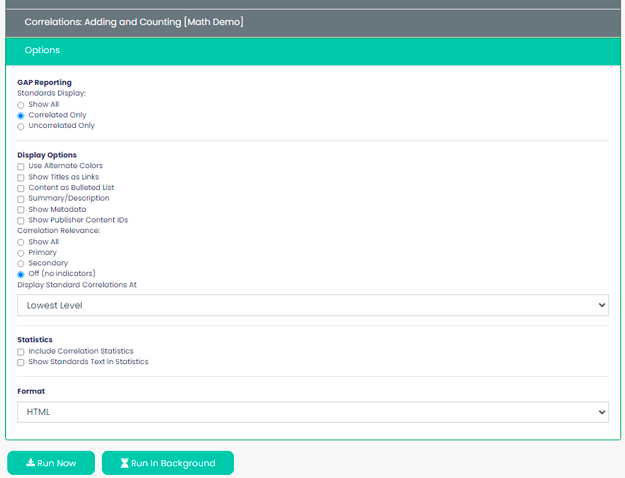
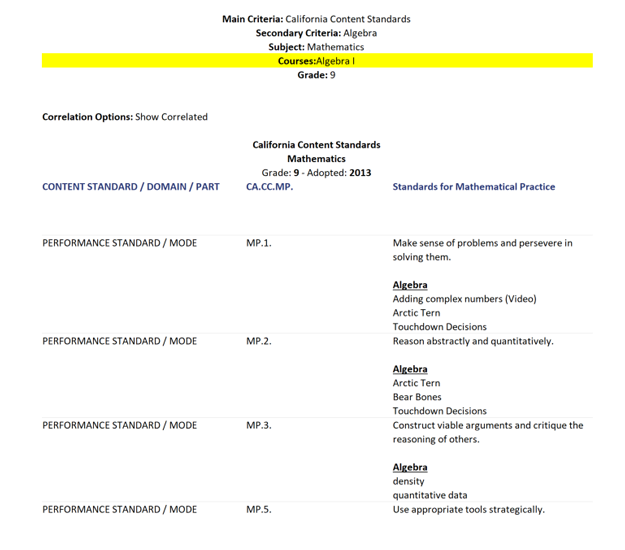
When using the Course selection, when the report generates, only the selected Course standards will display.
Standards Comparison Reports
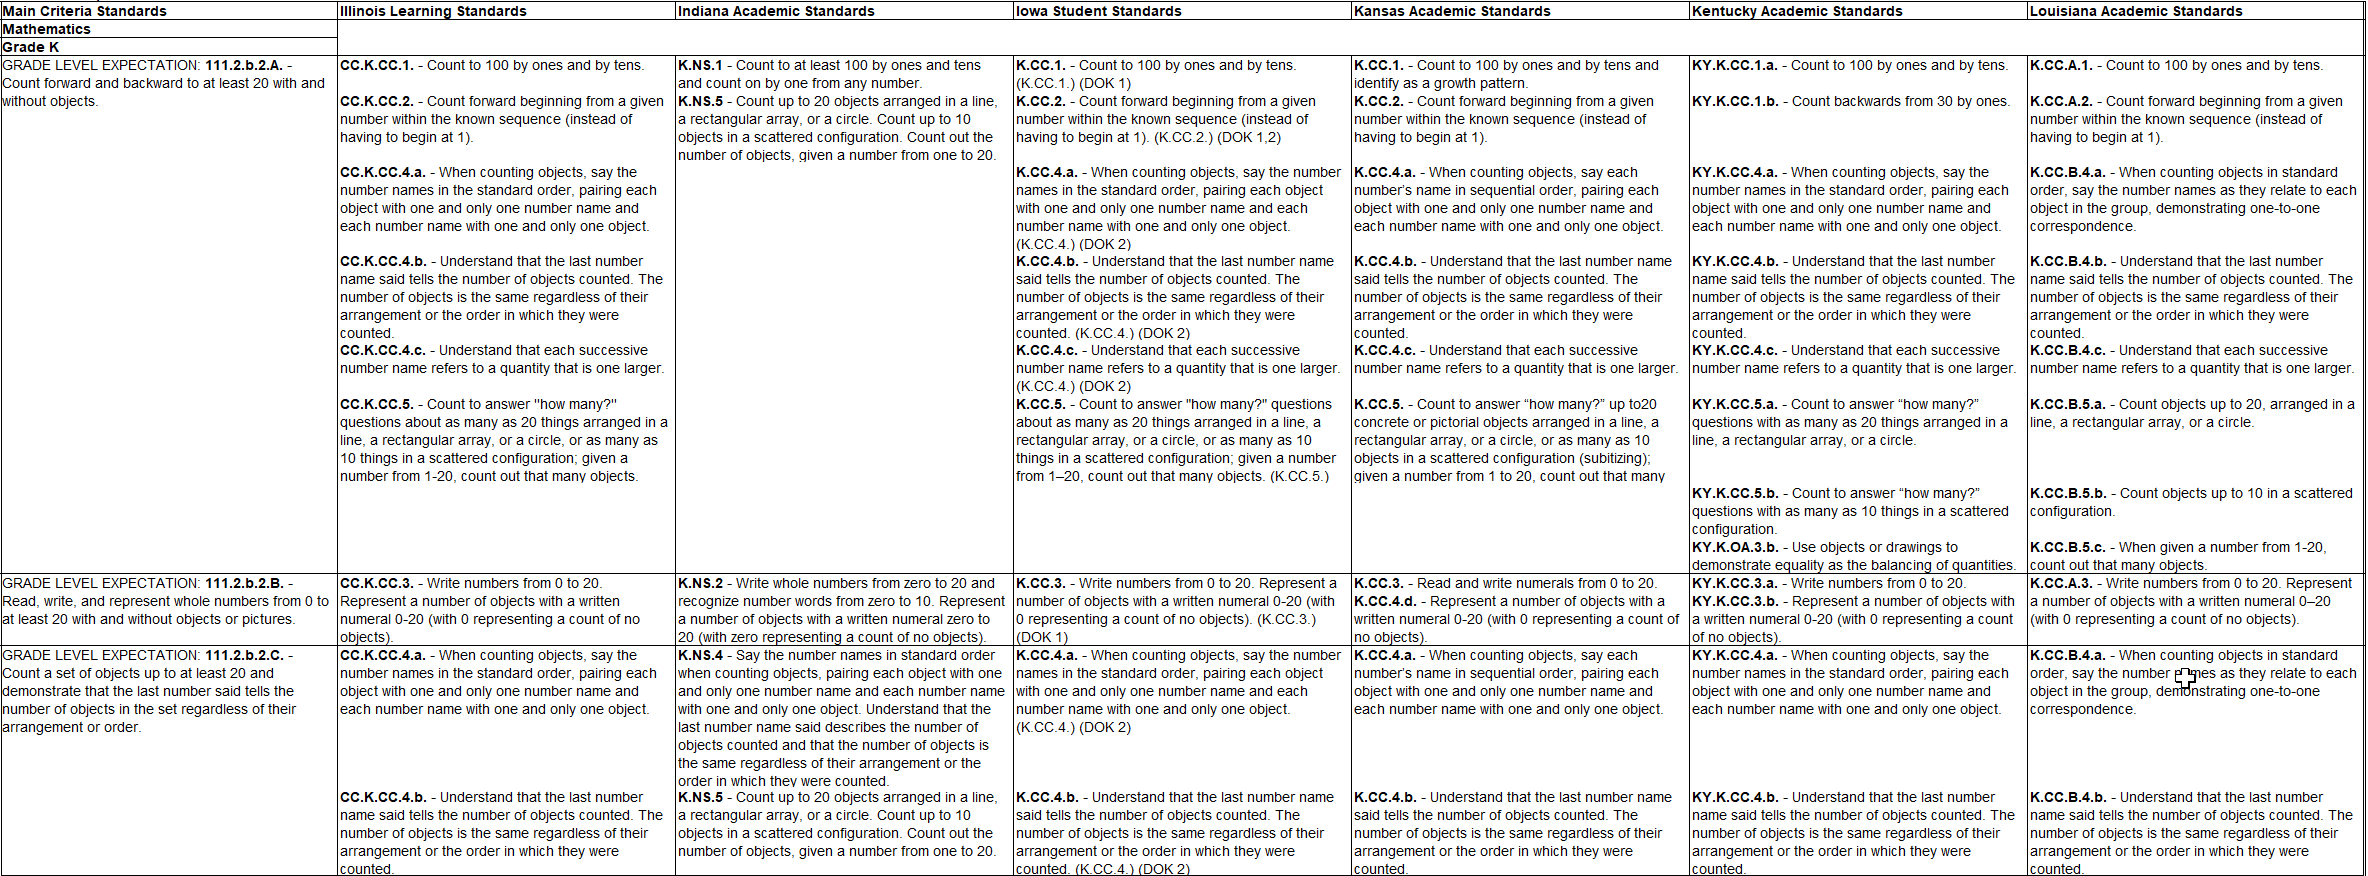
Standards Comparisons Reports are a premium service that allows you to generate an Excel report by state, subject and grade(s) and include crosswalked standards from another state(s).
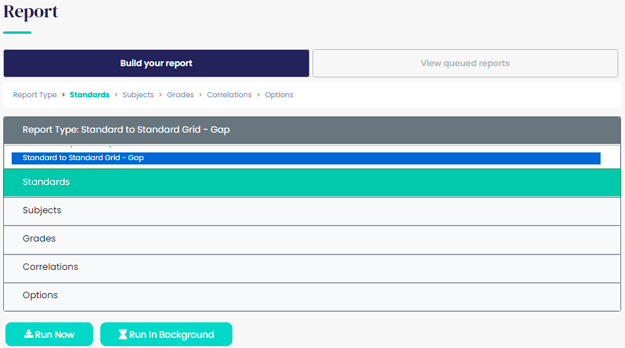
To create a Standard Comparison Report, in the ExACT login click on Report and select the Standards to Standards Grid – Gap report.
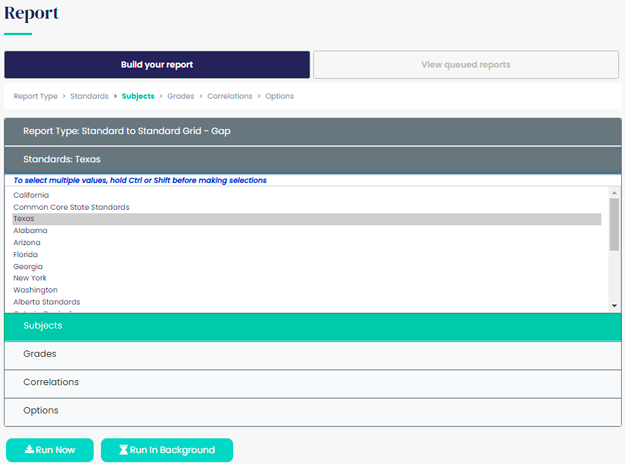
In the Standards list, choose the state for which you would like to compare other standards (Control Set). In this case Texas was selected.
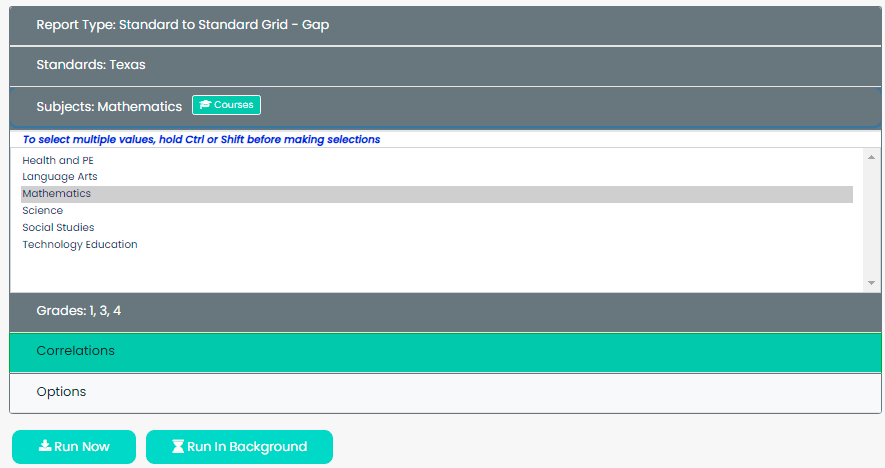
Select the subject for the report.
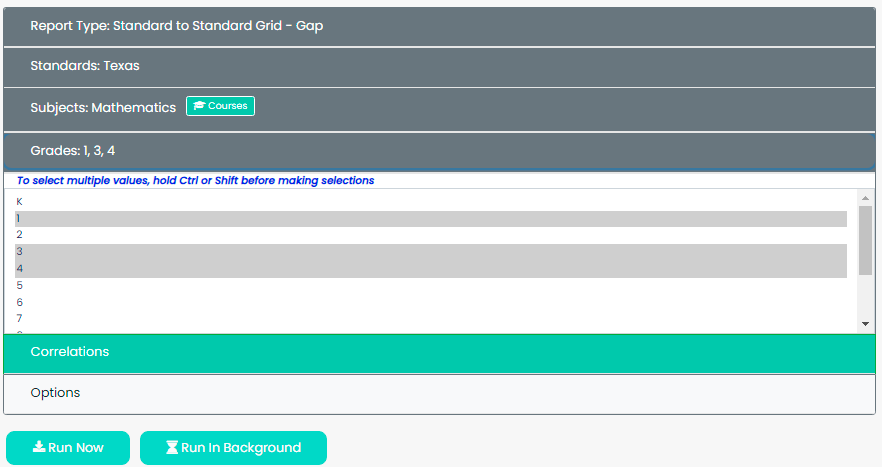
Grades is the next selection criteria. To make multiple selections use the Shift or Control key.
The next selection, Correlations, will display. In the Correlations list, choose the state(s) for comparison to the Control Set. Multiple states can be chosen by using the Shift or Control key.
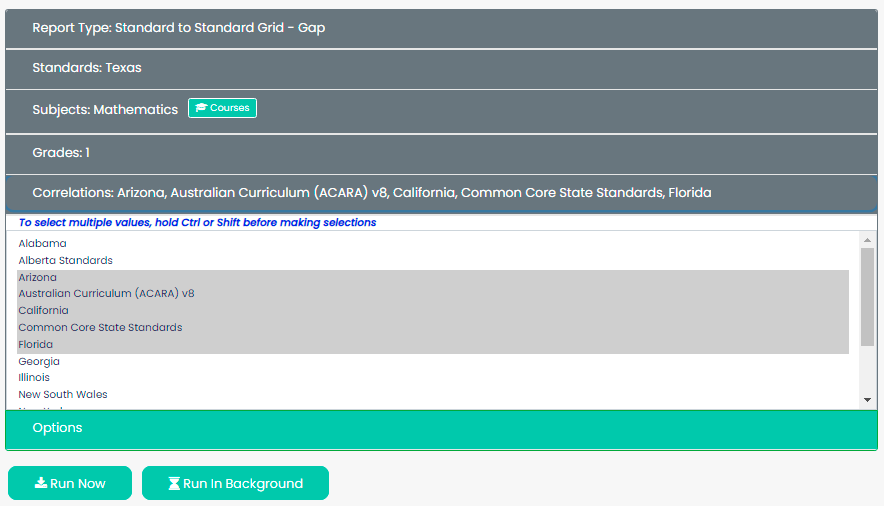
In the Options section, choose Show All in the Gap Reporting section. Before Running the report, choose the Format.
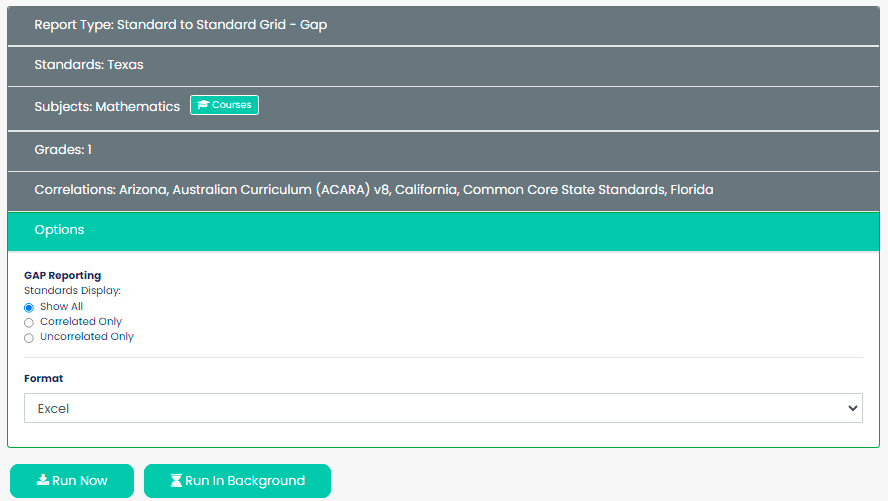
Once all the criteria selections have been made, you can choose Run Now or Run in Background. When you select Run Now, it will take several seconds for the report to generate. Please note that when selecting multiple criteria it will take longer for the report to generate.
When complete if using Google Chrome, a download link will appear in the browser, otherwise a popup will display if using other browsers. Open the report by clicking on the downloaded file. The report will look similar to the image below.
Note: Files that are generated from the EdGate database via a browser are by default a Web Page export. When running a report and selecting Excel or Word as the report format, after downloading the file, it can be saved as an Excel/or Word file. Click on the Save As type, for Excel select Excel Workbook and for Word select Word Document from the dropdown menu. This will convert the file into an Excel spreadsheet or Word document respectively.
Running Reports in ExACT
Alignment Reports
To run alignment reports, use the left hand side navigation and choose Report. Running a Content Unit report allows you to see resources with the respective standards alignments listed underneath each resource. A standards report will list the standards with the aligned resources listed underneath each standard. As a general rule, the more criteria chosen, the longer it will take to run the report.

Content Unit Reports
To run a Content Unit report, select Basic Content Report.

The next selection, Content, will display. This will be a list of the Content Sets in the your company’s ExACT profile. When choosing a Content Set the Subjects list will display. If you would like to choose more than one Content Set, click on Content and use the Shift or Control key to choose additional Content sets.

Item Reporting
To create a Content Report for a single resource or specific resources, select the Items button.

This will open a separate window.

Choose Expand All. The list of resources in the selected Content Set will display. You can select titles in the list or input search terms in the Filter to locate specific titles. Once selected, the count will display for the number of items selected. Close the window by clicking Close in the bottom left hand corner or by clicking on the X in the upper right hand corner.


Select the subject for the report. To make a Course selection see Course Reporting instructions below. Similarly you can return to Subjects to choose additional subjects using the Shift or Control key.

Grades is the next selection criteria and as above when the state list appears under Correlations, you can select grades again to add other grades.
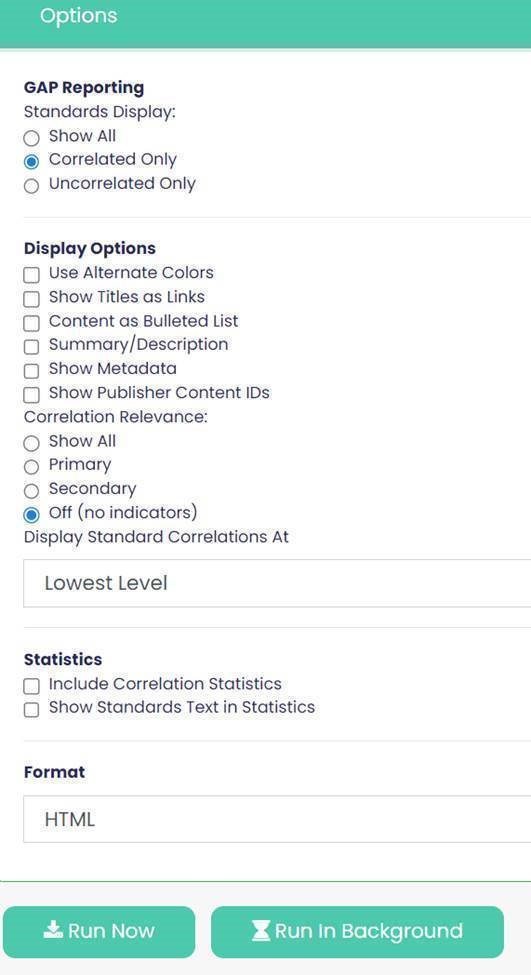
In the Correlations list, choose the state for the report. Again multiple states can be chosen by selecting Correlations to add other states.

Content Report Options
In the Options section, you can choose from Display options for inclusion in the report.
Using the dropdown for Display Standards Correlations At, you can roll standards alignments up to the intermediate or parent standards.
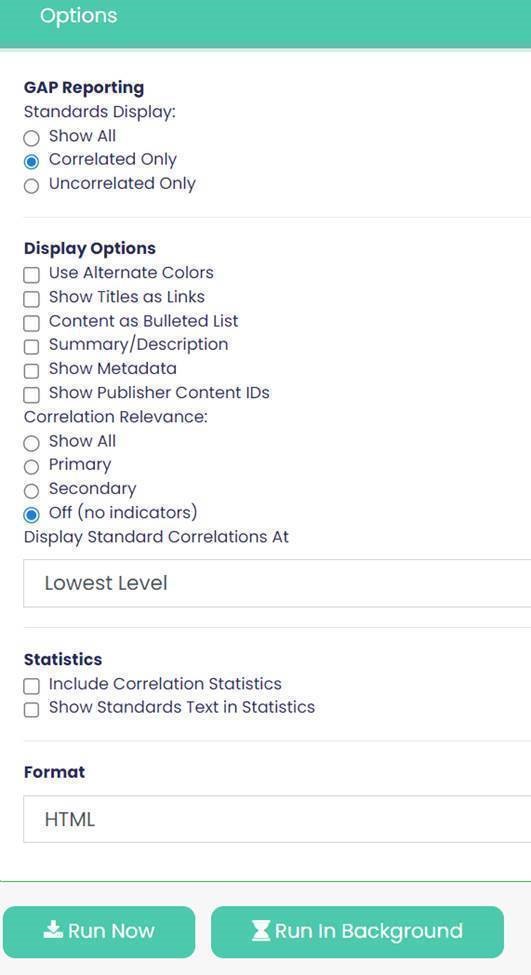
Gap is a premium service. If your company has contracted for gap services, you will have the options to select Show All, Correlated Only, or Uncorrelated Only and you can also include Correlation Statistics. If you would like more information on gap services, please contact one of our account representatives.

Once all the criteria selections have been made, you can choose Run Now or Run in Background. When you select Run Now, it will take several seconds for the report to generate. When complete if using Google Chrome, a download link will appear in the browser, otherwise a popup will display if using other browsers. Open the report by clicking on the downloaded file. Note: Files that are generated from the EdGate database via a browser are by default a Web Page export. When running a report and selecting Excel or Word as the report format, after downloading the file, it can be saved as an Excel/or Word file. Click on the Save As type, for Excel select Excel Workbook and for Word select Word Document from the dropdown menu. This will convert the file into an Excel spreadsheet or Word document respectively.
Standards Reports
To run a Standards report, select Basic Standards Report.

In the Standards list, choose the state for the report. Multiple states can be chosen by selecting the Standards section again to add other states using the Shift or Control key.

Select the subject for the report. Similarly you can return to Subjects to choose additional subjects using the Shift or Control key.

Grades is the next selection criteria and as above when the state list appears under the Standards list, you can select Grades again to add other grades.

The next selection, Correlations, will display. This will be a list of the Content Sets in the your company’s ExACT profile. If you would like to choose more than one Content Set, click on Correlations and use the Shift or Control key to choose additional Content sets.

In the Options section, you can choose from Display options for inclusion in the report. Before Running the report, choose the Format.
Gap is a premium service. If your company has contracted for gap services, you will have the options to select Show All, Correlated Only, or Uncorrelated Only and you can also include Correlation Statistics. If you would like more information on gap services, please contact one of our account representatives.

Once all the criteria selections have been made, you can choose Run Now or Run in Background. When you select Run Now, it will take several seconds for the report to generate. When complete if using Google Chrome, a download link will appear in the browser, otherwise a popup will display if using other browsers. Open the report by clicking on the downloaded file. Note: Files that are generated from the EdGate database via a browser are by default a Web Page export. When running a report and selecting Excel or Word as the report format, after downloading the file, it can be saved as an Excel/or Word file. Click on the Save As type, for Excel select Excel Workbook and for Word select Word Document from the dropdown menu. This will convert the file into an Excel spreadsheet or Word document respectively.
Course Reporting
Course reporting is now available in ExACT. If your profile includes Course reporting, when selecting a subject, the Course button will display if applicable.

To choose a course, click on the Course button. Make a selection(s) by checking the box next to the course(s) and click Apply.

After making the course selection(s), continue with the grade and option selections.


When using the Course selection, when the report generates, only the selected Course standards will display.

Standards Comparison Reports
Standards Comparisons Reports are a premium service that allows you to generate an Excel report by state, subject and grade(s) and include crosswalked standards from another state(s).
To create a Standard Comparison Report, in the ExACT login click on Report and select the Standards to Standards Grid – Gap report.

In the Standards list, choose the state for which you would like to compare other standards (Control Set). In this case Texas was selected.

Select the subject for the report.

Grades is the next selection criteria. To make multiple selections use the Shift or Control key.

The next selection, Correlations, will display. In the Correlations list, choose the state(s) for comparison to the Control Set. Multiple states can be chosen by using the Shift or Control key.

In the Options section, choose Show All in the Gap Reporting section. Before Running the report, choose the Format.

Once all the criteria selections have been made, you can choose Run Now or Run in Background. When you select Run Now, it will take several seconds for the report to generate. Please note that when selecting multiple criteria it will take longer for the report to generate.
When complete if using Google Chrome, a download link will appear in the browser, otherwise a popup will display if using other browsers. Open the report by clicking on the downloaded file. The report will look similar to the image below.

Note: Files that are generated from the EdGate database via a browser are by default a Web Page export. When running a report and selecting Excel or Word as the report format, after downloading the file, it can be saved as an Excel/or Word file. Click on the Save As type, for Excel select Excel Workbook and for Word select Word Document from the dropdown menu. This will convert the file into an Excel spreadsheet or Word document respectively.
Using Direct Alignment
Direct Alignment is a premium feature available in ExACT. If your company has contracted for the Direct Alignment service you can associate a resource to a specific standard without using a taxonomy term from EdGate’s Controlled Vocabulary. Similarly you can override an alignment that exists by disassociating/hiding an alignment to a specific standard. Note: Resources that directly aligned to standards will display as aligned in alignment reports and in all delivery applications. Also, resources that are updated to override/hide alignments will not display in alignment reports or delivery applications.
Standards Search
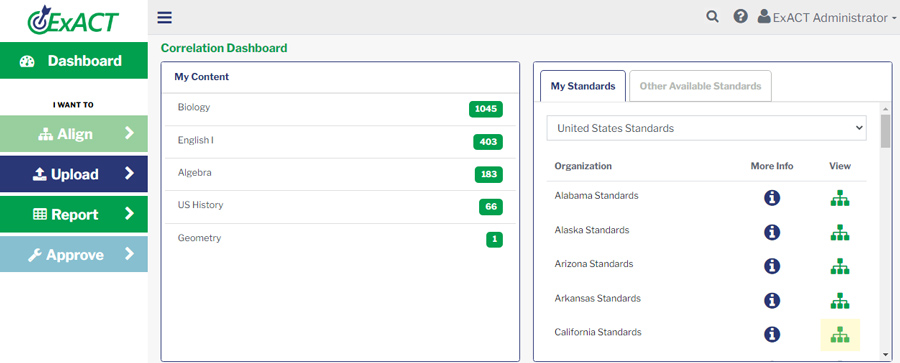
To use Direct Alignment, start with the set of standards. From the Dashboard you can choose a set of standards in the My Standards section of the Dashboard by clicking on the View standards link.
For this example, the California standards were chosen.
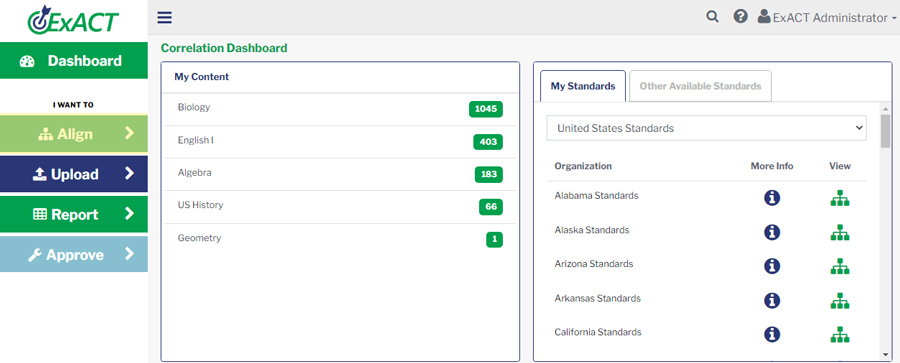
Alternatively, you can access the standards using the Align link in the left hand navigation panel.
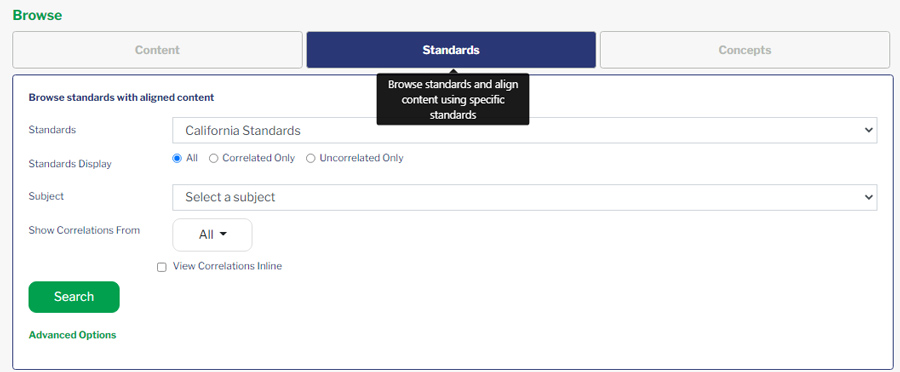
Select the State, subject and grade for the standards. Make a selection(s) from the dropdown list of the Content Sets. Also, check the View Correlations Inline box. Click Search.
Note: If your company has contracted for Gap services, you can make additional selections (All, Correlated Only, or Uncorrelated Only). These choices allow you to view either all the standards (correlated and uncorrelated), only the correlated, or only the uncorrelated standards.
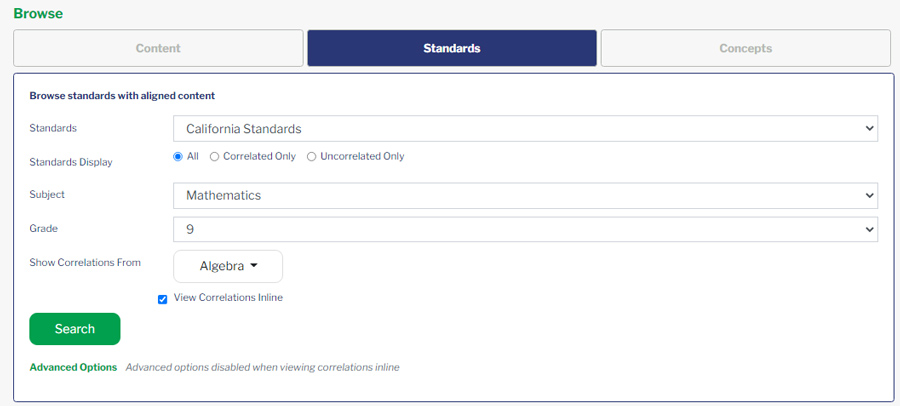
The standards will display.
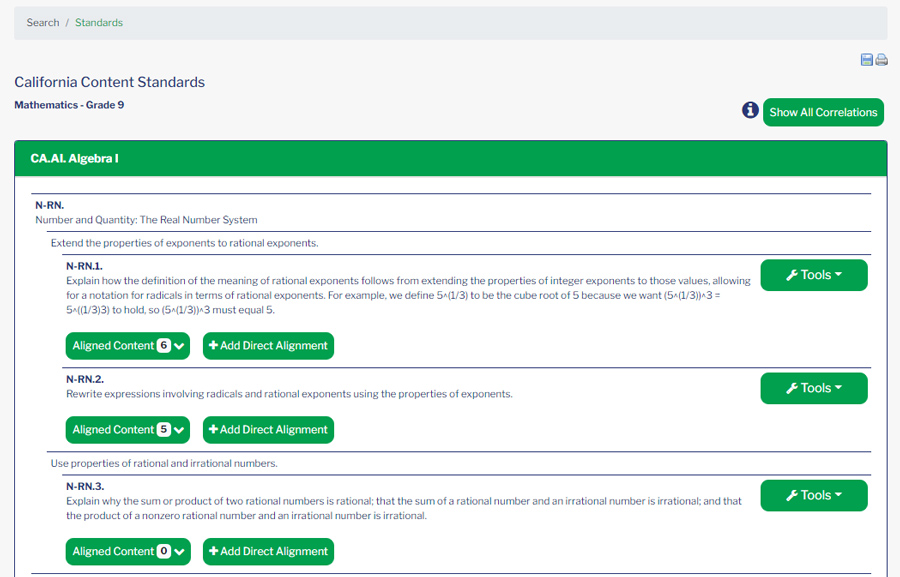
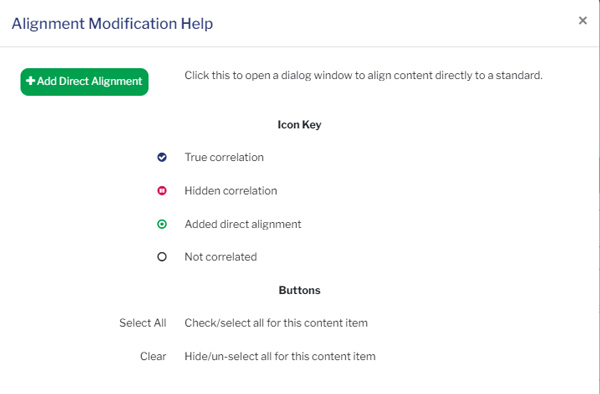
Direct Alignment Legend
For more information on the legend for the Alignment Modifications click on the information icon on the right of the screen.
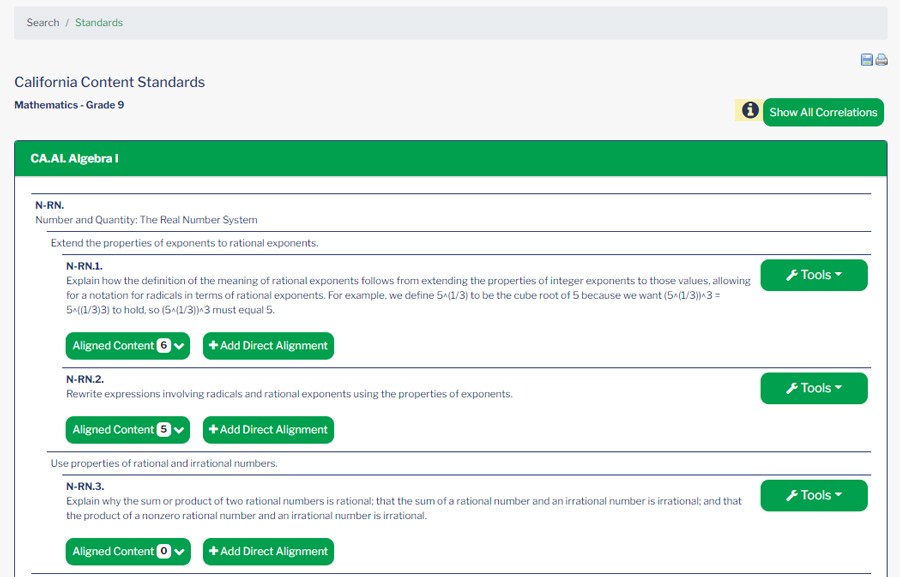
Creating Direct Alignments
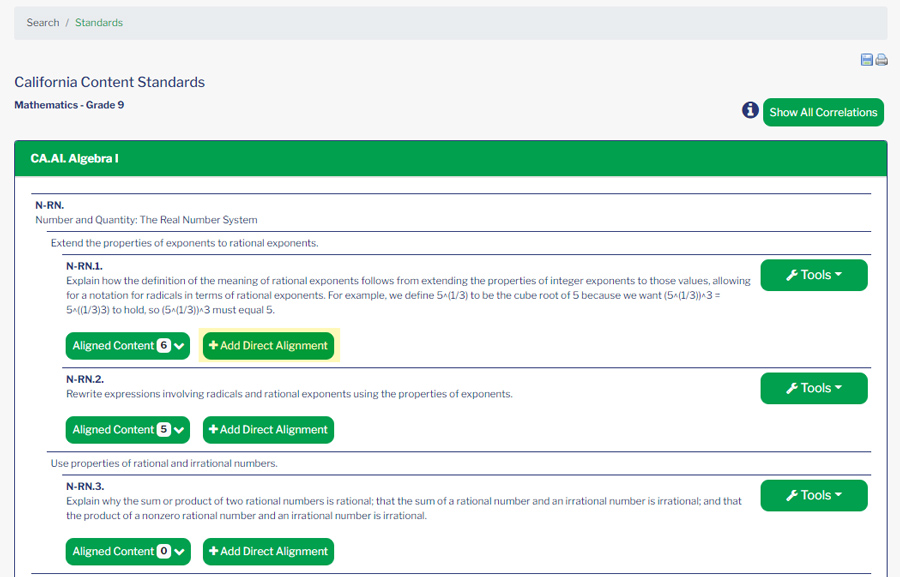
To add alignments to a standard, click on the Add Direct Alignment button.
A modal window will open. Check the radio buttons for each grade for which you would like to create a direct alignment.
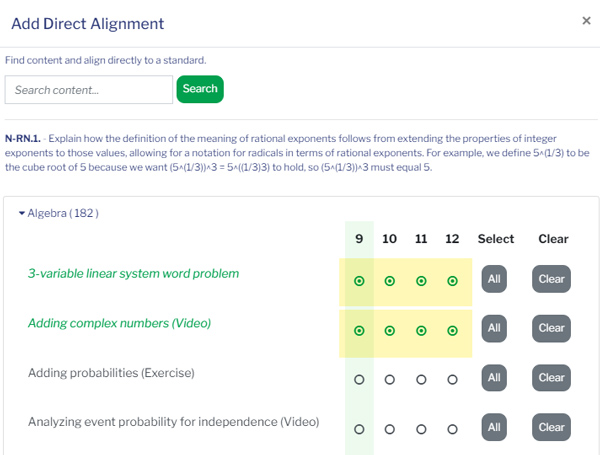
When all the selections have been made, simply close the modal window using the X in the upper right hand corner.
Viewing Direct Alignments
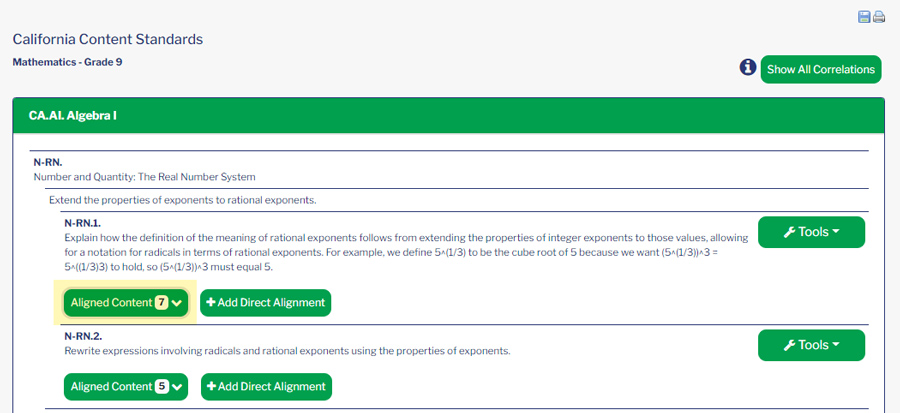
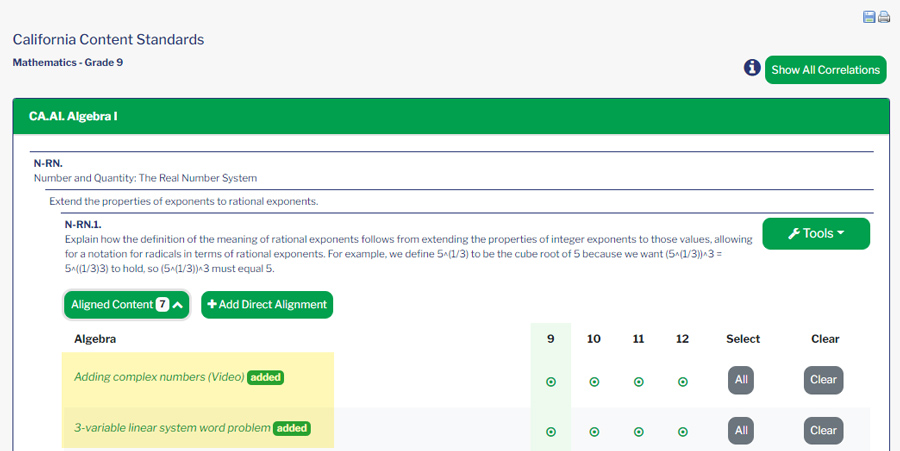
On the standards page, expand the link for Aligned Content to see the added resources.
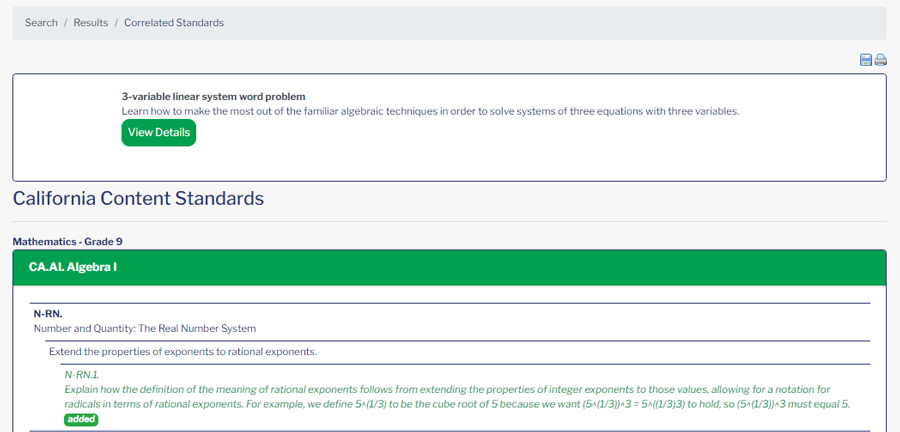
Note that the resources are labeled with “added” to denote resources that have been directly aligned to standards.
Reviewing Resource Alignments
To view standards alignments for the resource, navigate to the content set for a resource. See the Using ExACT tab in the User Manual in the Browsing Content section.
When resource has been directly aligned to a standard, its alignment status icon will update to Alignment Pending.
Click the View Standards button to see the resource alignments.
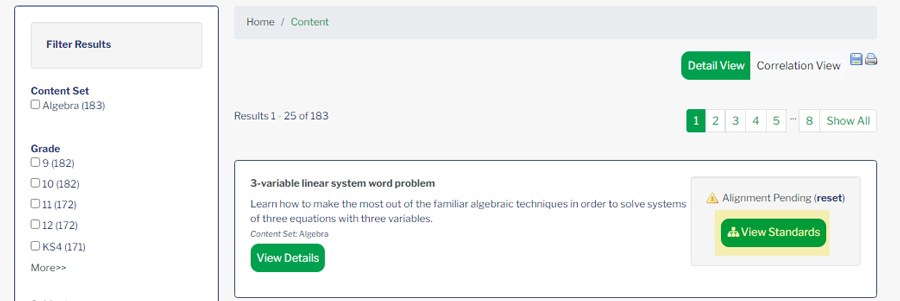
This resource was directly aligned to California math standards, so those are the standards for this example.

After clicking View Standards, the resource will display along with its alignment in California. Since this was a direct alignment, the resource is labeled with “added” to denote that it has been directly aligned to this standard.
Overriding (Hiding) an Alignment
Alignments of a resource to a specific standard can be overridden or hidden. To override an alignment to a specific standard, start with the set of standards. From the Dashboard you can choose a set of standards in the My Standards section of the Dashboard by clicking on the View standards link as described in Search Standards above and again choosing View Correlation Inline.
For this example, the California grade 9 math standards were chosen. On the resulting standards display page expand the Aligned Content button to see the resources aligned to a standard.
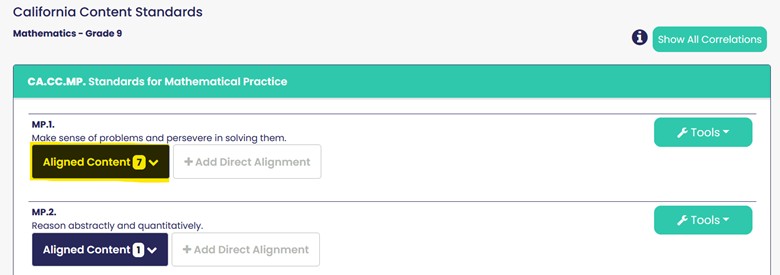
The aligned content will display.
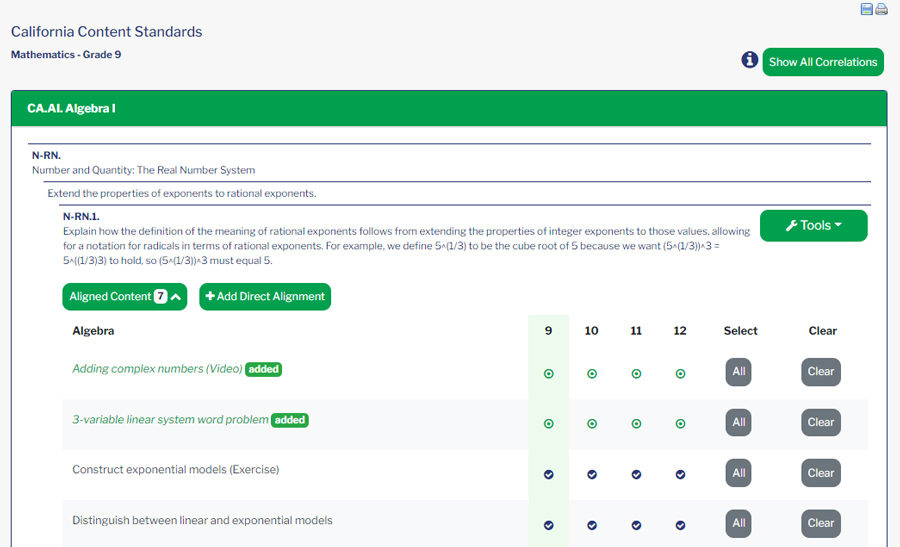
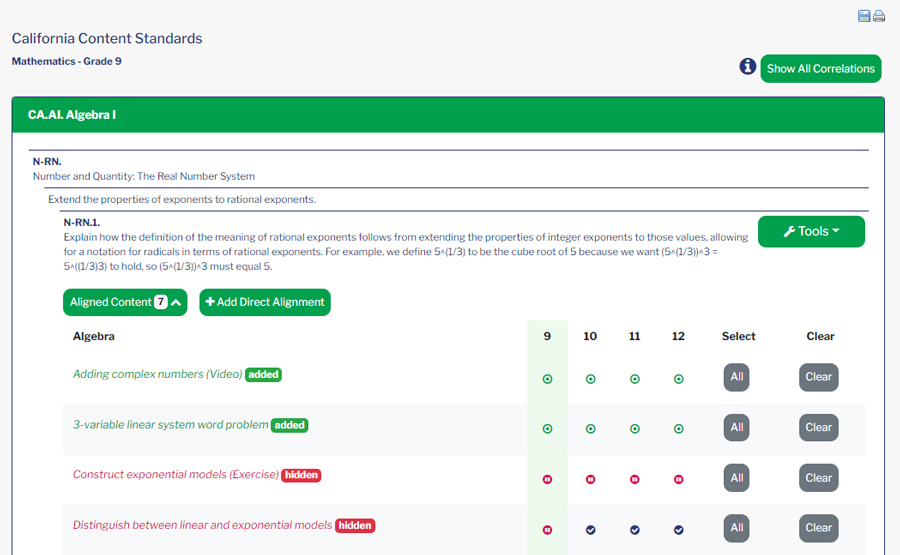
Using the tools for each resource, you can override/hide alignments using the radio or Clear button. The radio button will override/hide a correlation from the specified grade. The Clear button will override/hide an alignment for all the grades.
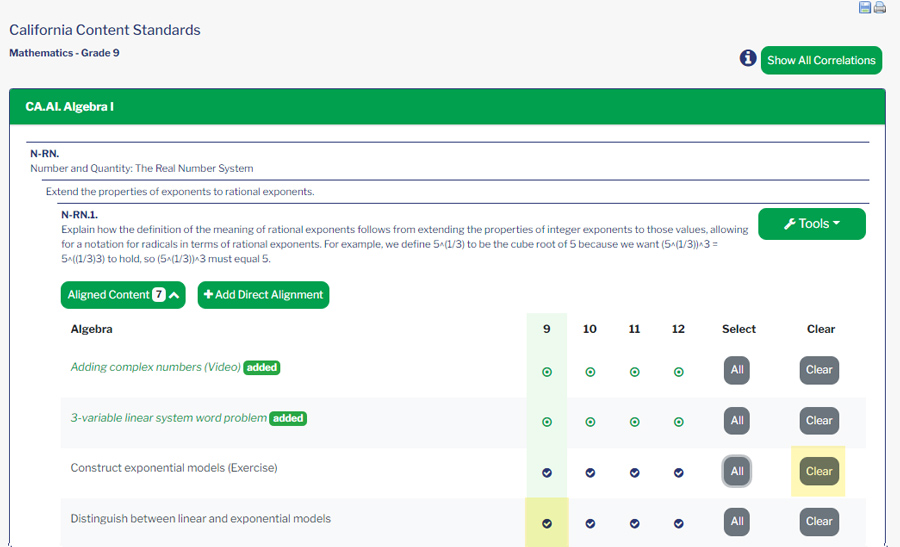
Once the selections are made, and upon refreshing the screen, the resources where the alignment has been overridden will be labeled as “hidden”.
Reviewing Resource Alignments
To view standards alignments for the resource, navigate to the content set for a resource. See the Using ExACT tab in the User Manual in the Browsing Content section.

When resource alignment to a standard has been overridden, its alignment status icon will update to Alignment Pending.
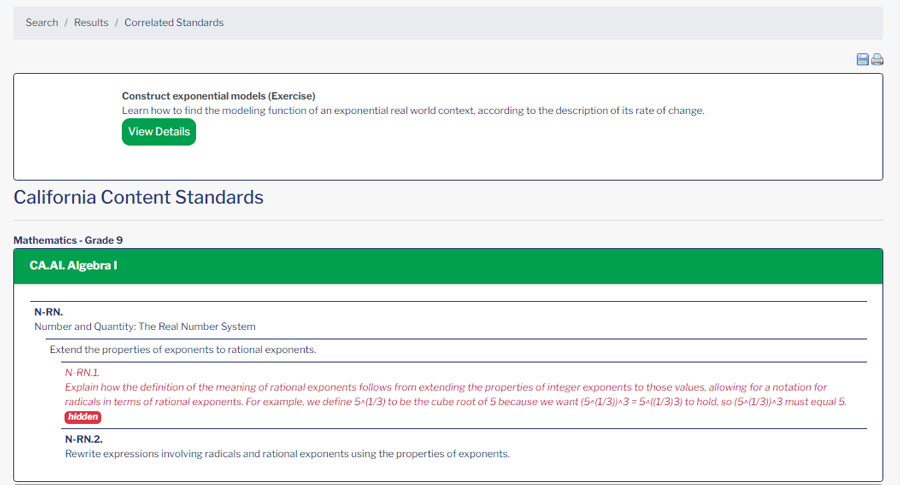
Click the View Standards button to see the resource alignments.
For standards where the resource alignments were overridden, the resource will display with the label “hidden”.
Viewing and Printing Direct Alignments (Adds/Hides)
To view and print items Direct Aligned to Standards, in the ExACT login, click on Align.
Click on Standards tab.
Select a State, Subject and Grade for the Standards Search. Use the dropdown to select the Content Set for which you would like to view and print Direct Alignments.
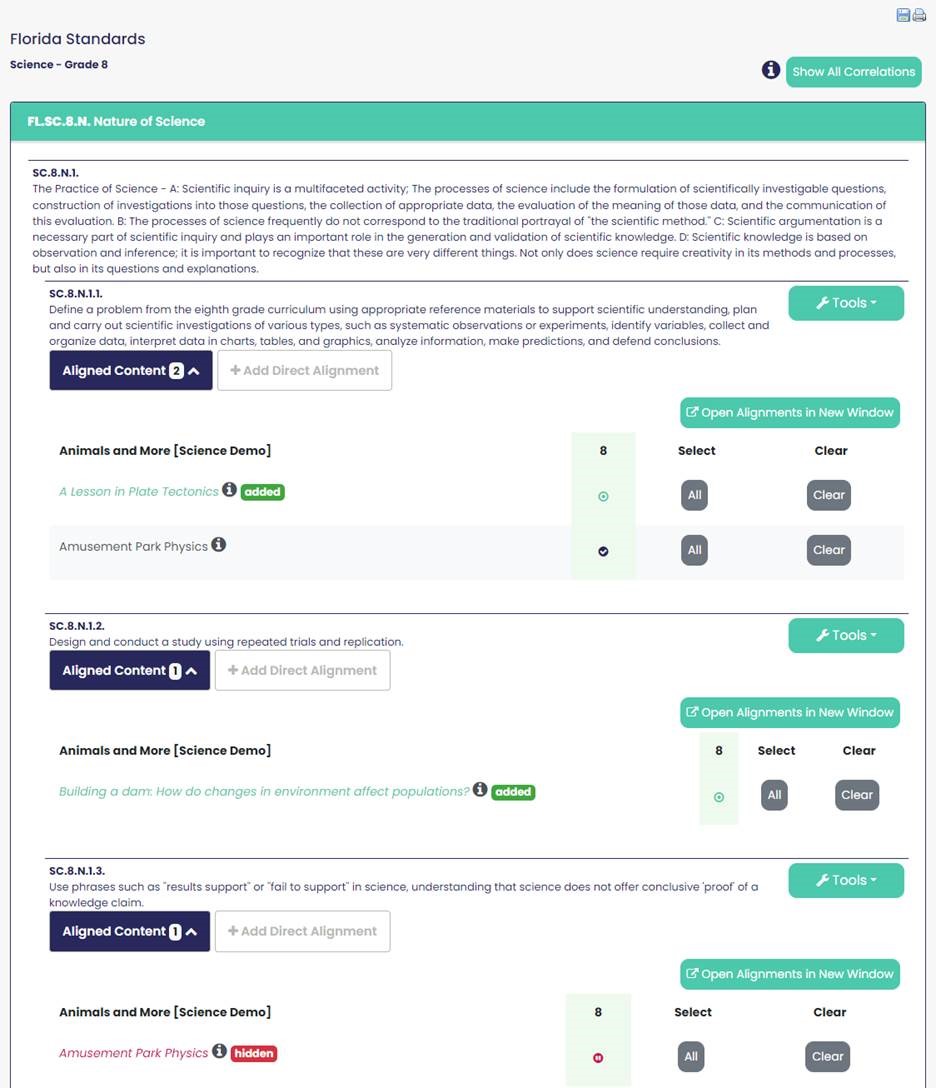
When the standards results display, at the top of the window, click Show All Correlations.
In this view, select the printer button to export a copy of this information for the resources aligned in this state subject and grade.
Repeat these steps for additional subjects and grades.
Direct Align to Related Standards
Direct Align to Related Standards is a premium feature available in ExACT. If your company has contracted for the Direct Align to Related Standards service you can associate a resource to a specific standard and simultaneously to the related standards in other state and national standard sets. This allows alignment without using a taxonomy term from EdGate’s Controlled Vocabulary. Similarly you can override an alignment that exists by disassociating/hiding an alignment to a specific standard and simultaneously to the related standards in other state and national standard sets. Note: Resources that directly aligned to standards will display as aligned in alignment reports and in all delivery applications. Also, resources that are updated to override/hide alignments will not display in alignment reports or delivery applications.
Standards Search
To use the Direct Align to Related Standards, start with a set of standards. From the Dashboard you can choose a set of standards in the My Standards section of the Dashboard by clicking on the View standards link.
For this example, the California standards were chosen.
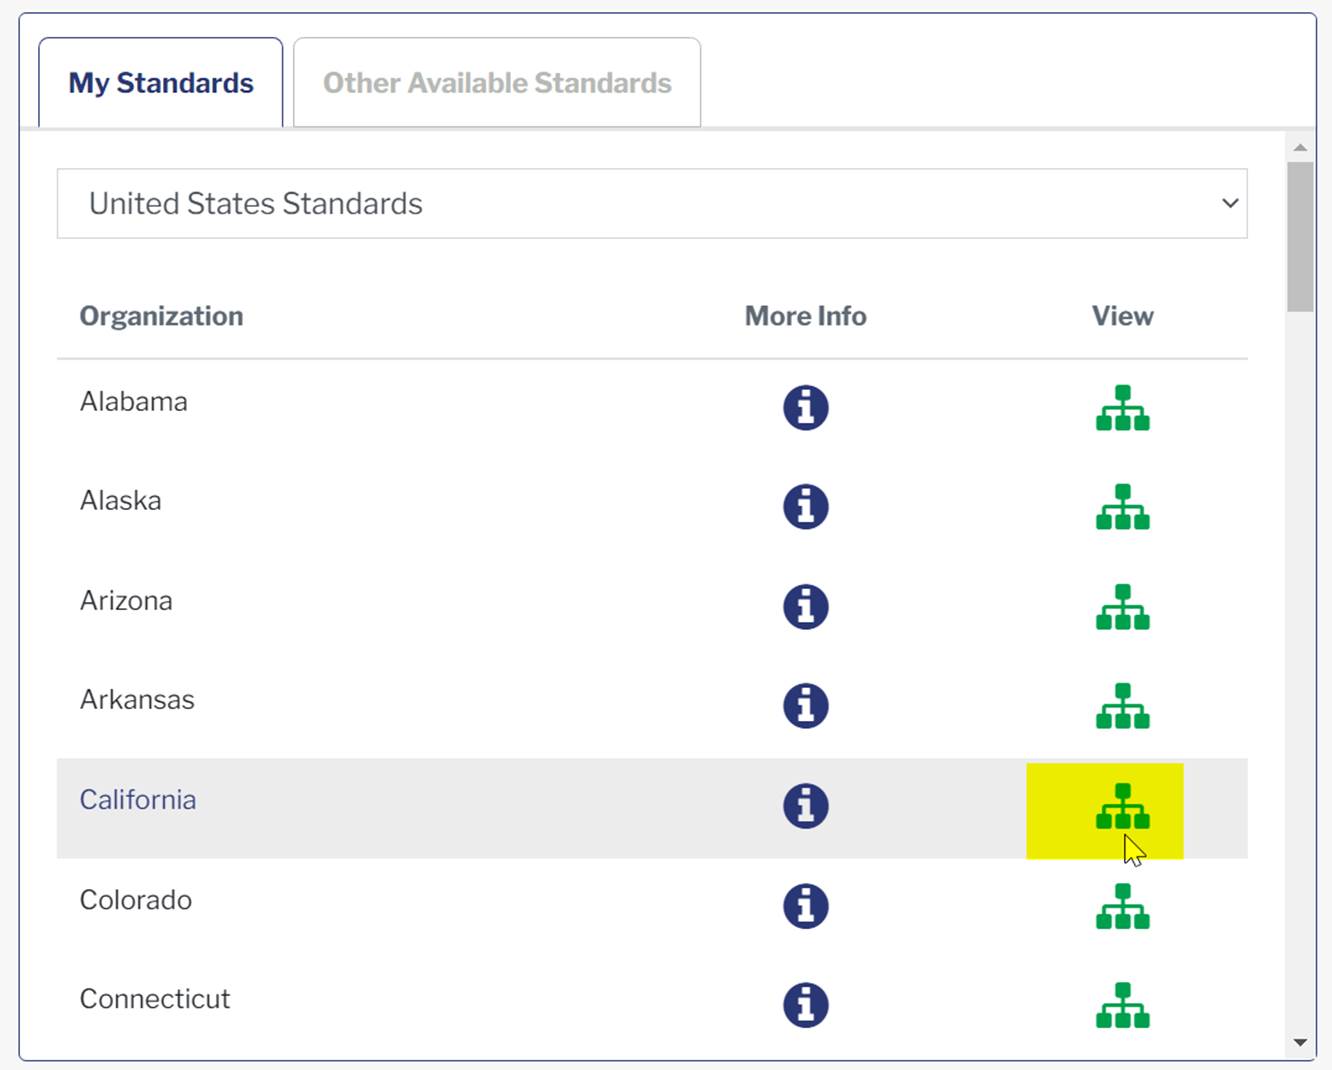
Alternatively, you can access the standards using the Browse/Align link in the left-hand navigation panel.
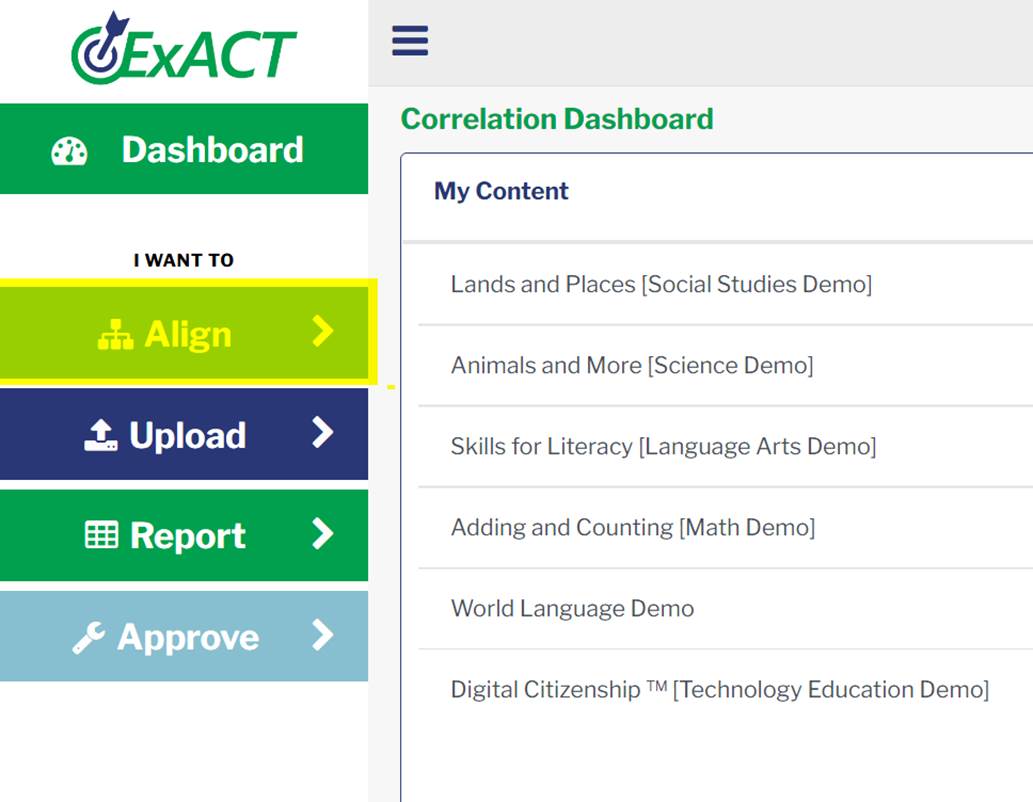
Then select the Standards tab.
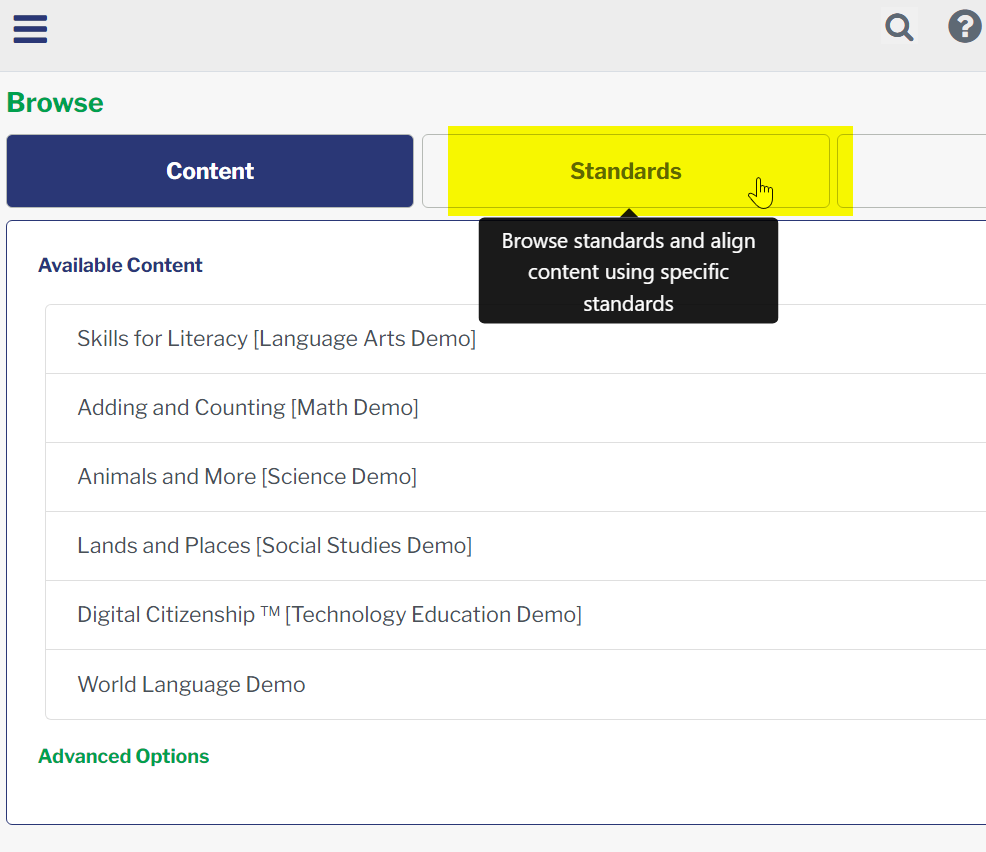
Select the State, subject and grade for the standards. Make a selection(s) from the dropdown list of the Content Sets. Click the check box for Include Related Standards.
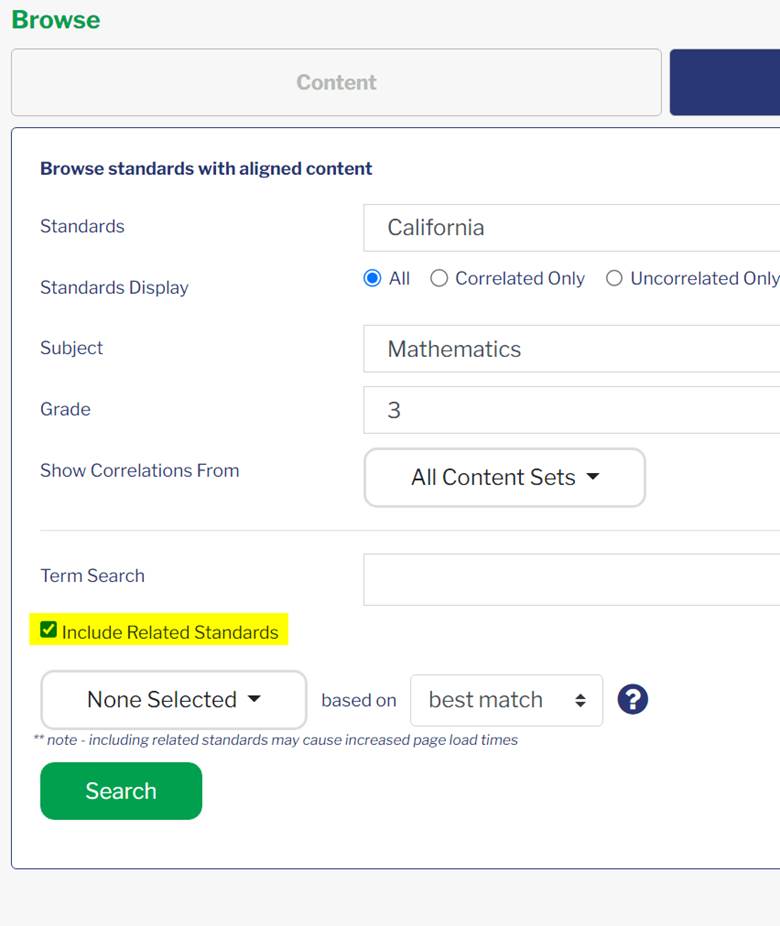
Use the dropdown and select the related standard(s) to which you would like to Direct Align resources.
Use the qualifier drop down to select one of the of following options:
- Best Match – uses a combination of similar text and like concepts
- Similar Text – this will match on standards where the text is very similar
- Like Concepts – these will match on standards with EdGate Concept Index terms in common
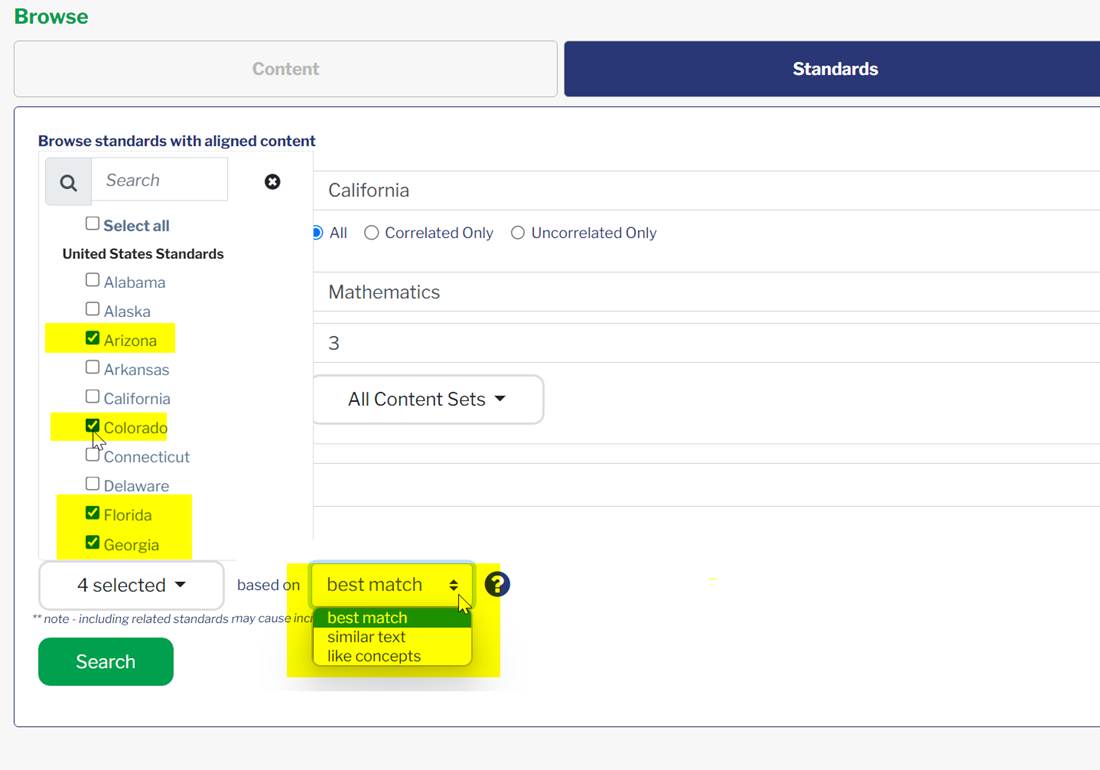
Click Search.
Note: If your company has contracted for Gap services, you can make additional selections (All, Correlated Only, or Uncorrelated Only). These choices allow you to view either all the standards (correlated and uncorrelated), only the correlated, or only the uncorrelated standards.
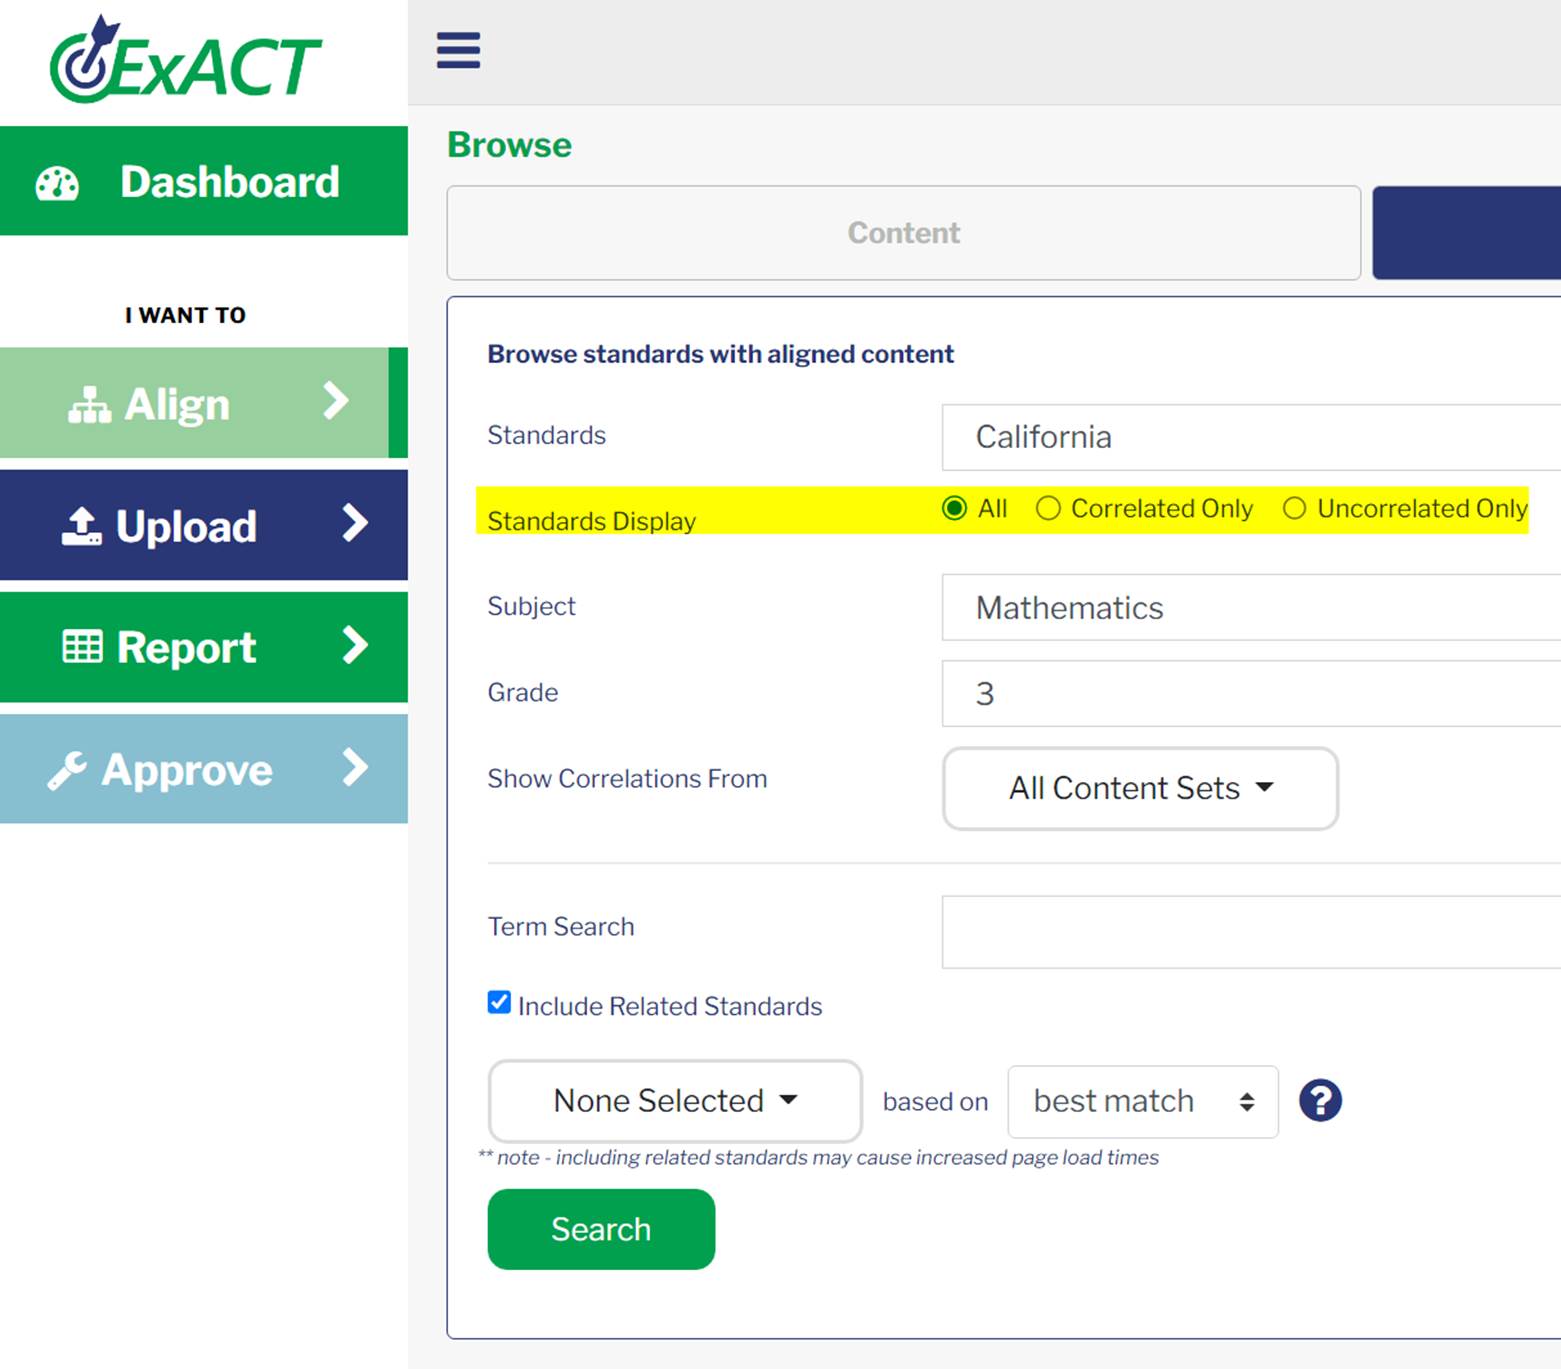
The standards will display.
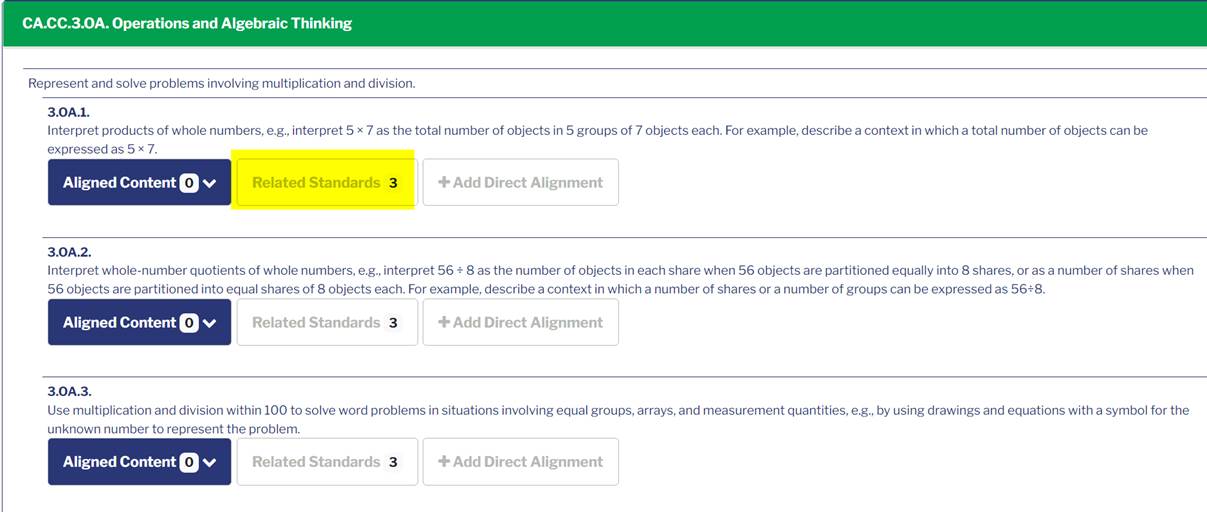
Creating Direct Alignments to Related Standards
To view and create Direct Alignments to Related Standards, click the Expand All button.

You can choose to leave all selections enabled or uncheck the ones that are not needed.
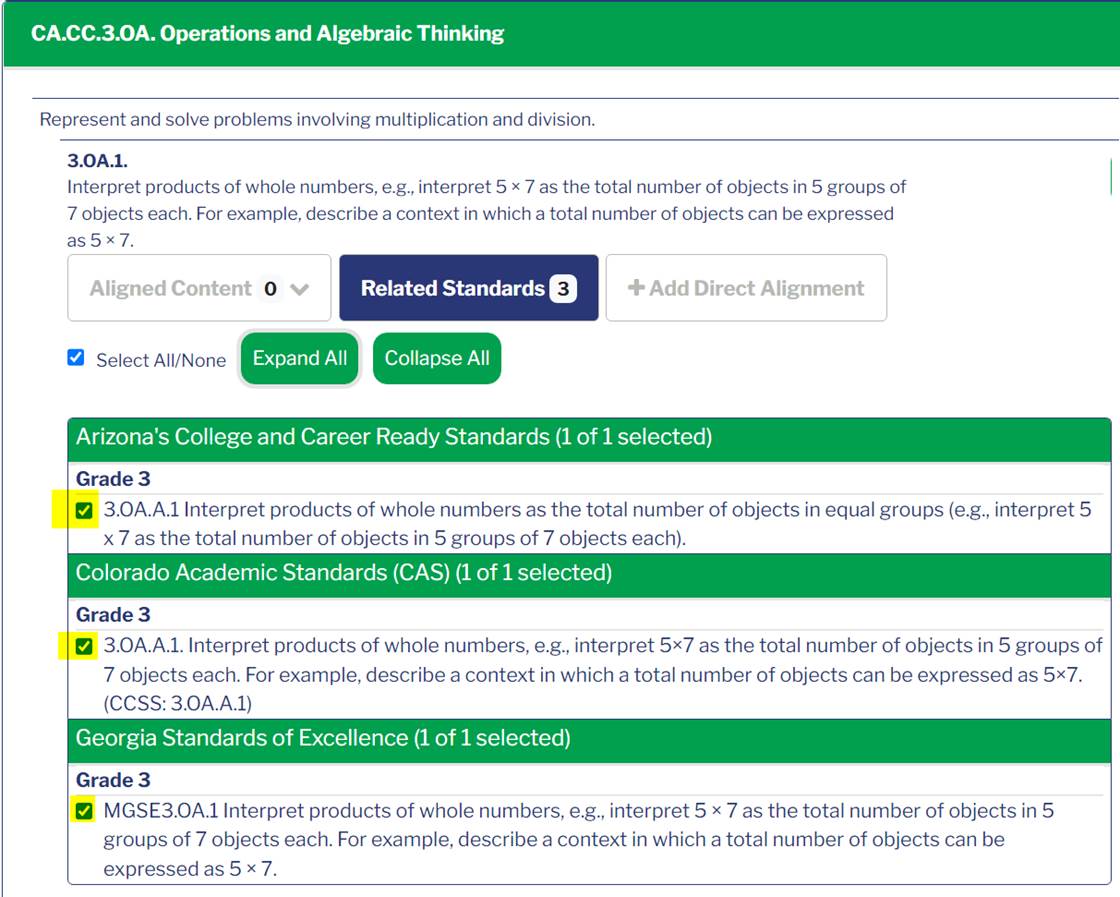
To add alignments to a standard, click on the Add Direct Alignment button.
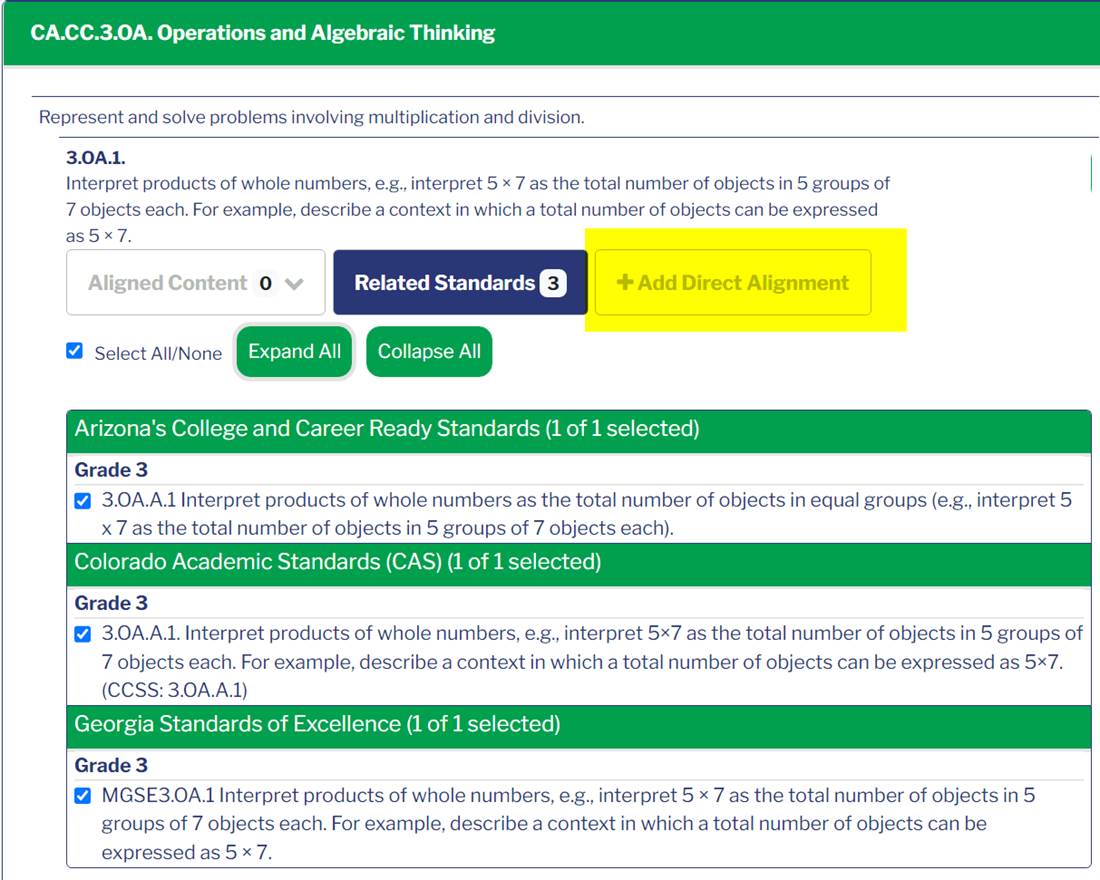
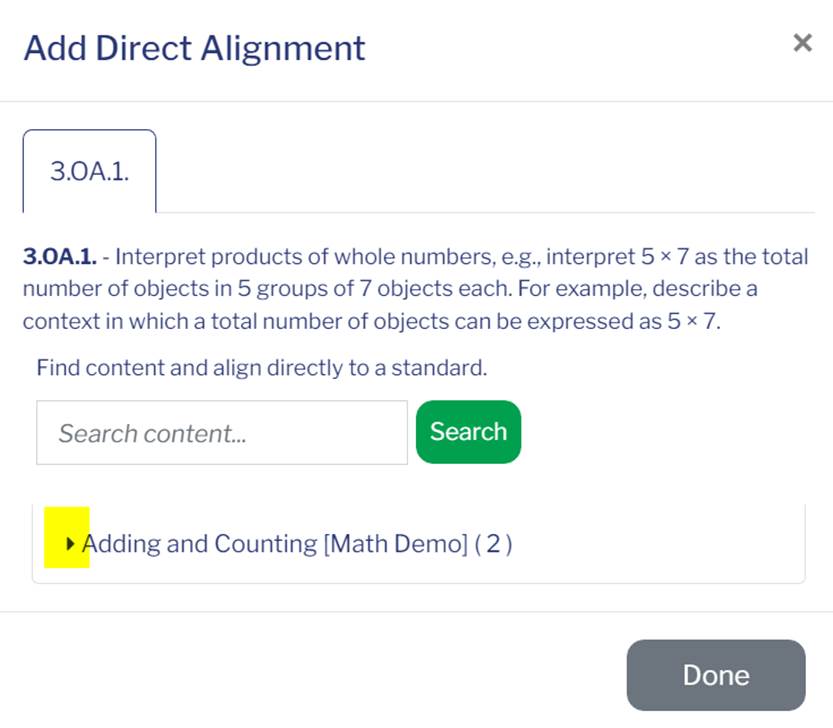
A modal window will open. Use the arrow next to the Content Set to expand the list of resources from which to choose.
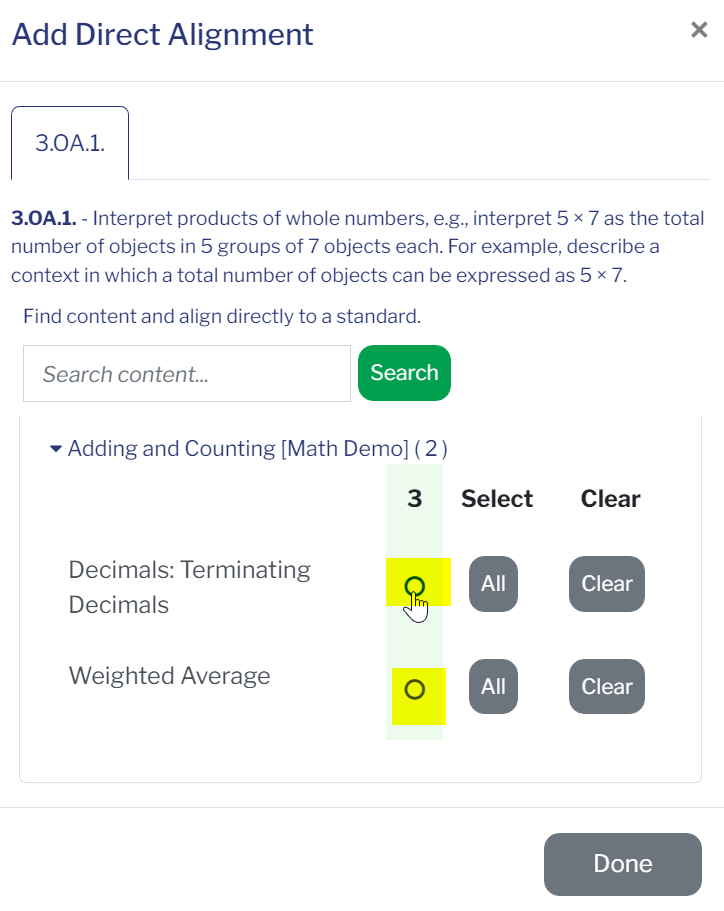
Check the radio buttons for each grade for which you would like to create a Direct Alignment to Related Standards.
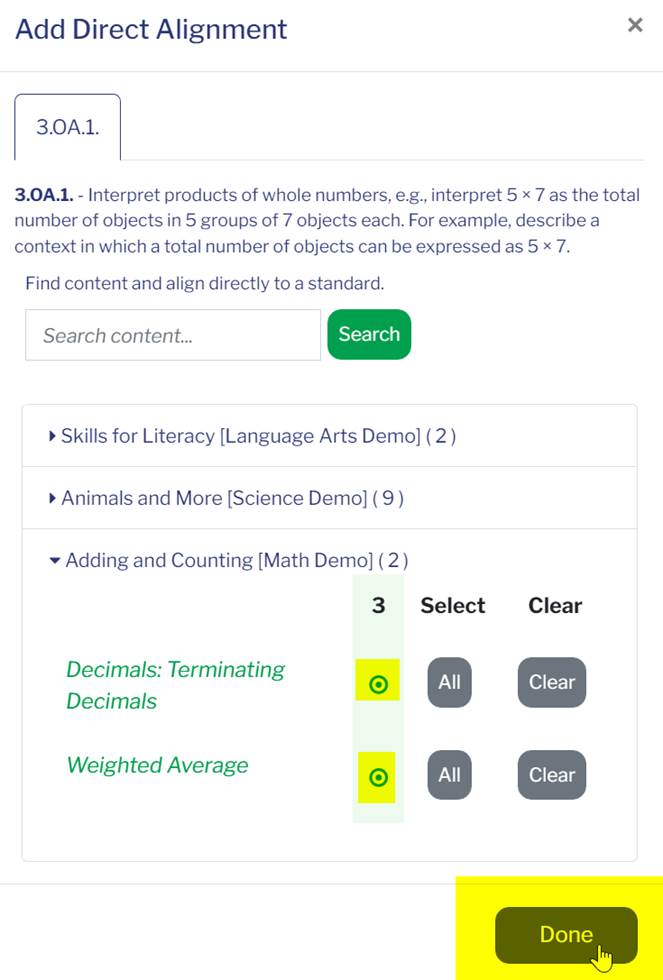
When all the selections have been made, click Done or simply close the modal window using the X in the upper right-hand corner.
Modifying Direct Alignments to Related Standards
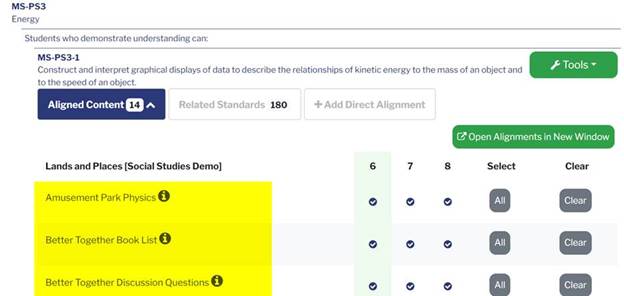
When viewing Direct Alignments to Related Standards using the search instructions above and including Related Standards, alignments can be modified (hidden) to all related standards. To accomplish this, expand the list of items aligned to the standard. Note that for this standard, there are 180 Related Standards.

This will show the titles of the resources aligned to this standard.
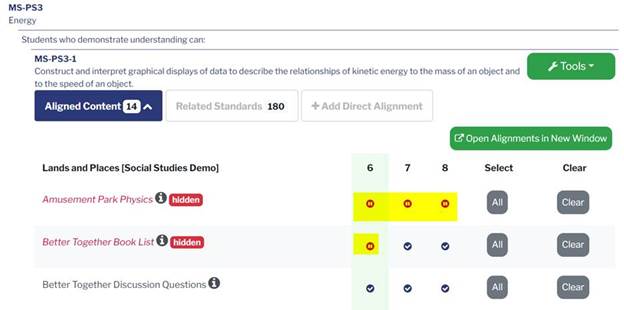
To Modify (hide) an alignment, click the checkmark(s) for each item and grade where the resource alignment should be modified (hidden). In doing so, the alignment will be modified for not only the standard in the search, but also for all Related Standards. When modified, the resource will show as Hidden and will no longer appear in reports or deliverables as aligned to these standards.
Viewing Direct Alignments to Related Standards
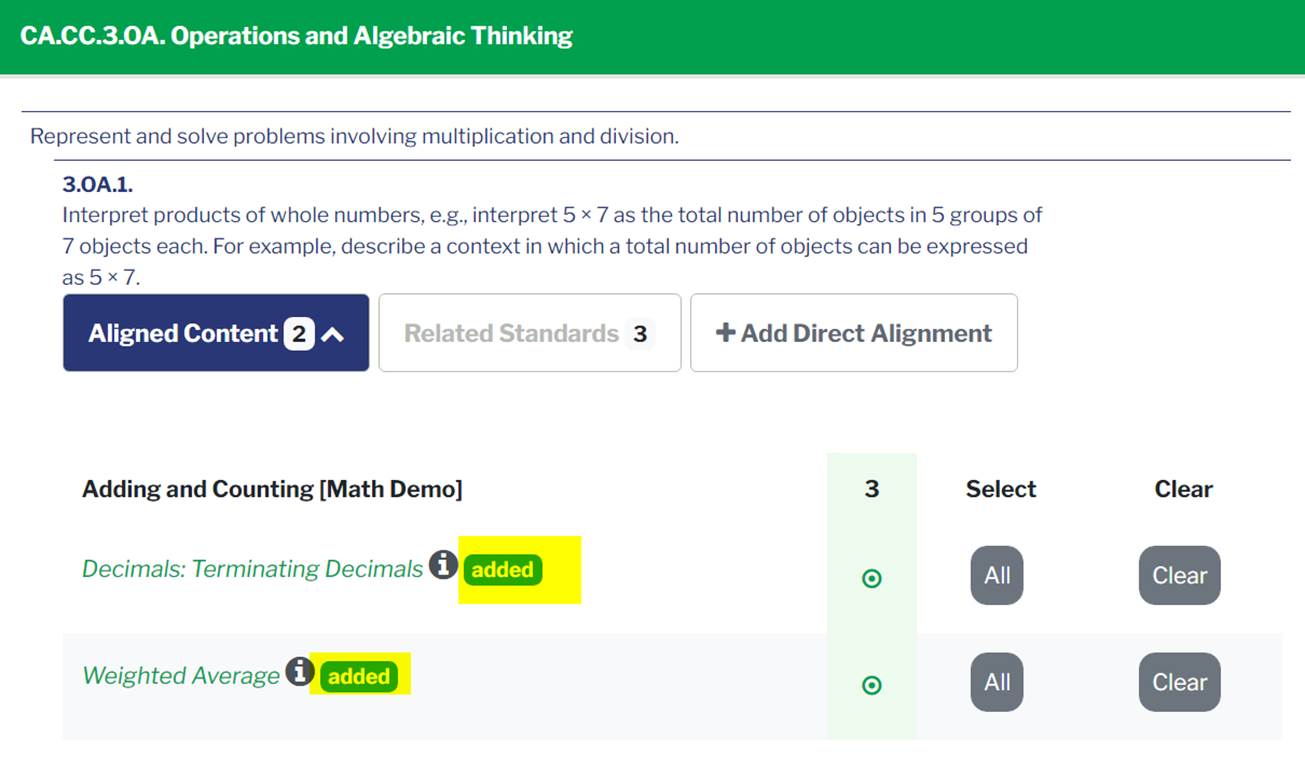
On the standards page, expand the link for Aligned Content to see the added resources.

Note that the resources are labeled with “added” to denote resources that have been directly aligned to standards.
Reviewing Resource Alignments
To view standards alignments for the resource, navigate to the content set for a resource. See the Using ExACT tab in the User Manual in the Browsing Content section.
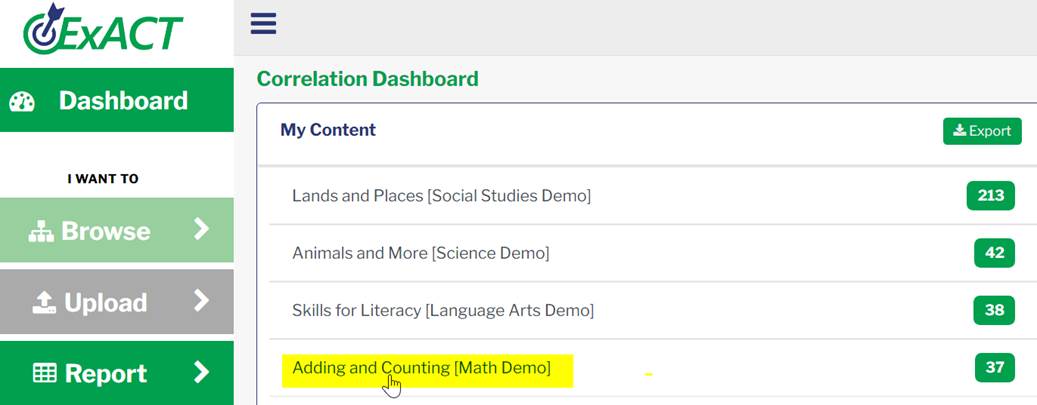
After a resource has been directly aligned to a standard, its alignment status icon will update to Alignment Pending. Click the View Standards button to see the resource alignments.

After clicking View Standards, the resource will display along with its alignment in California. Since this was a direct alignment, the resource is labeled with “added” to denote that it has been directly aligned to this standard.

Going back to the results page and using the View Standards button, select one of the states included in the Related Standards search. In this case, Arizona was selected. The resource also shows a Direct Alignment to this standard.


Importing Alignments
Importing Alignments into ExACT is a premium feature. If your team has aligned content to standards, these alignments can be imported into EdGate’s secure ExACT platform and available for all your team members to access.
-
Concept Based Imports (Requires ExACT Alignment Tool licensing)
This provides your team with the power of the EdGate Concept Index and house your content alignments securely within the ExACT Alignment Tool platform. Using this feature allows for resources to inherit EdGate Concept Index terms associated with standards. When importing your team’s alignments, the system will locate the respective standards and upon review by your team to confirm the standards match as expected, the resources will inherit the EdGate Concept Index terms associated with the standards. Once the EdGate Concept Index terms have been associated with the resources, you can then view the crosswalk to other standards and generate alignment reports.
-
Direct Alignments Imports (is a Premium Service)
This provides your team with the power to import alignments and directly associate them with the respective standards and house your content alignments securely within the ExACT platform. When importing your team’s alignments, the system will locate the respective standards and upon review by your team and confirmation that he standards match as expected, the alignments will be imported and available for all your team members to access and generate alignment reports.
-
Direct Alignments to Related Standards Imports (is a Premium Service)
This provides your team with the power to import alignments and directly associate them with not only the respective standards, but also related standards based on matching text and concepts and house your content alignments securely within the ExACT platform. When importing your team’s alignments, the system will locate the respective standards and upon review by your team and confirmation that the standards match as expected, the alignments for the resources will be imported and available for all your team members to access. Your team will also then be able to view and generate reports on alignments and those of the related standards.
Content Sets
Before alignments can be uploaded, a Content Set with the titles/resources is needed. See Batch Upload Content section of the ExACT User’s Manual for instructions on uploading content. For example, in the image below, there is a Content Set entitled Algebra I Test. When importing alignments for these resources (i.e. alignments for Algebra I Test), the titles/resources need to be loaded in a Content Set (Algebra I Test) along with a unique ID/Client Item ID [LOID] for each resource prior to Importing Alignments. When using Batch Upload Content, this will load the titles/resources into ExACT. Also, the EdGate project manager for your contract can assist with creating a content set and loading the titles/resources into ExACT.

Alignment Spreadsheet
To Import Alignments, a spreadsheet of the alignments is needed. There are a minimum of 6 columns required to import alignments. Each column should have a unique name/header in the first row. Below is a list of the information that needs to be included in the import spreadsheet. Please note that the order of columns in the spreadsheet and the name of the headers does not need to match a specific template. It is the content of the columns that is pertinent. Also, each row should only contain a single resource and associated standard, or in other words, cells should not contain more than one resource title or more than one standard. If a resource is aligned to more than one standard, in the next row add the resource metadata and the next standard to which it is aligned. Repeat this for each additional standard a resource is aligned to.
There needs to be a column in the spreadsheet for the information below.
- Content Item ID - unique ID/Client Item ID [LOID] for each resource
- Standard Organization - State or agency of the standards source (i.e. Common Core, California, Next Generation Science [Standards, etc.)
- Standard Grade – Grade(s) for the standard [NOTE: If a standard is banded (i.e. for grades 9, 10, 11, and 12) input the grade band for the standard in the spreadsheet (9,10,11,12)]
- Standard Subject
- Standard Code [Number]
- Standard Text
Best Practices
When importing alignments, the best approach is to upload separate spreadsheets for each state/agency standards to be imported. Importing Alignments for Concept Based Alignments will result in EdGate Concept Index terms being associated with the resources. This will crosswalk alignments to other states. For this reason, importing additional alignments for other states may not be necessary.
For Direct Alignment Imports, these should be done per state as needed.
For and Direct Alignment to Related Standards Imports, this will associate the Direct Alignments to standards across other states. For this reason, importing additional alignments for other states may not be necessary.
Once you begin an import and progress through each step you must continue with the review and complete each step. If you decide changes are needed in the processing of the imported spreadsheet, you will need to start again at Step 1.
Importing Alignments
After logging into ExACT, to import alignments select the Upload tab. On this screen, use the Import Alignments tab and then follow the instructions below for the specific type of Alignment needed, Concept Based, Direct Alignment or Direct Alignment to Related Standards.

Concept Based Imports
Before importing alignments, refer to the Content Set and Alignment Spreadsheet sections above. Importing of alignments is accomplished using a spreadsheet. Importing Alignments for Concept Based Alignments will result in EdGate Concept Index terms being associated with the resources. This will crosswalk alignments to other states. For this reason, uploading importing additional alignments for other states may not be necessary.
After logging into ExACT, click on Upload in the left hand navigation. Select the Import Alignments tab.
Step 1 of 6
- Choose Concept Base as the Alignment Type.
- Locate and upload the spreadsheet (see Alignment Spreadsheet section above) with the alignments using the Browse button.
- Choose the Content Set from the Content List dropdown.
- For Match Threshold, choose the level of match you need for the standards included in the spreadsheet. High is recommended.
- Click Import

Step 2 of 6
Match the detected columns (from the spreadsheet) to the appropriate field name. See list below for required fields. The spreadsheet you upload needs to have a column for each of these fields and again your spreadsheet does not need to be named the same, but there needs to be data in the spreadsheet for each of these fields.
- Content Item ID - unique ID/Client Item ID [LOID] for each resource
Note: Learning Object IDs are case sensitive. When Batch Uploading for the purpose of Importing Alignments the case (upper/lower) of the Learning Object IDs loaded in the Content Set must match the case of the Learning Object IDs in the Import Spreadsheet.
- Standard Organization - State or agency of the standards source (i.e. Common Core, California, Next Generation Science [Standards, etc.)
- Standard Grade - If a standard is banded (i.e. for grades 9,10,11,12) choose one of the grades from the list (i.e. grade 9)
- Standard Subject
- Standard Code [Number]
- Standard Text
Check the box to confirm the first row of the spreadsheet includes column/header names.

Using the dropdown to match the detected columns (from the spreadsheet) to the appropriate field name.

The fields on the left would be contain a list of headers from the spreadsheet you uploaded. Match Using the dropdown to match the detected columns (from the spreadsheet) to the appropriate field name.

Once all the selections have been made, click Next.
Step 3 of 6
In step 3, use the dropdowns to select the System Value to match the Import Value.
- Grades - If a grade is banded in the Import Value, select only one grade from the System Value dropdown.
- Subject – use the Subject dropdown to select the appropriate value.
- Standards - use the Standards dropdown to select the appropriate value.
Once all selections have been made, click Next.

Step 4 of 6
Step 4 is the review step. Compare the System Equivalent to the Standard in File. Note: if there are no matching standards available from dropdown selections, it is possible that the standards set (i.e. CSTA) identified in the spreadsheet is not the correct match for the standards.
 Use the Plus icon to include a standard, an additional standard, or a different standard.
 If the System Equivalent is not the standard needed, use the red X to remove each individual standard.
 The Trashcan will remove all matched standards for the comparison, and you can add back standards using the plus (+) icon

If there is no standards match, use the Plus (+) icon to select the needed standard from the dropdown.

Manual Editions will be highlighted in blue.

Magnifying Glass – Clicking on the magnifying glass will open a modal window that will show the standard in its hierarchy. This may be helpful to clarify context.

To close the modal window, click Close.

 Click Next to view the next list of standards and continue until all standards have been reviewed.
Step 5 of 6

Step 5 has the Pending Actions and No Changes lists.
- Pending Actions – This lists the titles of the resources and the EdGate Concept Index terms that will be added. There are four titles in the example image below. When expanding this list by clicking on Pending Actions you can view the concepts that will be associated with each resource. You can disable concepts by unchecking the checkbox and these will not be associated with the resource.

No Changes – In this list, resources that already have alignments to the standards imported will populate in this list and no further action is needed.

Step 6 of 6
Step 6 displays that the Import is Complete and provides a summary of the process.

Direct Alignments Imports
Before importing alignments, refer to the Content Set and Alignment Spreadsheet sections above. Importing of alignments is accomplished using a spreadsheet.
After logging into ExACT, click on Upload in the left-hand navigation. Select the Import Alignments tab.
Step 1 of 5
Choose Direct Alignment as the Alignment Type.

- Locate and upload the spreadsheet (see Alignment Spreadsheet section above) with the alignments using the Browse button.
- Choose the Content Set from the Content List dropdown.
- For Match Threshold, choose the level of match you need for the standards included in the spreadsheet. High is recommended.
- Click Import

Step 2 of 5
Match the detected columns (from the spreadsheet) to the appropriate field name. See list below for required fields. The spreadsheet you upload needs to have a column for each of these fields and again your spreadsheet does not need to be named the same, but there needs to be data in the spreadsheet for each of these fields.
- Content Item ID - unique ID/Client Item ID [LOID] for each resource
- Standard Organization - State or agency of the standards source (i.e. Common Core, California, Next Generation Science [Standards, etc.)
- Standard Grade - If a standard is banded (i.e. for grades 9,10,11,12) choose one of the grades from the list (i.e. grade 9).
- Standard Subject
- Standard Code [Number]
- Standard Text
Check the box to confirm the first row of the spreadsheet includes column/header names.

Using the dropdown to match the detected columns (from the spreadsheet) to the appropriate field name.

The fields on the left would be contain a list of headers from the spreadsheet you uploaded. Match using the dropdown to match the detected columns (from the spreadsheet) to the appropriate field name.

Once all the selections have been made, click Next.
Step 3 of 5
In step 3, use the dropdowns to select the System Value to match the Import Value.
- Grades - If a grade is banded in the Import Value, select only one grade from the System Value dropdown.
- Subject – use the Subject dropdown to select the appropriate value.
- Standards - use the Standards dropdown to select the appropriate value.
Once all selections have been made, click Next.

Step 4 of 5
Step 4 is the review step. It will list the Standard in the File and the System Equivalent. Note: if there are no matching standards available from dropdown selections, it is possible that the standards set (i.e. CSTA) identified in the spreadsheet is not the correct match for the standards.

If there is no standards match, use the Plus (+) icon to select the needed standard from the dropdown.

Manual Editions will be highlighted in blue.

Magnifying Glass – Clicking on the magnifying glass will open a modal window that will show the standard in its hierarchy. This may be helpful to clarify context.

To close the modal window, click Close.

 Click Next to view the next list of standards and continue until all standards have been reviewed.
Step 5 of 5
Step 5 displays that the Import is Complete.

Direct Alignments and include Related Standards Imports
Before importing alignments, refer to the Content Set and Alignment Spreadsheet sections above. Importing of alignments is accomplished using a spreadsheet. For Direct Alignment to Related Standards Imports, this will associate the Direct Alignments to standards across other states. For this reason, importing additional alignments for other states may not be necessary.
After logging into ExACT, click on Upload in the left-hand navigation. Select the Import Alignments tab.
Step 1 of 6
Choose Direct Alignment as the Alignment Type.

- Locate and upload the spreadsheet (see Alignment Spreadsheet section above) with the alignments using the Browse button.
- Choose the Content Set from the Content List dropdown.
- For Match Threshold, choose the level of match you need for the standards included in the spreadsheet. High is recommended.

Select the Include Related Standards box

Use the Standards Dropdown to select the standards sets for the Related Standards alignment import.

Click Import
Step 2 of 6
Match the detected columns (from the spreadsheet) to the appropriate field name. See list below for required fields. The spreadsheet you upload needs to have a column for each of these fields and again your spreadsheet does not need to be named the same, but there needs to be data in the spreadsheet for each of these fields.
- Content Item ID - unique ID/Client Item ID [LOID] for each resource
- Standard Organization - State or agency of the standards source (i.e. Common Core, California, Next Generation Science [Standards, etc.)
- Standard Grade - If a standard is banded (i.e. for grades 9,10,11,12) choose one of the grades from the list (i.e. grade 9)
- Standard Subject
- Standard Code [Number]
- Standard Text
Check the box to confirm the first row of the spreadsheet includes column/header names.

Using the dropdown to match the detected columns (from the spreadsheet) to the appropriate field name.

The fields on the left would be contain a list of headers from the spreadsheet you uploaded. Match Using the dropdown to match the detected columns (from the spreadsheet) to the appropriate field name.

Once all the selections have been made, click Next.
Step 3 of 6
In step 3, use the dropdowns to select the System Value to match the Import Value.
- Grades - If a grade is banded in the Import Value, select only one grade from the System Value dropdown.
- Subject – use the Subject dropdown to select the appropriate value.
- Standards - use the Standards dropdown to select the appropriate value.
Once all selections have been made, click Next.

Step 4 of 6
Step 4 is the review step. It will list the Standard in the File and the System Equivalent. Note: if there are no matching standards available from dropdown selections, it is possible that the standards set (i.e. CSTA) identified in the spreadsheet is not the correct match for the standards.

If there is no standards match, use the Plus (+) icon to select the needed standard from the dropdown.

Manual Editions will be highlighted in blue.

Magnifying Glass – Clicking on the magnifying glass will open a modal window that will show the standard in its hierarchy. This may be helpful to clarify context.

To close the modal window, click Close.

 Click Next to view the next list of standards and continue until all standards have been reviewed.
Step 5 of 6
Step 5 will display the Main standard uploaded in the file and underneath it the related standards from the standards sets selected will display. Note: each standard may or may not have a matching standard(s). Standards matches are based on concepts and similar text. You can remove a standard that is not needed by unchecking the checkbox.

Step 6 of 6
Step 6 displays that the Import is Complete and provides a summary of the process.

Semantic Standards Comparisons
Ever wonder how closely matched a state or countries standards are to the national Common Core? Using EdGate’s ExACT's Advanced Technologies, this interactive map offers an overview of the precise differences between state standards and Common Core, NGSS, C3 and other widely used libraries. ExACT can also provide accurate comparisons between any two states and even a state’s new version to an older version of learning standards. Most publishers and EdTech companies will want to know exactly which standards match, are similar, or don’t match.
National Semantic Standards Comparisons
On the National Standards tab, clicking on any state will bring up comparisons for selected state standards to the national standards for the four core subjects to which your company subscribes.
- Language arts and math standards comparisons are to the Common Core standards
- Science Standards comparisons are to the Next Generation Science Standards (NGSS)
- Social Studies standards comparisons are to the College, Career, and Civic Life (C3) Framework for Social Studies
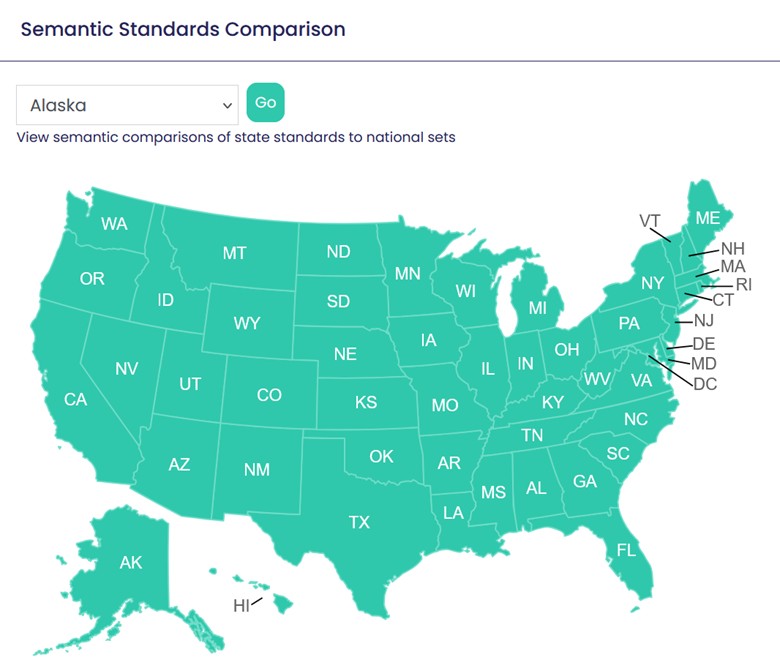
After clicking on a state, the Semantic comparison will generate and the statistical information will display. The statistics displayed show the percentage of standard semantic matches. A bar chart with the number matching standard records for each category (Match, Similar, Partial, and Low) also displays.
Clicking on a different subject tab will generate a Semantic Comparison for that subject. You may also adjust the grades for the comparisons by clicking on the Grades dropdown and specifying the grades of interest.
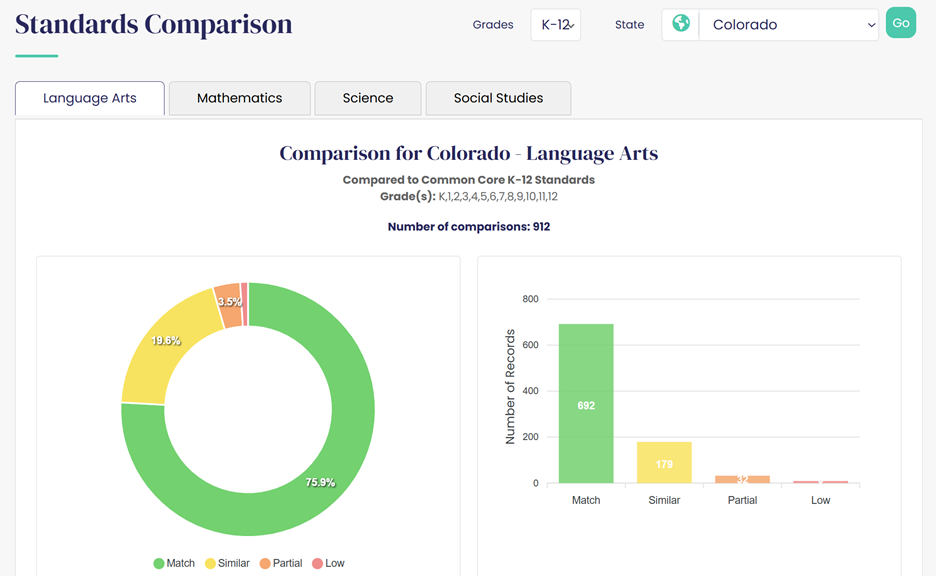
The first 20 records of the dataset display under the charts. To download the full dataset, a subscription is required.
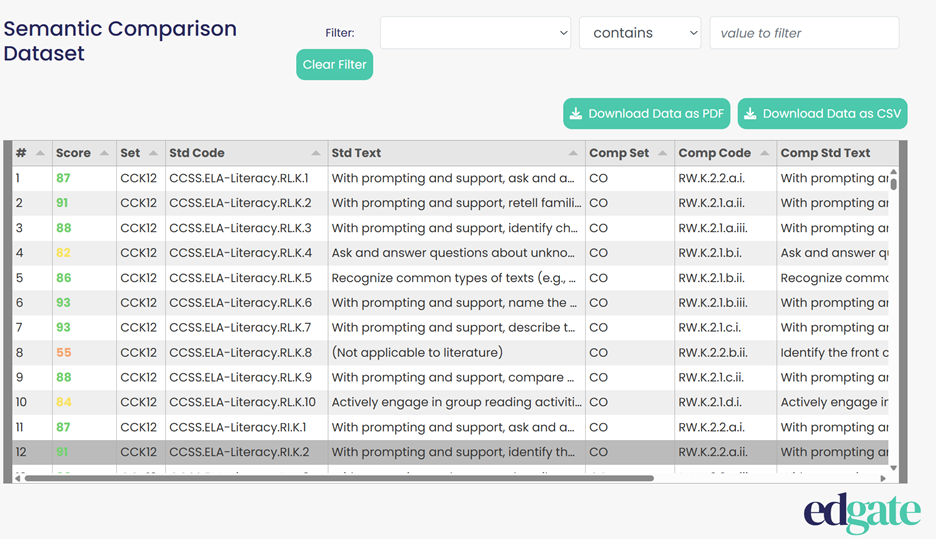
Custom Semantic Standards Comparisons
Custom Semantic Standards Comparisons are a premium service available on the dashboard in ExACT. Semantic Standards Comparisons utilizes EdGate’s ExACT Advanced Technologies to demonstrate how closely matched a state or country’s standards are to each other, to previous versions, or to national standards. The comparisons rank how closely the standards are semantically matched, and helps the user know how closely its alignment in one state will transfer to another state. The Semantic Comparison categories are Match (> 85), Similar (65 < 85), Partial (45 < 65), and Low (0 < 45).
If your company subscribes to the Custom Semantic Standards Comparisons, you can generate comparisons between any two states or international standards, and even a state’s new version to an older version of learning standards. These comparisons can be generated for the subjects available in your profile.
To generate a custom comparison, click Get Started on the Custom Comparison tab. When running a comparison, the “Standard Set” or the initial set selected serves as the reference. The initial selection is intentional, reflecting the user's focus for analysis. All its elements are listed in the leftmost column of the spreadsheet. Each additional “Comparison Set” is compared against the initial set. Not all standards in the “Standard Set” will necessarily have matches across the other sets, but the initial standards set remains fully visible to preserve context.
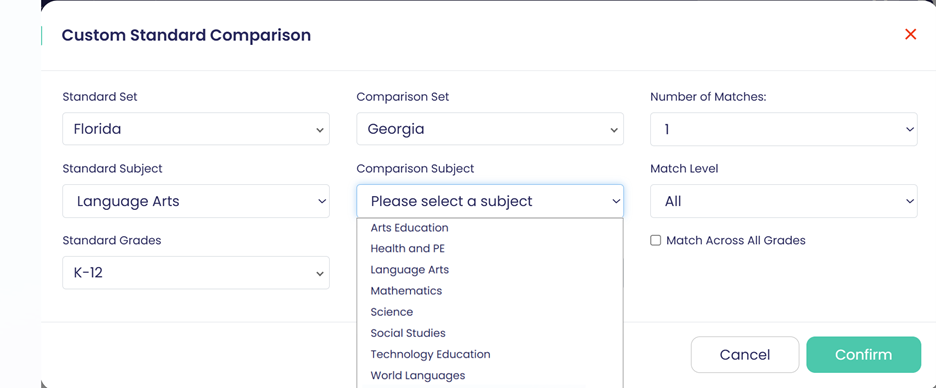
After selecting the standards, select the subjects. Typically, you will want to compare the same subjects for the standards.
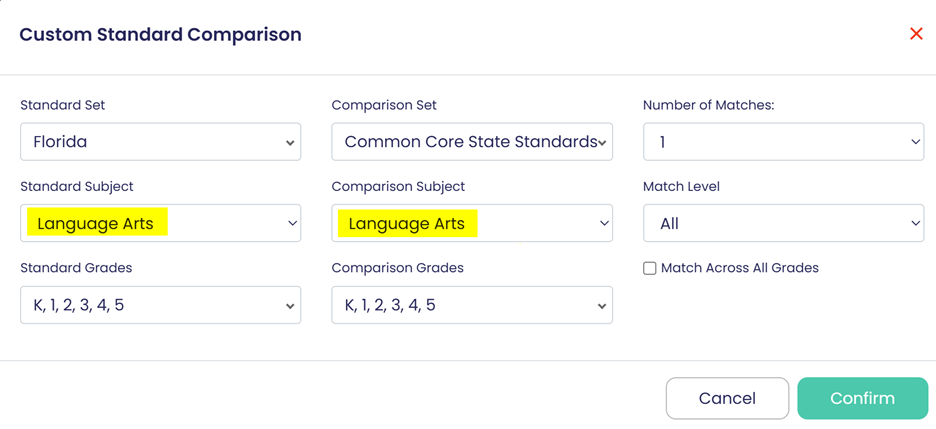
Using the dropdown for Standards Grades, you can choose a single grade or multiple grades to compare. By default, the comparison will be grade to grade comparison, however there is the ability to Match Across All Grades by enabling the checkbox for this.
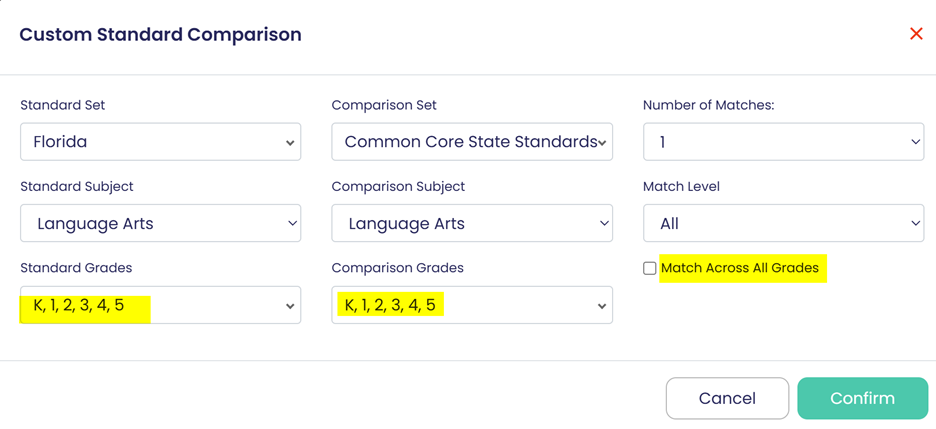
You can also change the number of matches to bring back additional semantic matches for each standard. The default is the best match per standard. Note, if you select multiple states to compare to the initial set, the system will return the single best semantic match across the compared states.
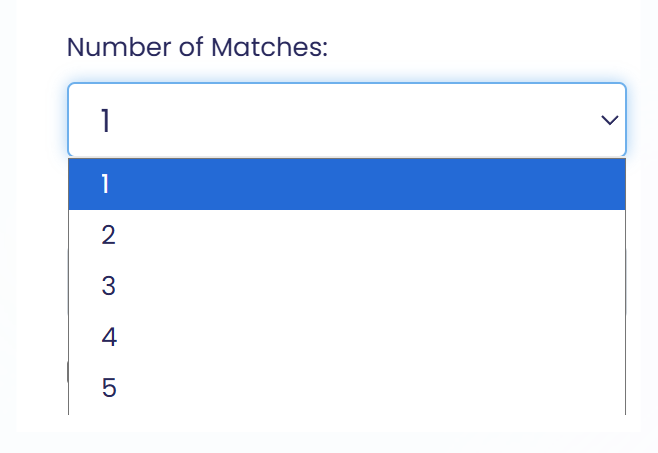
For Match Level you can choose all ranges or specific ranges to view. Match is > 85, Similar is 65 < 85, Partial is 45 < 65, and Low is 0 < 45.
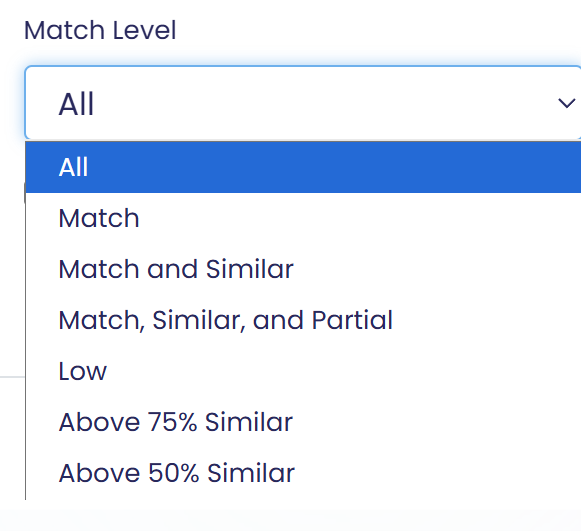

The statistics display percentage of standard semantic matches. A bar chart with the number matching standards records for each category (Match, Similar, Partial, and Low) also displays.
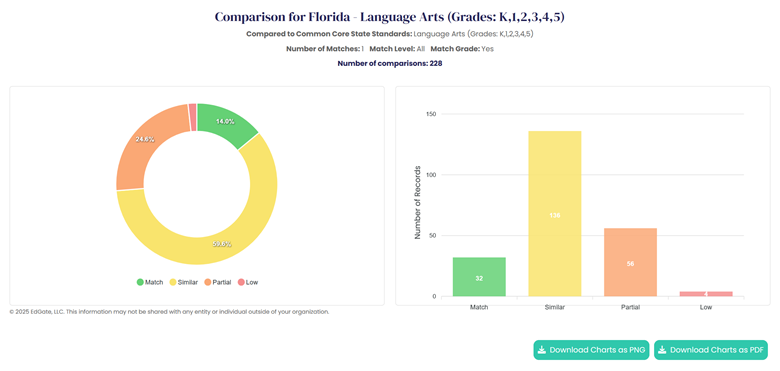
Beneath the charts, a dataset with the results of the report will display.
To download the dataset, click Download Data on the preferred format (PDF or CSV file).
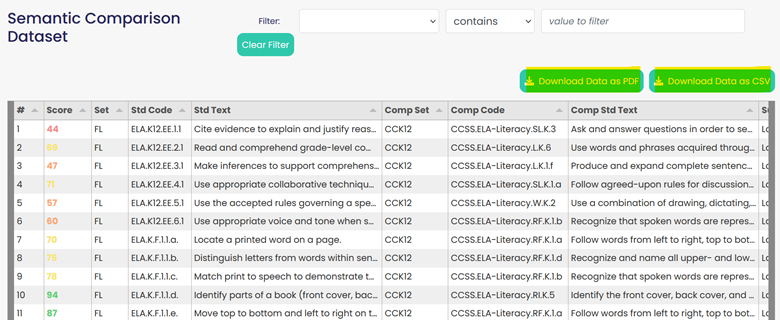
Downloaded datasets include the following data:
Score: sematic similarity percentage between the sets
Set: standard organization of the reference set
Std Code: standard number for reference standards
Std Text: text of the reference standards
Comp Set: standard organization of the comparison standard set
Comp Code: standard number for the comparison standards
Comp Text: standard text for the comparison standards
Grade: grade for the comparison standards
